Yesterday I went out into the garden for my usual check on things, and was astonished to find that my green beans were absolutely LOADED! I had no idea they were ready!
So, obviously that determined what I would be doing for the rest of the day. Fortunately, it was early in the morning and the sun hadn’t come out in its full fury yet. It has been in the triple digits for the past few days, which means we haven’t been outdoors very much.
I elicited Jada’s help with the picking, since she helped me plant one of the rows. I figured it would be rewarding to her to see how her little seeds turned into productive plants.
She actually really enjoyed filling her bag with beans, but after a while it just became too hot. With a sweaty, red cheeked face she finally said to me, “Mommy, I’m going to go inside now. It’s too hot.”
I told her, “Okay baby, you just do what you need to do to take care of yourself. Go get some ice water. I’ll pick your side.” So she went inside to cool off.
A little while later she came back out with a tall mug full of ice water and handed it to me, saying, “Here you go Mommy. You sure are working hard and you look so hot!” I thought that was awfully sweet of her to think of me.
I am SO PLEASED with this year’s harvest so far!! It is definitely the best I’ve ever had. Last year, the Mexican Bean Beetles just devoured everything, and although my plants produced a lot of beans, most of them were all spotted with holes from the bugs.
This year, my beans are almost all perfect. Every here and there I’ve found a couple of small places where a bug has chewed, but honestly it has been very little damage, and most of my beans have no bites at all.
As I gathered the beans, I lifted each individual plant to make sure there weren’t any big beans hiding under the leaves anywhere. When I was satisfied that I’d picked all of the ripe ones I could find, I carried my load in.
The kids wanted to help me break the beans, which I was happy to let them do! We snapped the ends off, broke the beans into bite sized pieces, and sorted them into proper bowls.
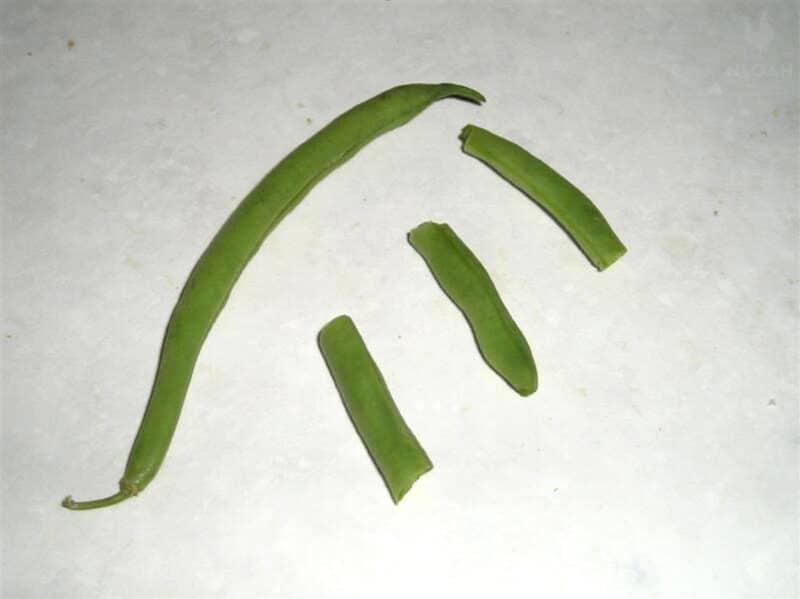
Sit down with your green beans, a trash can or bowl to throw the broken off tips in, and a large bowl or pot to throw the snapped beans in.
Begin by breaking the tips off each bean, then snapping it in pieces. I like 1″ pieces, but by the time I got to the bottom of the box I was just snapping the beans in half! My mother-in-law gave me a good pointer. She uses a knife to cut several beans at once, instead of breaking them one at a time.
If you line up the beans on a cutting board, you can use the edge of your knife to even them out. Then, you can trim off all the tips at once and then repeat with the other side.
This will let you get into a nice little rhythm to make the task go by easier. You also don’t have to worry about quite as much waste, since you’ll have a more even cut on them all.
When you’re done trimming all your beans, don’t throw the ends out. They make fantastic little snacks for your livestock, including chickens and pigs, who will happily dispose of these nutrient-dense treats for you!
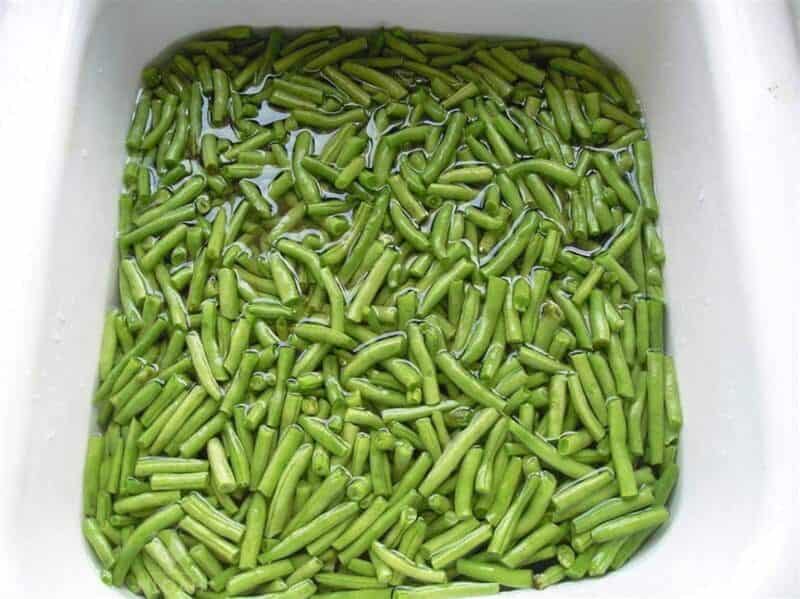
Once you’ve finished breaking a good amount of beans, wash them well before canning. (Don’t wash the entire amount at once. If for some reason you are unable to finish the job right away, the beans could begin to go bad if sitting wet for a while.) Even if they have been grown organically, you still wanna get all of the dirt and stuff off.
There are a few ways you can clean green beans, depending on how much time you have and how much you need to clean the beans.
The easiest way is to fill a bowl or colander with the beans, and then run it under cold water. As you run the water, use your fingers to remove any visible dirt. Pat them dry to avoid any spoilage.
As you wash and prepare your green beans, throw away any that are moldy or somehow damaged. Remember, the quality of your canned goods is only as good as the quality of the fresh ingredients. Any discolored or spoiled beans will do nothing except ruin the rest of the batch of beans.
You can also soak beans fresh from the garden. Wash them for a minute or two, then pour the beans into a colander and let the water drain slowly. You may need to repeat this process.
Also, always make sure your hands are nice and clean before you wash your green beans, because this is a common source of food contamination that people often do not think about.
I put mine in my kitchen sink to soak, then rinsed a second time, since they were not grown organically. (Clean your sink out well! I used baking soda to scrub it down, rinsed with vinegar, then filled the sink with a couple of inches of water, added a little bleach, and let it soak to sanitize for a while.)
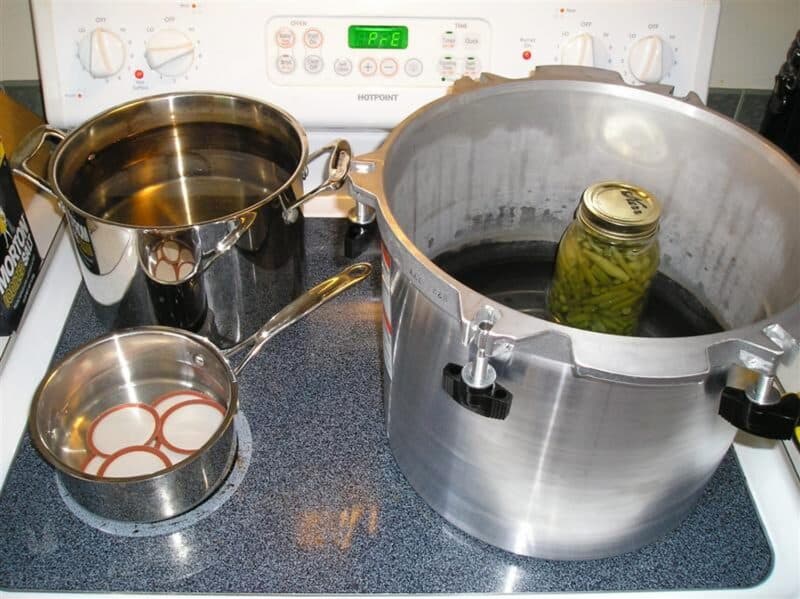
While the beans are soaking, get your supplies ready. You’ll need a large pot of boiling water, a smaller pot of simmering water (not boiling) to sanitize the lids in, and a pressure canner.
You’ll also need to have clean, hot jars ready. (Make sure you have checked the jars for chips around the rim, and for any cracks.) I either get mine straight out of the dishwasher while they are still very hot, or I set the oven to the lowest heat setting and put the jars in there to keep hot until ready to be used.
The jars must be hot before filling with boiling water, otherwise they will crack.
You can reuse bands between canning seasons, but never reuse the lids. The seal on your lids can get worn down over time, and this will be impossible for you to determine. Instead, purchase new lids every year and reuse the bands to save some money.
You should also avoid using jars that aren’t specifically mason jars for your canning. Some people try to use things like old jelly or mayonnaise jars, but you need to be really careful with this, because the jars can break and they also don’t seal like actual mason jars do. You’ll end up wasting time and could likely wind up sick.
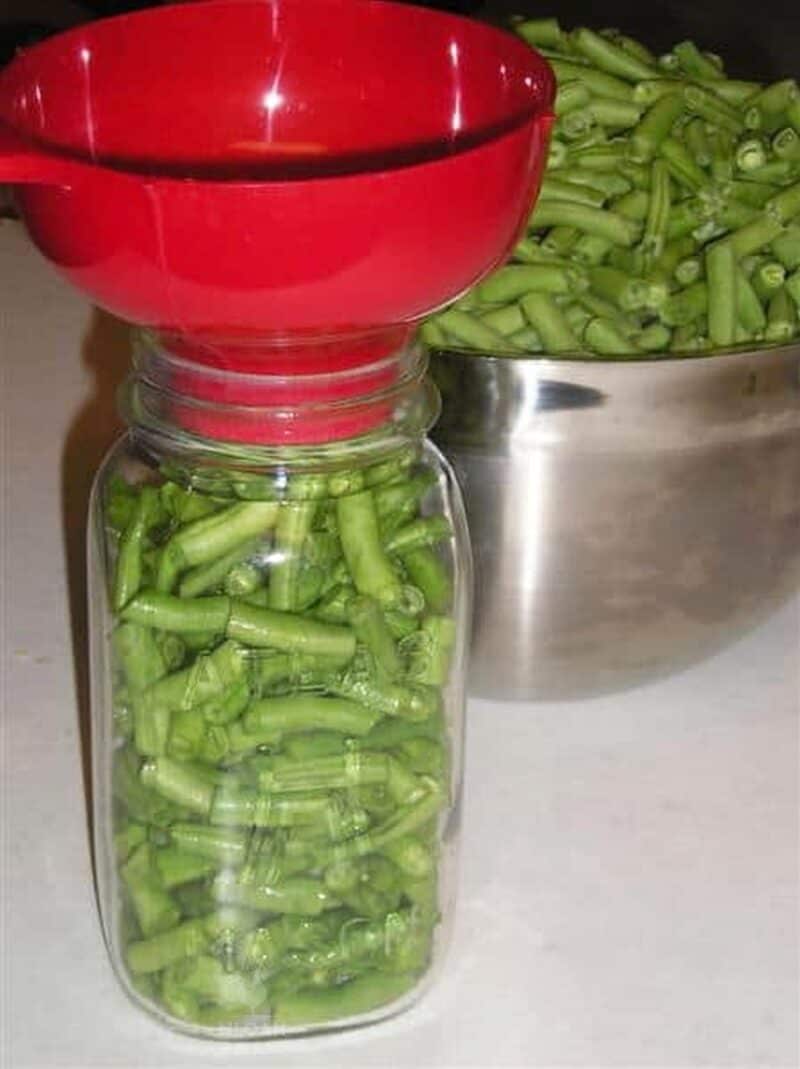
Anyway, once the jars are clean and the ingredients are ready to go, the real fun can begin. Now you are ready to fill the jars! I used the raw pack method (meaning the beans weren’t blanched before canning), because it’s just easier.
Put as many green beans as you can fit into each jar. I used quart jars, which hold almost 4 cups of green beans. Tap the jar on the counter to pack the beans down tight, up to an inch from the top of the jar.
You can add salt if you want. I added 1 teaspoon to each quart jar. This is totally optional.
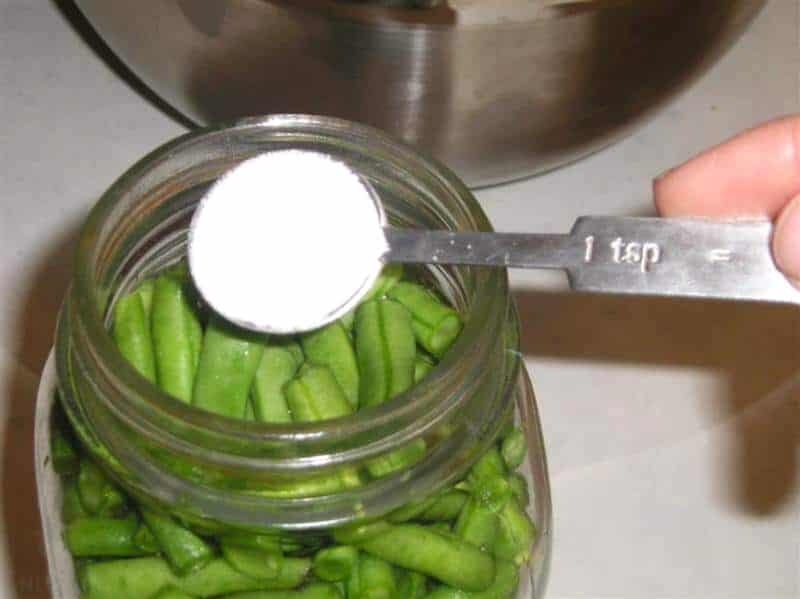
You could also add onions, a teaspoon of sugar, or whatever else you’d like to flavor the green beans. If you are trying to cut back on salt or sugar, you don’t need to add these items at all. They don’t lend to the safety of the finished product – just the taste.
I have also heard of people adding ingredients like dill, garlic, or shallots to their green beans to spice things up. You can really use whatever you want in this process, just make sure you are following the basic canning recommendations set forth by Ball and other experts.
Remember, these people have been doing this for a long time – they know what they are doing!
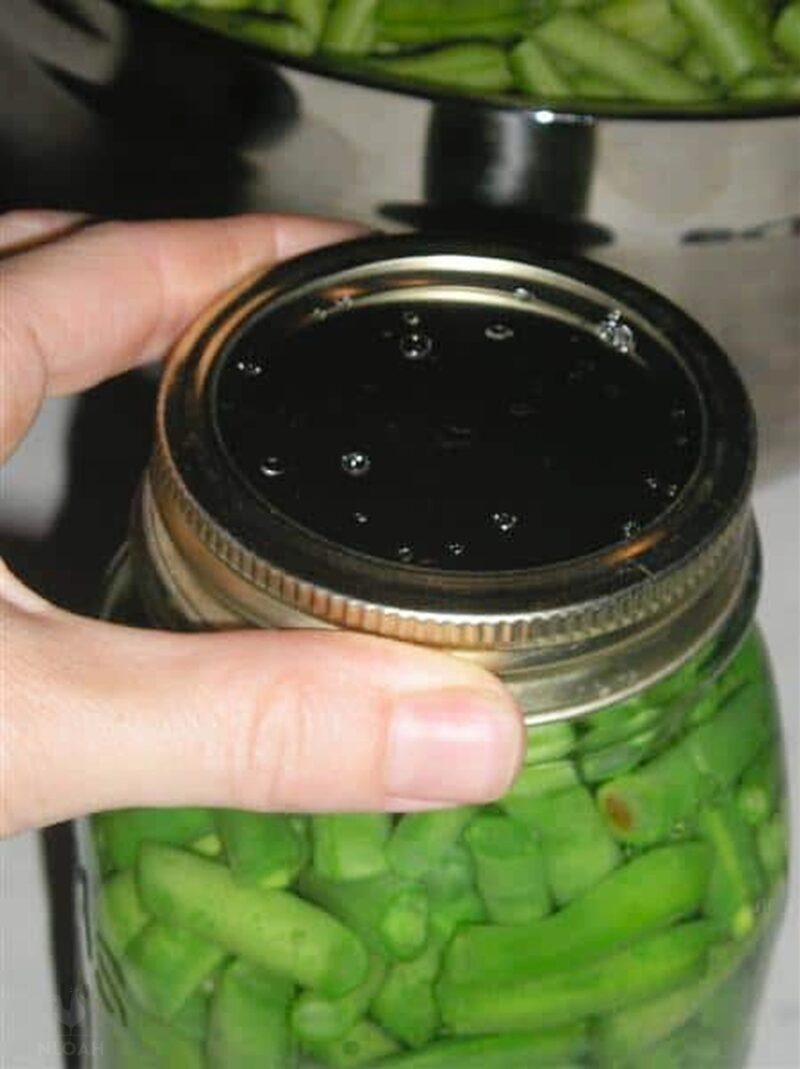
Next, ladle boiling water over the beans. Fill the jar up to the first thread on the neck- an inch from the very top.
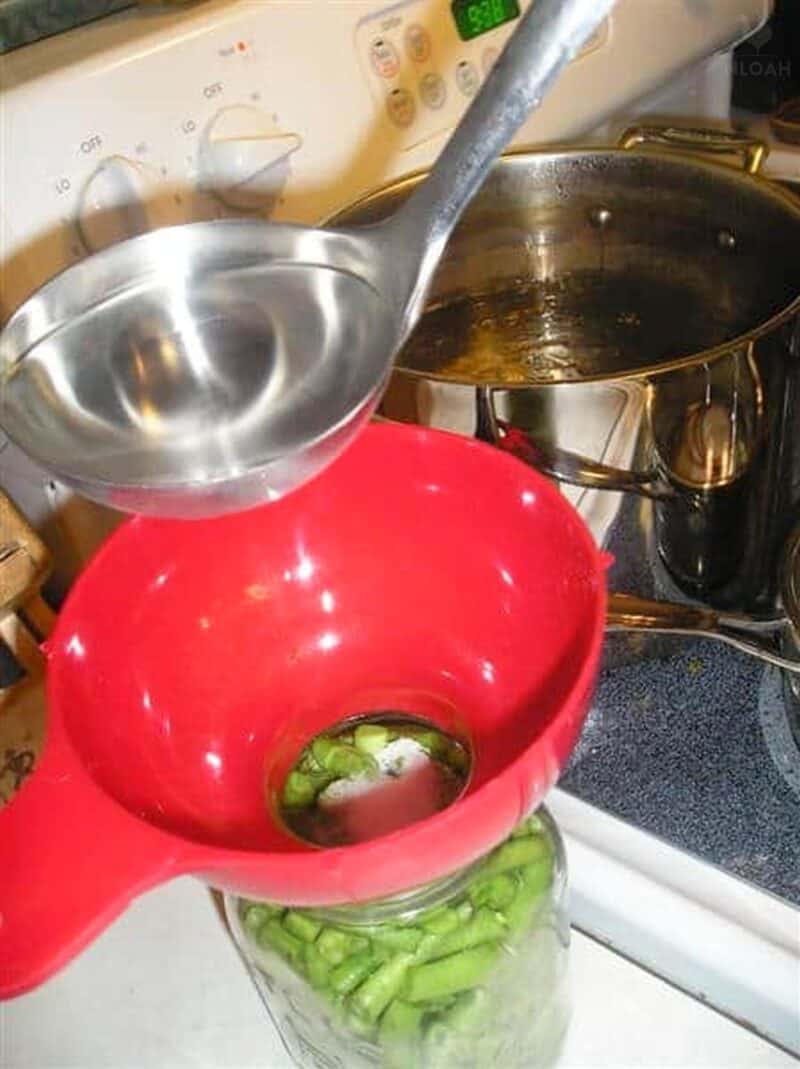
Tap the jar to release trapped air bubbles. Add more green beans if more space at the top has opened up.
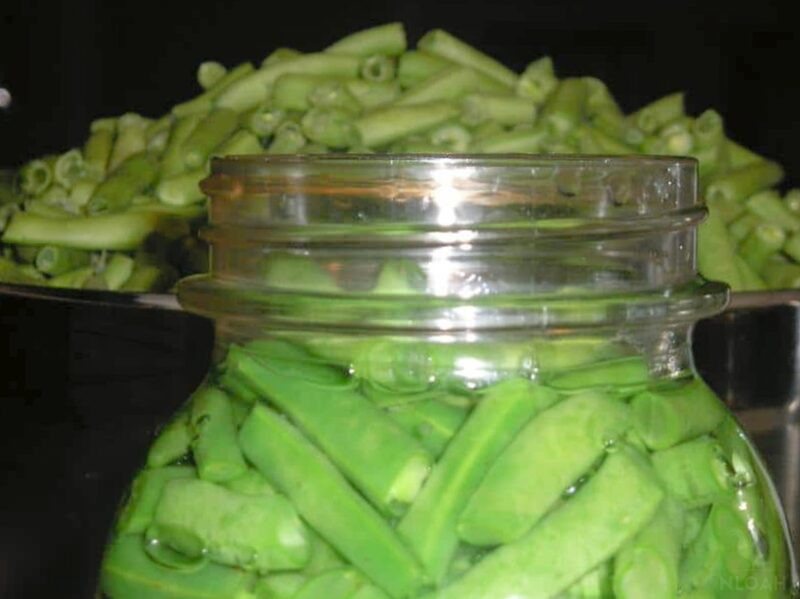
This is how it ought to look. About an inch of head space. Use a clean, wet cloth to wipe the rim of the jar. This will ensure that there aren’t any food particles that could prevent the lid from sealing.
Plus, it will save you the hassle of needing to clean the outside of your jars and the inside of your pressure canner after all of your jars have processed.
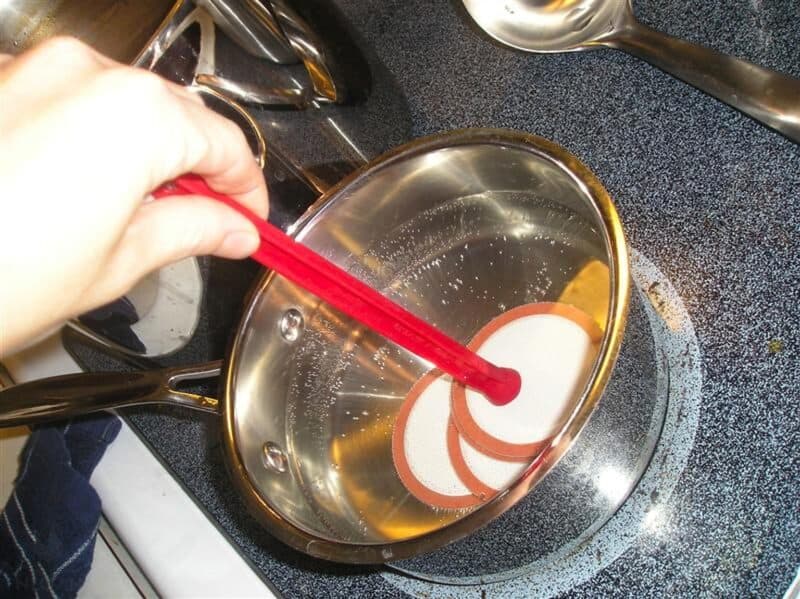
Now you’re ready for the lid. If you have one, use your magnetic lid lifter to retrieve one of the sanitized lids and place it on your full jar.
Secure the lid with a ring. Make sure you get it good and tight, and that it is not cross threaded at all.
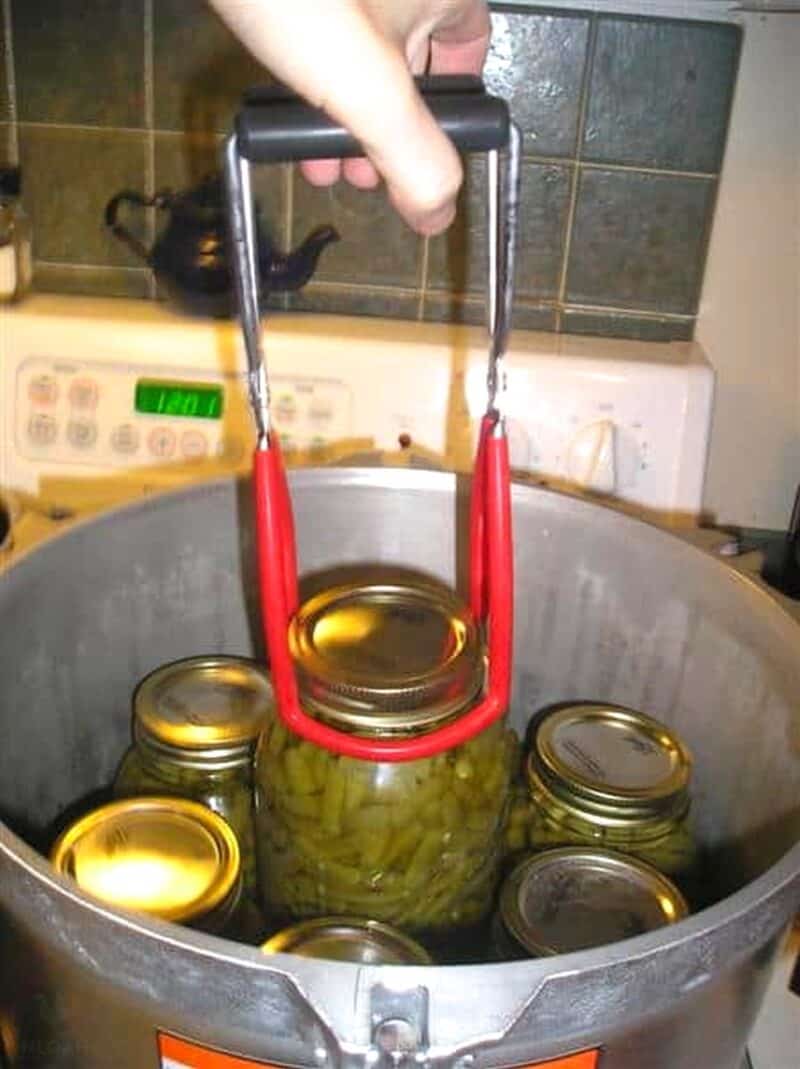
Place your filled jars in the canner. I’m not sure if all canners are the same, but this one requires an inch and a half of water before the jars are set on the rack in the bottom of the canner.
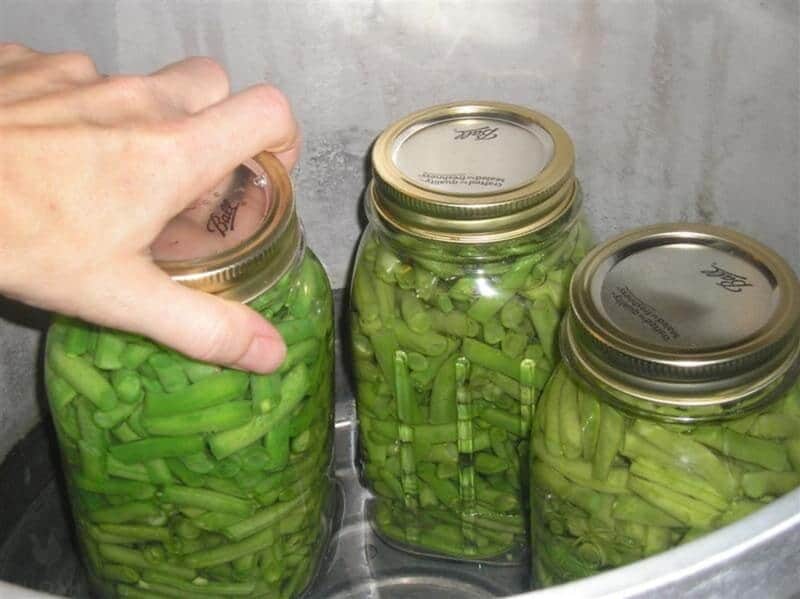
My pressure canner will hold 7 quart jars. Once it’s full, follow the manufacturer’s directions for your particular canner.
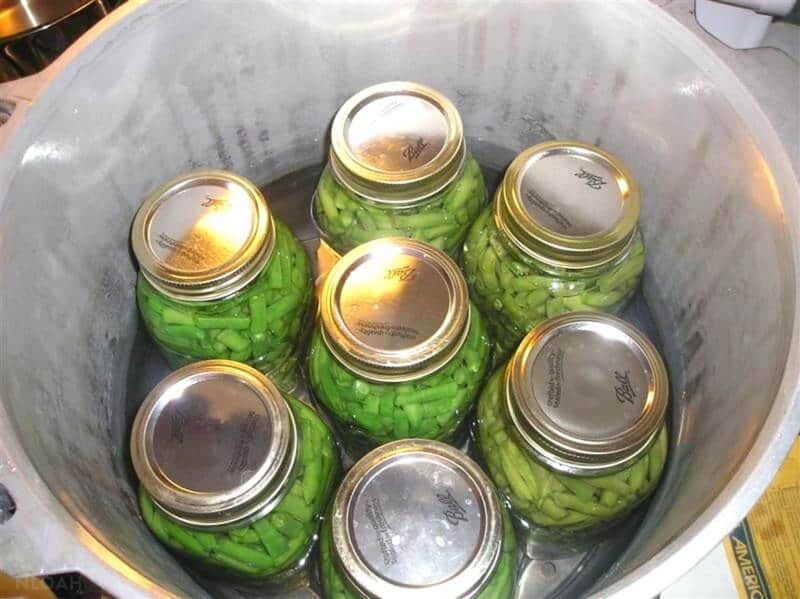
For quart jars, pressure can at 10 pounds of pressure for 25 minutes. (Pint jars only need 20 minutes.) Once it’s finished, make sure to allow the pressure to reach zero again before opening the canner.
If you are working at a higher altitude, make sure you adjust your pressure canning time and pressure to accommodate for this. Many people forget this important detail, but it can cause your food to not preserve properly.
A jar lifter is really handy for removing the steaming hot jars. (Notice the clock in the background? That’s midnight, folks, and I still had lots more to do!)
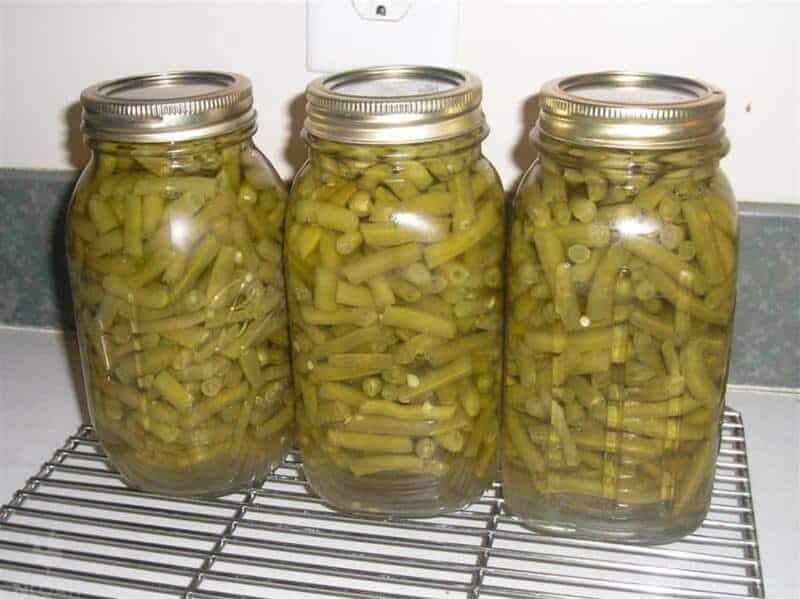
Set the hot jars on a rack to cool. As the jars cool off, you’ll hear the sound of the lids popping. Then you know they have sealed properly!
Whatever you do, don’t let your jars cool in an area where they will be exposed to a direct breeze. This can cause the jars to crack. Also, make sure you have something underneath the hot jars.
I mentioned using a rack, but if you have more jars than will fit on a rack, or if you simply don’t own a cooling rack, you can place the jars on a table, island, or countertop – just make sure there are at least two towels underneath the jars.
It is not uncommon for hot jars to take the finish right off a wooden surface, or even to leave burn marks. This is definitely not something you want to deal with!
After about 12 hours, unscrew the ring from the lid and see if you are able to easily pull the lid off of the jar. You should not be able to pull it up.
If the lid comes off, the jar didn’t seal and you’ll need to either put that one in the fridge to be eaten right away, or start over by dumping the beans into another hot, clean jar and canning again with a different lid.
I have always found that my experience with pressure canning vegetables is that the lid is so secure on the jar, I have to have outside help (cough – my husband) when opening them. They really stick on there! You’ll know your jars have sealed effectively if you struggle to get them open.
Make sure you write the date on the lid. Not only will you know when the beans were canned, but you’ll be able to tell that the lid has already been used.
Like I said, you aren’t supposed to reuse the lids… though I do save mine just in case I am ever desperate for a lid. But that’s on a food I am not going to can – I wouldn’t do it on a batch of canned goods.
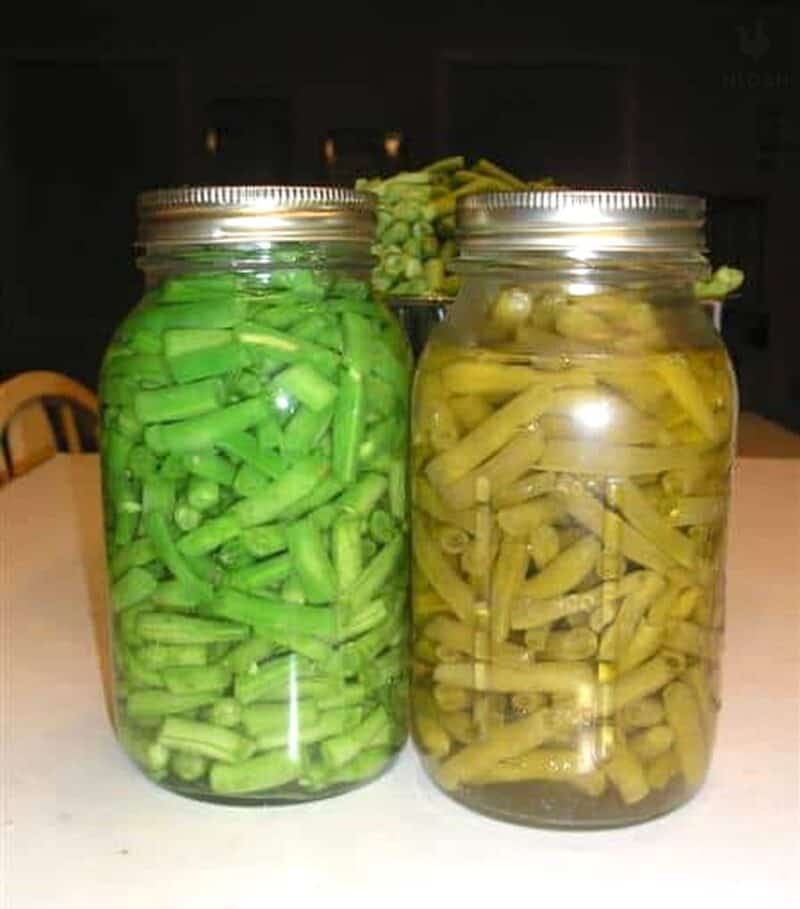
Here is a before and after of the beans. They do get cooked in the canning process:
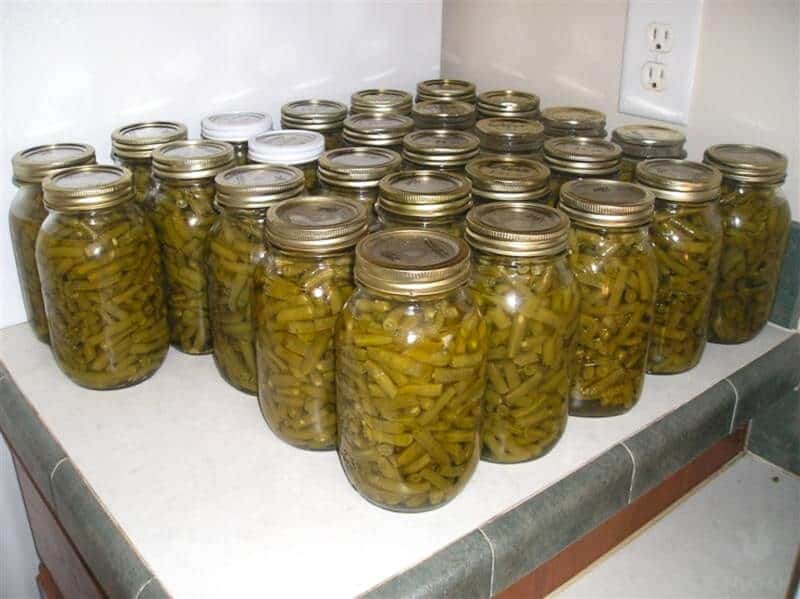
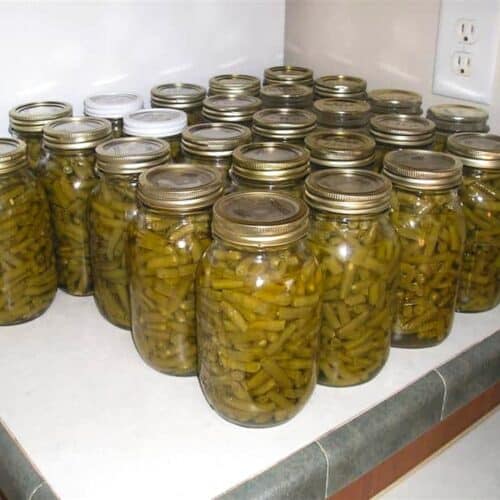
Final total, 27 quart jars. It cost me a little over $1 per jar. After a little calculating I was disappointed to find that the cans of green beans at Aldi’s still would have been cheaper to buy! But you know, for the extra 20 cents (plus a lot of effort), at least I got fresh, local green beans.
These weren’t packed with preservatives, extra sodium, and sugar like the ones you buy at the grocery store. Plus, recent studies have shown that store-bought canned goods tend to be high in chemicals like BPA.
These can be really bad for you! So, the home-canned green beans tasted better, were made with love, and were better for us. Win win!
And nothing beats the satisfaction of having these beautiful jars in my pantry. I love the feeling of having a freshly stocked pantry that I can go to whenever I need to go “grocery shopping.”
No, this wasn’t a money saver. But, if you can grow enough of your own, or barter for them, canning them yourself would definitely save a bundle!
Here’s another tip. If you, for whatever reason, can’t get around to canning your green beans right away, don’t stress.
You can freeze your beans and can them later. Simply make sure you wash and trim your green beans as you normally would, since this will be practically impossible to do once they have thawed.
Blanch the beans for a minute or two, then pack tightly into a vacuum sealed bag. When you thaw them, they can go directly into a mason jar and be canned, with very little changes in texture, flavor, or color.
Canning Green Beans: Raw Pack Method
Equipment
- Pressure canner
- jars
- Lids, rims
Ingredients
- green beans
- salt
Instructions
- Break off tips of beans; snap into bite sized pieces.
- Wash, and drain.
- Pack beans into hot, clean jars, as tight as you can get them, leaving 1″ head space.
- Optional: Add 1/2 tsp salt to each pint jar, or 1 tsp salt to each quart jar.
- Ladle boiling water into each filled jar, leaving 1″ head space.
- Tap jars to remove air bubbles.
- Put lids on jars.
- Process pints for 20 min, or quarts for 25 min. at 10 pounds of pressure in a pressure canner.
Do you have a favorite way of canning green beans, other than just salt and water? Do you add anything special for flavoring? Or maybe a favorite way to cook them fresh?


A city girl learning to homestead on an acre of land in the country. Wife and homeschooling mother of four. Enjoying life, and everything that has to do with self sufficient living.
I canned all my green beans this year at 10 lb for 20 mins Will they be alright if not is there anything to do. Thanks
I left my jarred beans in the pressure cooker more then 20 minutes, will they all turn messy??
If done right otherwise they should be fine. 🙂
You have brought up a very superb points, thanks for the post.
Can I just cook the greens bean all in a big pot then after their cook .pour them in jars while there still in a boil . And add salt then put lipid on . Then be done . Or do I have to still put them in jars and set jars with beans in them and they the cook longer
They are a low acid vegetable, and must be processed in a pressure canner.
How many days ahead of time can I snap these green beans?? Help
Heather,
The greenbeans will stay good for 2 or 3 days usually, depending on how fresh they are when you start working with them. They’ll start to shrivel a little after sitting out, but they’ll plump back up once canned.
Wish me luck! I’m sitting here waiting on a friend to get here at the farmers market:)
I am going to buy my first bushel of green beans :))
Getting very excited
Yay!! Have fun with it, Heather 🙂 Try making dilly beans, too, if you have enough to play with. 🙂
The cans at the grocery store are a lot smaller aren’t they? I would think ou would ave to buy two cans at least to equal your quarts?
Good point Toby
How many years can you keep green beans preserved in jars. MY friend gave me a whiole bunch of them dated to 2007.
Linda,
The longer they are stored, the more their quality diminishes. That doesn’t mean they aren’t safe to eat, they just aren’t as nutritious or flavorful as they were that first year. As long as the seal is in tact, the greenbeans should be safe to eat (assuming they were canned properly).
Test the seal on the jars by picking them up by the flat lid, with no ring screwed on. If they are still sealed, smell them once you open the jar. If they have a sour odor, throw them away, if not, boil for ten minutes before tasting. Nice thing about green beans, the longer they’re cooked, the better they taste. Hope this helps.
You all sound like you do such wonderful things. But you do it with pressure canners. Where can I find processing times for regular canners?
I remember how she prepared the jars, what her recipies were, how to sterilize and pack for canning, from doing that all with her as I grew
up, but I don’t know how long different tnings stay in the boiling water bath. Any OIdeas would be appreciated.
Thank you
Cindy,
Some things must be canned in a pressure canner. Sounds like you need a Ball Blue Book of Canning 🙂
I have canned green beans by water bath for years. That is how I was tought Cook for 3 hours from the time it starts to boil.
Debbie,
Just understand that you are taking a risk of botulism every time you water bath can anything low acid. It’s like playing Russian Roulette. You might be okay for a while, but it only takes one bad batch to kill. 🙁 Cooking doesn’t kill the botulism spores, only pressure canning will heat the product adequately enough. Please be safe.
It is no longer “proper” and some consider it unsafe nowadays, but my mother in law and I still water bath can our beans. Once jars are in canner, bring to full boil. Begin timing for 3 hours. Turn off heat, wait 5 minutes, lift rack of jars up, wait 5-10 minutes, then remove to counter to cool. Done! Removal of rings is more important with water bath to be sure lids sealed.
I second the Tattler lids!!!
I just bought some and used them for making jam. They worked perfectly and I’m excited to know I can use them again and again.
The only downside is shipping ($12) because I have to buy them in small increments as I can afford them. But, I got 3 doz in regular mouth,3 doz. in wide with shipping it was about $58.
Good job! And $1 a lb is a good price (at least here, where they want $2.50 a lb at the Farmer’s Market). And you’re avoiding the BPA linings that many cans have these days as well.
I tried the Dilled Green Bean recipe in the Ball book last year. Super yummy – they taste like dill pickle-beans.
Not to mention Kendra, you can use those jars over and over again. I’ve had jars for almost 7 years that I’m still using each summer when we can. {I buy nothing but Ball brand because the other brands don’t last as long}
Great tutorial!
You should be really proud of yourslef. You did a fine job!
Awesome job, Kendra! Were your beans really that green, they look fabulous.
Ladies! Gosh am I the only guy here? Cost is important these days…no doubt about it, but for the sake of sitting out on the porch on a beautiful afternoon, alone or with the family, a huge pitcher of home made lemonade and a basket of beans like the ones you just canned, there’s no contest.
How much easier could it be to avoid the possibility of harm from the linings of canned goods. Not wishing to get a free ad, here, I’m not selling anything, but I’ve posted a link in my article ‘Squash The Revolution’ about BPA and breast cancer.
I know which option I’d choose. Can’t wait until next year when we plan to follow your lead.
Well done, homesteaders!!!
Marty
I’ve posted a link
Hi Marty!
It’s always nice to have a man’s voice here!! You’re so right!
And as an update, Tattler Canning Lids are made without BPA, so we can safely preserve our food 100% BPA free. Definitely the best choice!
Thank you Save the Canning Jars!!
We canned beans 2 years ago but it took up too much space so last year I bought a dehydrator and we have over a half gallon still left from the 3 or 4 we dried. Not the best when you are wanting just green beans but amazing in casserole and stews. Sadly I don’t know if I can do it again this year–dealing with garden intruders that munched a lot of my beans straight to the ground.
Love your site!! I am a mom of 4 and have been homesteading for 4yrs now—I love it!!
I canned green beans for the first time last year…they were SO good. I planted quadruple the amount this year, but almost half of them have been eaten by something. Still, I’m excited to have that bounty to use all year long. I agree that it is worth the effort! You got a great price, btw. Picking green beans is tedious…takes a long time to get that many picked!
Great post, loved the pics!
Mary
No, it wasn’t a canner, it was a pressure-cooker. I’m not sure what the difference is. It actually blew up on her when she was taking the lid off at the end of the process. Burned her and everything. Scary! It was a few years back, so maybe they’re safer now.
I would say it’s possible she didn’t wait for the pressure to return to zero before opening the lid. You should also raise the back of the lid first, keeping the lid between you and what steam is left in the canner, as a precaution. I am so very sorry to hear someone was hurt doing something I personally enjoy so much. I started helping my parents preparing and canning both vegetables and meats when I was 7, that was almost 60 years ago. We never had a canner explode in all that time.
Is there a way to can these lovely beans without using a pressure cooker? I am so afraid of the thing blowing up because that happened to my sister. TIA daisy
Daisy,
I’m pretty sure pressure canning is the only safe method of canning green beans. Your sister’s canner blew up?? Do you know if she left it unattended, and the pressure just rose too high?
Oh Kendra, I am so glad you tried canning. I love to can my veggies. It would not matter to me if it cost more – I at least know what is in the can!! And if everything did collapse – you would still have all these veggies (and meat cans well too). That’s the drawback to freezing everything – if there is no power, you are in a bunch of trouble or shall I say food. Last year was our first year at preserving food by ourselves. My mom used to come and help me when she was alive and we shared a garden with my parents. But when I got started by myself, I could not stop. I canned everything. Also try jellies and jams with all this fresh fruit. If you are lucky enough to find muscadine grapes, be SURE to make some jelly from them. You will never want Concord Grape again. I love to do it even when I do not feel like I can stay up another 5 minutes, and I hope you feel that way too. Your family will appreciate it so much this winter. If you ever have any ?? on something I will be happy to help.
Nah, just have a lot of kids to feed. I think you’ve seen photos of my pantry at one point or another, right?
Plus I’m a snob about food like that now. The home-canned stuff just tastes so much better than the tin can stuff at the store. 😉
Feel free to come on over and help in August/Sept if you’d like, or are up for one heck of a road trip. The kids can chase each other around to keep each other occupied (mine are 6yo, 4yo, 2yo, 4mo).
ok. That makes me feel better. Wasnt worried when my alum. posts did it… but the canner darkening that much made me wonder.
I think Im going to get some okra next weekend to can. I’ll get a good stash for future gumbo weather. LOL.
I finally took the plunge and took out my new All American canner and did some green beans this weekend. I feel soooo accomplished! I got 14 quarts done (would’ve done more if I couldn’t gotten my hand on more green beans). Your post was very encouraging! I was so scared to break it out and now I feel very comfortable.
PS. I have the same canner as you. The inside (part where the water is) turned blackish in the bottom of the canner. Did yours do this? I have alum. pots made just like this canner and they did the same thing when I first used them except not as much (perhaps because the pots didn’t get that hot).
juju_mommy,
I’m SO proud of you!!!! Yay!! So, about the canner. Yes, mine did the same thing. I was all worried at first, but I found somewhere in the owner’s manual where it does mention that this discoloration will happen and is normal 🙂
Bethany amd Kendra – I have a flat top stove and I have been using mine for canning for 3 years now and I have had no problems….
I have a 6.5yo flat top glass stove.
I have the same All-American pressure canner Kendra does and a regular water bath canner, used for 4-5 years now. I have probably 900+ jars total right now. Stove’s still kickin’. If it does happen to break, I can blame it on my engineer husband telling me I was fine to do so, and we’ll get a gas range to replace it. 😀
But, I will say that my Ashland canner doesn’t fit the glasstop. Our burner knobs are on an upright panel-type deal at the back of the stove, and the flattop is about 1/4″ too short length-wise for my canner. Which is a total bummer. I may jerry-rig something up though – being able to do 15 quarts of fruit at a time (I need to can at least 700+ quarts of applesauce/peaches/pears this year, we’re almost out) would make life slightly easier this season.
Wow, Lanna!!! That’s some SERIOUS canning you got goin’ on!! You’re my hero.
Kendra,
Did you use a flat surface oven to can on? I bought a ceramic top oven, because they are so easy to clean. BUT they are not supposed to be used for canning, because the top can crack/break. So, I am waiting to start canning until I can buy an alternative heat source. (They are a lot of options, I am just hard-pressed for the extra cash to buy them.)
I enjoyed your post. It is so much easier to learn to do new things when you have pics!
Bethany W in mid-MO
Bethany,
I was like you at first, and planned on selling my flat top (which I LOVE) and buying a more traditional stove so that I could can on it. But after talking to lots of people who have canned on a flat top stove for years, and have had no problem, I decided to give it a try. So far, I have had no problems at all! I plan on keeping my stove and continuing to can on it.
Good job Kendra. I can remember burning the “midnight oil” doing the canning just so the girls wouldn’t be underfoot and I could concentrate on what I was doing. In VT our garden produced bushels of beans. We haven’t had quite that many here, but it’s a work in progress. One year in VT the bean beetles took out the whole crop… so I’ve been in your shoes more than once. One year we thought we had really healthy happy squash plants but all they produced were nonedible gourds… the previous year’s plants had cross pollinated and the saved seeds were no good. Just one of the dangers of saving seeds another being nongerminating seed. You live and learn these things, but hopefully only have to go through it once.
Do you keep a garden journal? We have since we got married through my husband’s encouragement. We keep dates and what we liked and didn’t like. What date different bugs appeared and what we did to get rid of them. We keep information like last year planting lots of different types of squash which ones we like the flavor of and which ones were not so good. How much is produced, how much is put up in the freezer or canned and how long they lasted. We just ate our last chicken this week, so that went in there. This year we bought 35 meat birds instead of 25. How much each bird weighed at butchering time, how many we lost before butchering day.
Well, you get the idea. I have a hard time remembering from year to year. Perhaps if I had another thirty or so years on this same little plot of land, I would remember like some old farmers what happens at what time each year.
There is a science to getting the land to produce enough food and fodder to keep a body alive for a year. I’m not sure if this 2 acres will do it, but we’re trying.
Hope the rest of your garden does very well.
God Bless ya!
What a great job!! I’m guessing the beans you canned are far better than what you might get off the Aldi’s shelf. And you have the satisfaction of an amazing job well done!
(all canning lids have a little BPA in them unfortunately – keeps the metal on the underside from reacting with foods – think tomatoes and such… only way to totally escape it is using Weck jars or old school wire or rubber ring ones – both of which cost a pretty penny… but unless you store things upside down you’ll have minimal lid contact with your food) Sorry, I’m a little, hmmm, outspoken? About canning. Feel free to tell me to shut up if need be. 😉
Kendra,
One BIG bonus to canning your own food that is that you don’t have the toxins like BPA that leach into your food from the cans that stores use. And, funny, but one the highest offenders was Del Monte green beans! Using glass is the way to go!
GREAT JOB!!! That just looks beautiful too!
Ok, I have to know…does the canning method loose nutritional value??? I really want to can, but I’ve been wondering about this. Ever heard anything? We could get a large freezer and just freeze things, but then there is the cost of keeping it running and such.
What’s a girl to do?
Just curious! =)
Tarena- Well, as you know, any time you cook veggies some nutrients are lost. We choose to can because, 1) you won’t lose any food if you are without power for several days, 2) the food is preserved for much, much longer than frozen food, 3) it takes no energy to keep it stored. As for which method retains the most nutrients… no idea 😉
Tarena, pretty much everything loses a little nutrient value with canning/preserving. But. The fresher/better grown the ingredients are, the more nutrients they’ll have to start with, and the less they’ll lose during processing. Usually, home-grown and sometimes organically grown will have more goodies in ’em than conventional/commercially grown stuff. But it’s all about what you feel the most comfortable with for your family. I have almost a dozen cans of diced tomatoes from the store that recently started bulging. I have yet to have had any of my home-canned goodness flat-out bulge. I’m not a fan of botulism.
Kendra, next time see about finding local u-pick places. Two years ago I got a 5-gallon bucket of beans for $5. Guy wasn’t officially organic, but his growing practices were fine by me. Doesn’t take long to pick that many beans, either. Despite me having a 4yo, 2yo and newborn with me at the time.
I use a knife (like your MIL) to cut up my beans into bite-sized pieces for canning. Then everything gets a good rinse, and into the fridge usually. If they’re rinsed well, have a bunch of the water shaken off, and are stuck in a ziploc with a paper towel they’ll keep a day or four until you have enough beans ready for a canning session or five. 😉 At least that’s how I rolled last year or the year before with beans from the garden. Never got enough at one time for a full canner load, just a pint or quart at a time. And, fwiw, if you have a bunch of half-pint jars? Those are a great size for sticking something in a husband’s lunch box. Not like I’ve done that or anything… 😉
Great advice, Lanna!
Great looking beans! I canned green beans for the first time this year, too. I got 6 pints from my garden before the Mexican bean beetles took over, I pulled all my plants up yesterday and fed to the chickens and goats. I am going to replant and try to get a few more cans because the are just SO DARN GOOD!!
We usually make pints and quarts of pickled beans. Here is a decent recipe. We usually freeze beans from the garden but can the pickled beans.
Ingredients
* 6 cups water
* 1 cup pickling salt
* 6 cups distilled white vinegar
* 8 heads fresh dill weed
* 1/2 cup pickling spice
* 1/2 cup mustard seed
* 8 dried red chile peppers or ground cayenne
* 16 cloves garlic, peeled
* 5 pounds fresh green beans, rinsed and trimmed
Directions
1. Sterilize 8 (1 pint) jars in boiling water for at least 5 minutes.
2. Combine the water, pickling salt and vinegar in a large pot, and bring to a boil. When it begins to boil, reduce heat to low, and keep at a simmer while you pack the jars.
3. In each jar place the following: 1 head of dill, 1 tablespoon of pickling spice, 1 tablespoon of mustard seed, 1 dried chile pepper, 2 cloves of garlic. Pack beans into the spiced jars in a standing position.
4. Ladle the hot brine into jars, leaving 1/2 inch of space at the top. Screw the lids onto the jars, and process in a hot water bath for 6 minutes to seal. Store for at least 2 weeks before eating.
Pat,
I bet that’s the same thing that my friend just gave us to try. She calls them “Dilly Beans”. Man, they were SOUR! But I think they’d soaked in that vinegar brine for several years. Thanks for the recipe!!
I am sorry that your greens beans did not do good this year… 🙁 my squash and zucchini is not producing anything this year… matter-of-fact my zucchini died…I am thankful that I have some family that have come to the rescue and are going to supply me with some… It is very disappointing when you can’t say you grew the veg. yourself but I refuse to buy anymore canned veg. at the grocery store ( if possible ). I was taught in high school home economics class that the canned food manufactures are allowed so many fly eggs in a can of food before it is sealed… I am not sure if this is true but I will never forget that… and anyway I have spoiled my boys and husband with fresh canned food and they can tell the difference… My kids will eat vegs. from the garden and before they would not even try it…Very rewarding when your kids beg for something you made from scratch.. 🙂
I canned my first batch of the season this week, too! It feels GREAT! I only bought a half a bushel and got 14 qts.. we are right on together. My beans are just not ready in the garden and I was ready to get a start…. Thanks for posting this to encourage others to give it a whirl… it does take a lot of time, but it is so satisfying. Job well done!!!
heather
I’m so proud of you guys for all of the canning everyone is doing!!!
Great job Kendra! I bet you are tired today hehe.
Proud of you daughter-in-law. These are beautiful. For me there’s more comfort to know I canned than buy at stores unless you buy Food Lion blue lake beans. They taste just like home canned beans. I enjoyed helping you yesterday and watching the kids play. I hope Katlin didn’t drive you nuts last night. Love to all.
We have added red peppers to ours at times. It gives the beans a sweet taste and a little color. So good when you have an abundance of red peppers! 🙂
Don’t be discouraged that you bought beans because yours didn’t produce like you thought they would. Gardening is a learning process, and once you get it down you’ll be over run with veggies, I promise you.
I can about 100 quarts a year, I get my seed from the local feed mill and I also gleen extra beans from my grandpa who thinks he has to have a huge full size garden every year even though they will NEVER use that much, I think he just likes to pass veggies around.
Your beans look great and I hope next year your able to can your own!!
Love your posts!!
Dana
Canning string beans is a long process! I think it is worth the effort though. We put up 42 quarts this year.
I can’t believe you canned that many! You’ll have green beens once a week for 6 months…that’s so awesome. I’m a big fan of freezing veggies, but I’m running out of room in my freezer. I thought of getting a chest freezer, but the extra energy consumption is a deal breaker when I can can instead. Now I just have to get the materials!