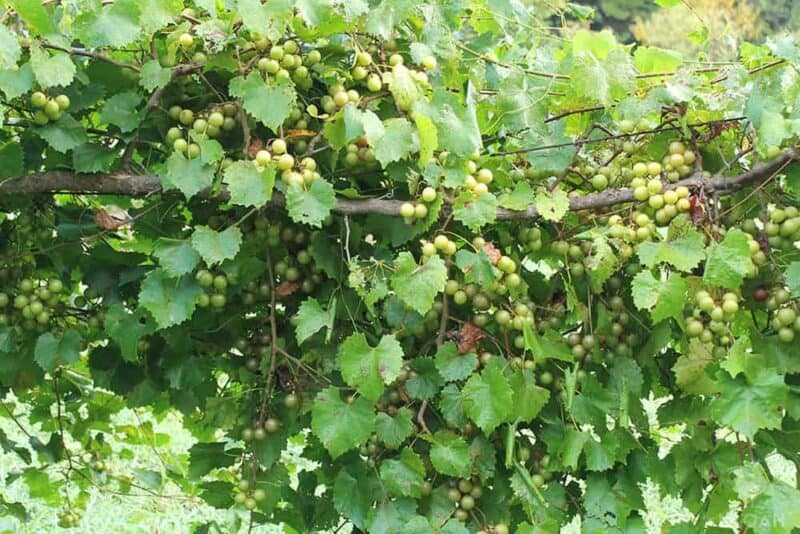
If you remember, a couple of weeks ago we purchased our first grape vines, Scuppernong Muscadines, to be exact. I promised to show you how we planted and trellised them, so here it is.
If you’re reading this article, you might be wondering, “That’s great. I’m glad to hear you found some Muscadine vines and were able to plant them! But what exactly are they?”
Simply put, muscadines are American grapes that do well in hot, humid environments.
They can be easily grown in USDA growing zones 7 through 10, producing sweet fruits that taste great when eaten straight from the vine. You can also make them into preserves, jams, or wine.
Native to the coastal plains of North Carolina, these plants prefer areas in which temperatures don’t often fall below 10 degrees. It’s very easy for the plants to be killed when winter temperatures get below 0.
There are some hardier cultivars, like Magnolia, Sterling, and Carlos, that do well north of Virginia or even into the Blue Ridge Mountains.
However, if you live outside of the suggested growing zones, I wouldn’t suggest pushing your luck. While muscadine grapes are beautiful fruits with which nothing else can compare, there are other fruits you can grow instead if you can’t grow muscadines in your growing zone.
Table of Contents:
Muscadine Varieties
Muscadine vines have been cultivated for more than 400 years. Native Americas preserved muscadines as dried fruit before the European arrival, and later, the first recognized cultivar of muscadine was the Big White Grape – later named Scuppernong!
There are many other cultivars available of Muscadine grapes. You might find popular options like Nesbitt, Magnolia, Carlos, Nobel, or even Doreen where you live.
When you are selecting the best muscadine variety for your property, make sure you select one that is self-fertile and won’t require another plant for cross-pollination. Although you can always plant several plants and hope for the best, choosing a variety that is self-pollinating will be much, much easier.
Like I said, we planted the Scuppernong cultivar of muscadine grapes. This is the original name given to the bronze-skinned grape that originated along the Scuppernong River in North Carolina. One of the oldest and most well-respected varieties of muscadines, it also has one of the best flavors.
Another option is the Fry Muscadine Grape. Also a bronze grape, it’s similar to the Scuppernong except that it’s from Georgia. It’s perfect for hot, humid areas.
Scarlet Muscadine Grapes produce red fruit, and while the clusters are small, the fruit tastes great. Another option is the Noble Muscadine Grape, which grows vigorously and is a cross between two other varieties.
Find the Right Environment
Muscadine grapes vary a bit between cultivars, but in general, most like the same conditions. When you are selecting a planting site, try to avoid heavily shaded areas. The plants need lots of light to set and produce fruits.
These plants are able to survive and bear fruit on a range of soils, as long as drainage is good. Standing water can spell disaster for your muscadine crop. You also should avoid soils with a heavy hardpan.
Muscadine vines are usually planted in the spring, so fertilizing the area in the fall is recommended. This fertilizing can help your plants make it through the following winter, as vines are more susceptible to winter injury where soils are infertile. The soil should be around 6.5 before you plant.
Before preparing to plant, make sure there is little to no chance of sub-freezing temperatures. Muscadine vines are going to be quite susceptible to a killing frost.
You may be able to hold on to potted plants a little bit longer, and if you have bare roots, you can keep them healthy by keeping them refrigerated until it’s time to plant.
Building the Trellis
Before you can do anything else while planting muscadine vines, you need to make sure you have some sort of support system in place. All muscadine vines, regardless of the variety, need a trellis on which to grow.
In a home garden, you can usually get away with planting one vine per every twenty feet of trellis.
The first task was to build the trellis. We decided on a nice sunny spot in the front yard and got to work. First stop was the hardware store where we purchased two 6″x6″x8′ pressure treated posts, two 4″x4″x8′ pressure treated posts, and 75 ft of 9 gauge smooth galvanized cable.
(This project cost about $100. If you can find scrap materials to build this from, or use metal stakes between the end posts instead of the wooden ones, you’ll save yourself some money.)
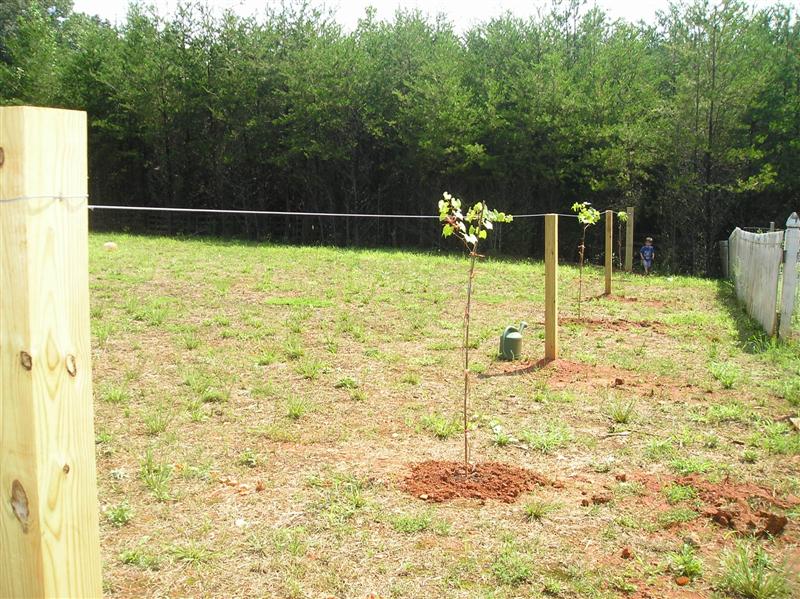
Each post needed to be three feet in the ground (though I think we only went two feet with the middle posts). We didn’t concrete them in, or reinforce them in any way.
We only packed them in well. If, with time, they begin to lean in under the weight of the vines, we’ll have to do something to make them stronger. We’re hoping they’ll just stay where they are.
Pressure-treated posts work just fine, but some people set these in concrete, building simple fences or even overhead arbors.
The posts are spaced 20′ apart, with the two smaller posts between the larger end posts. Each post is 5′ tall when sunk into its hole.
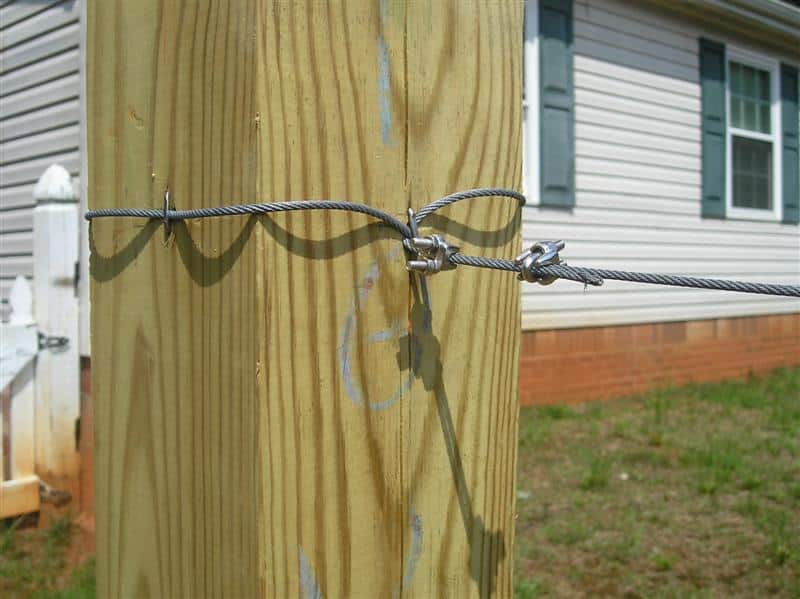
Once the posts were firmly in place, it was time to run the cable. We attached the cable on one side by wrapping it around the end post, stapling it with 1.5 inch staples, and securing it with two cable clamps.
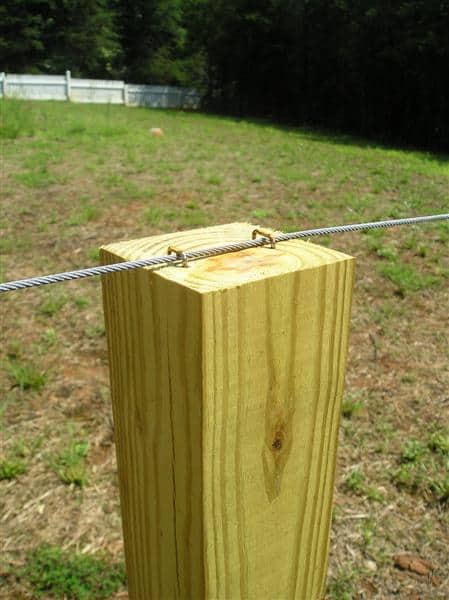
Then, pulling it as tight as we could, we stretched it across to the other end post, loosely stapling the cord to the tops of the two center posts as we went. You need to make sure that the cord can still slide underneath the staple as you will eventually need to tighten the line again.
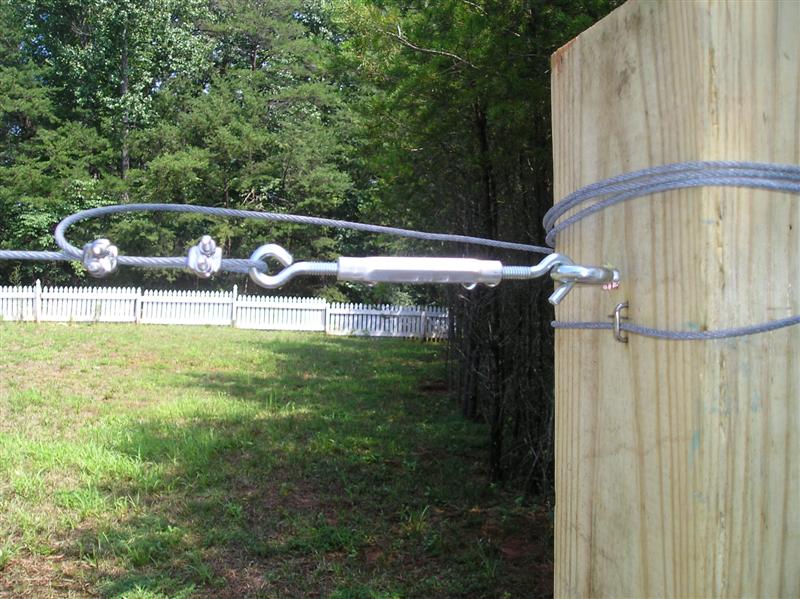
On the other end post we wrapped the cord once again, secured it in place with 1.5 inch staples, and attached it to a clothes line tightener using cord clamps.
We screwed a heavy duty eye hook into the post, and hooked the cord to it. As the line gains slack, we will use this to tighten it up again. We may have to cut the line to tighten it as well, over time.
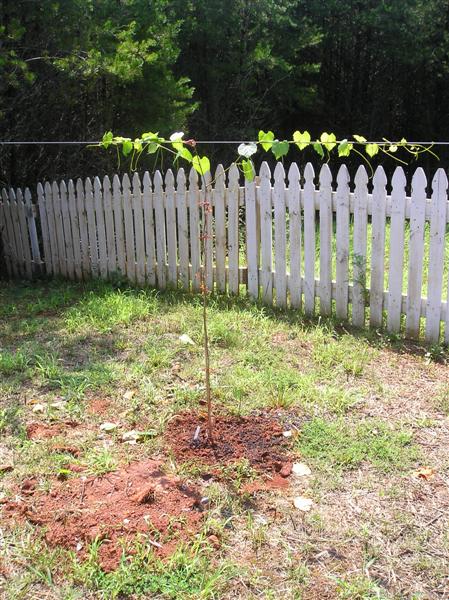
When we bought the plants they were in containers, and already trained up a 5 ft. bamboo shoot. Once our trellis was built, we planted each vine in its designated place, 10 ft from each post (or directly centered between the two posts which were set 20′ apart).
There are a few guidelines that you need to follow when building your trellis. First, keep in mind that the type of trellis you choose will determine where the plant can be established.
Make sure the trellis system has been decided upon and built before you start planting. You need to make sure that you can reach the vines easily for annual pruning and that you will be able to manage the plants.
This is important to mention because many people grow muscadine vines over garden arches or pergolas. This is beautiful to look at, but if you can’t reach every tendril of the plant, you’re going to have trouble pruning and caring for the plants –and you will notice that your fruit production drops off as a result.
How to Plant Muscadine Vines
I read that you are not to use a post hole digger to dig the hole to plant them in, as it would create a hole with walls that are too tightly packed for the roots of the plant to be able to grow through.
So, we dug with a shovel, and made a hole twice as big as we would need, just so that when we filled it back in around the roots it would be loose soil.
Once the hole was dug (only as deep as the root ball), we set the plant into the hole, and filled it in with potting soil. The vineyard man said not to use any compost or fertilizer during this process.
When the hole was filled, we packed it in well. We left the bamboo stick in with the plant, to help keep it trained up to the line as it grows.
Keep in mind that muscadine vines are best planted in the spring. No matter how you choose to dig your hole (like I said, we used a shovel), make sure the planting hole is large. You need to make sure the vine is directly in the hole and that the roots are fanned out with the stem of the roots just an inch below the soil line.
Backfill with soil until your hole is just about full – about 75% or so. Then, water to settle the soil and finish filling in with soil before providing the soil with another good, long drink.
If you are planting multiple vines, make sure they are at least ten feet apart in the row – 20 feet is even better. This will give you room to work around the vines.
Caring for Muscadine Vines
Muscadines need lots of care for the first two years especially. They need to be cleared of any grass or weeds around their base, and mulched with pine needles. Make sure that the pine needles don’t touch the base of the vine though, as it will cause more growth near the ground that you don’t want.
The man instructed us to remove all leaves from the trunk, and keep it free from growth so that all of the energy of the plant will go to the top instead. We were to prune all but two vines from the top of the plant, each going in the opposite direction to cover the cable on the trellis. We used some thin nylon rope to loosely tie the vines to the cord.
Proper pruning of your muscadine vines is essential, as it is with all grape vines. After you’ve planted, you should prune your vine back so it’s just one healthy cane.
The next spring, you can prune everything except the strongest canes. The remaining canes should be tied to the trellis. You’ll do the same thing every year, pruning back unhealthy or older canes while allowing the vigorous ones to remain.
We planted three of them this way, with the female plant placed between the two male plants. At some point, in Spring I think, we will need to fertilize with 10-10-10.
The man said not to use bug spray, that the Japanese Beetles might eat some of the leaves, but that they would not kill the plant or ruin the fruits.
Once established, muscadine vines are incredibly tolerant of dry weather. They do require a bit of irrigation when they’ve first been planted, though, as well as during fruit production. Otherwise, muscadines will produce well in poor soil.
As you can see, we still need to remove the grass underneath the trellis. We plan on tilling it up instead of spraying any weed killer. Be careful around the roots of the plant though, as they grow only a couple of inches beneath the soil.
Lightly cultivate around the base of the plant, as needed only. Planting a cover crop of crimson clover in Fall will help kill weeds, add Nitrogen to the soil, and help reduce fungus growth in the spring.
Like I said, muscadine vines do well without much fertilizing, but they can be extremely productive when more nutrients are added to the soil – a slow release fertilizer can be helpful in late spring.
Some people actually use tobacco fertilizer to feed their plants. This should be applied in March and in late June, which is when the plants will be the most accommodating when it comes to nutrient uptake.
Muscadine grapes also have significant requirements when it comes to boron and magnesium – these plants are often deficient in those minerals, so it’s important that you supplement them with a fertilizer.
Muscadine grapes aren’t susceptible to many diseases, but you should watch out for fungal conditions like downy and powdery mildew. Both of these can be caused by too much moisture, band both can kill the plant if left untreated.
Growing Muscadine Grapes from Seed
Did you know you can also grow muscadine vines from seed? To do this, you will need to remove muscadine grape seeds from ripe fruits, being careful to remove any pulp. Let the seeds dry for 24 hours before placing damp peat moss into a container with the seeds. You will store the seeds in the refrigerator for three months.
When the time comes to plant, you will put potting soil into four-inch pots, add your muscadine grapes, and push them ¼ of an inch deep in the soil. Mist the pots with lukewarm water before setting them on a tray.
Make sure the tray receives bright light and is exposed to temperatures around 75 degrees. Germination occurs within three weeks, after which time you can transplant your seedlings.
Training Muscadine Vines
After planting your muscadine plants, you should train it to crawl in the correct direction. This is especially important if you are growing your muscadine plant on a trellis. To do this, prune to one stem and then cut it back to two or three buds.
When new growth continues, you should select the healthiest shoot and cut away the rest. Use a training stake to attach the growing vine, making sure shoots continue to grow in the direction of the stake. Each year, you may need to retrain the vines a bit to keep them going in the right direction.
Harvesting Muscadine Grapes
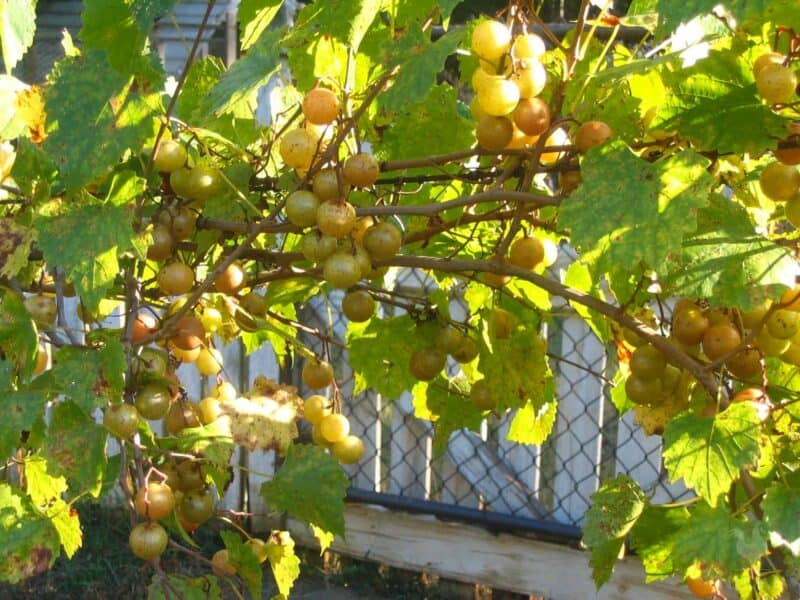
And now the best part – enjoying the grapes you’ve worked so hard to cultivate! If you’ve grown bunch grapes in the past, you might not be used to the unique ripening method of muscadine grapes.
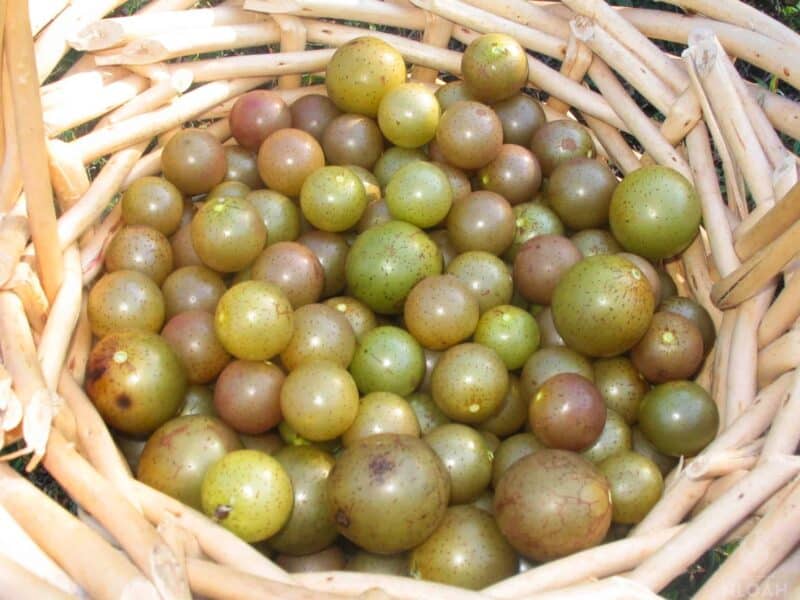
These fruits ripen individually instead of in clusters over a multi-week period during late summer. You’ll know your grapes are ready for harvest when they are easy to remove from the vine. You can really only harvest muscadine grapes by hand – doing anything else can damage the fruit.
We’re actually growing three different varieties: Tara, Darlene, and Pineapple Scuppernongs. Two have very large grapes on them, and one produces smaller ones more typical of what you’d see in the grocery store (though I can’t remember which is which right off hand).
All three are the “white grape”, Scuppernong variety of Muscadines. We did plant some purple Muscadines, but unfortunately those vines didn’t survive.
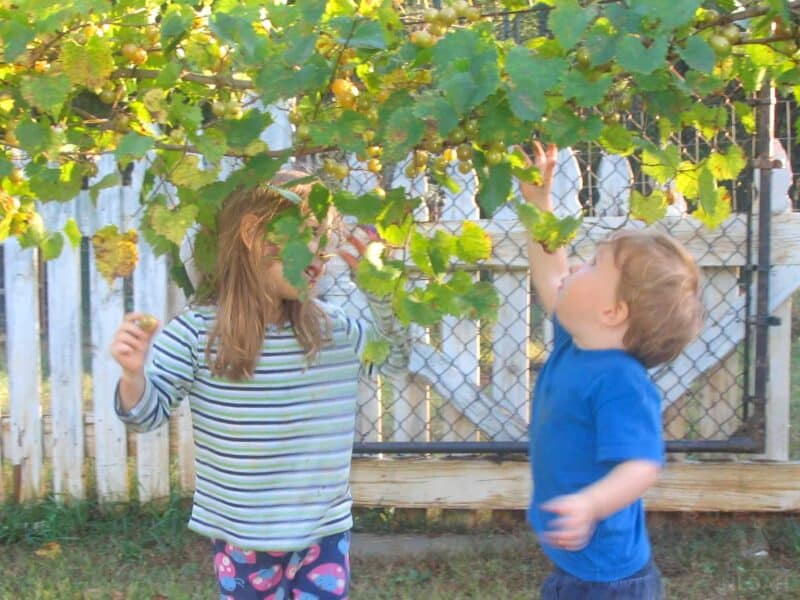
This year, our most productive so far, I’ve discovered that each of our vines ripens at different times, with about three or four weeks between them.
The first vine was ready to harvest last month. The second is ready now. And the third is just barely beginning to bare ripe fruits.
I like that with these different varieties our growing season is extended, and the kids have a longer period of time to graze the vines. They just move from one vine to the next as the weeks progress.
That’s the best part about growing these grapes- watching the kids picking freely from them, enjoying a little snack while they play.
Muscadines make fantastic juice and jelly. But I’ve realized I also need to plant some seedless grapes to make raisins for the kids. I hope to add a few of these varieties to our little “vineyard” in the near future.
Here are two sites that the guy we bought the plants from highly suggested for planting, pruning, and trellising advice:
We planted the vines along the front of the garden. I’m hoping to one day build an arched arbor as the entrance to the garden and have grape vines trained to grow over it. As with all things we plant, I really hope they do well!!
Anyone have any advice to share? Do you have grape vines or muscadines on your homestead?

A city girl learning to homestead on an acre of land in the country. Wife and homeschooling mother of four. Enjoying life, and everything that has to do with self sufficient living.
Calling all bronze muscadines, Scuppernongs is a common mistake that people make. Scuppernong is only one variety pf bronze muscadines. Do you call all yellow apples Golden Delicious? I didn’t think so.
I JUST MOVED to a home where I have muskicine vines that are 40 feet long growing up an evergreen tree.There are 5 or 6 and they are fatter than my thumb.There are three arborsin the area.Should I pull them down and put them on the arbors? Or prune them?
Thank you so much for your post. We live way off the road and have dozens of vines scattered through the woods. These are definitely wild vines, and have never been trained. the trunks range in size from less than an inch to about 3.5 to 4 inches and are very long, with the leaf branches reaching up as much as 35 feet into the trees. My ideal use of the vines would be to create walk-way arbors using 20 foot pvc pipe and wire overhead. I have have put some of these wild vines on a 10 foot trellis, and did get some fruit,(very sparse). I did very little pruning because I don’t know how to prune without harming the plant. I believe I have plenty of vines to cover a walk-way arbor, but I don’t know how to go about pruning, and training the vines. Does anyone have any experience with making such an arbor? or am I too ambitious? If I prune the vines too much will the vines die? Is it feasible to simply pull the leafy branches out of the tree-tops and tie them to the frame of the arbor? Any advise is much appreciated.
Grandma’s Boy,
I think making an arbor sounds like a wonderful idea. I hope to train my vines over an arbor one day as well (when we can afford to build such a structure, or when we have the time to build it from tree branches). I’m not an expert in pruning by any means, but I believe you could cut the vines all the way down to just a stump a couple of inches from the ground, and it would sprout again. I’ve had my vines do this when my husband has accidentally mowed over young vines, and chopped them down to a nub. They’ve always come back. You could even cut them down to a manageable size, and transplant them where you want them. If it wouldn’t be too much trouble to pull the vines out of the trees and train them over an arbor, there’s no reason that wouldn’t work. Best of luck to you!
I am about 4 years too late, for your concern; but, for details on prunint muscadines, see ” Ison’s Nursery & Vineyards, videos. Greg Ison made some truly
excellent training videos, for pruning muscadines. I’m sure you’ve found your
answers, for your trellis, log-ago; but, Greg ison’s has so many other subjects, too, regarding muscadines. Of course, his are hybrid plants, but, the rules are the same for wild plants, too.
I have 2 muscadine vines but I don’t know if I have male or female. How can you tell?
I used stainless cable with a plastic coating, will not rust or get to hot in the summer.
I am planning on making a trellis and growing scuppernongs, but I’m having a hard time finding 9 guage galvanized wire. Any ideas?
Go to ISON’s … they have 9 gauge wire and at a reasonable price, too. store.isons.com
Ace hardware or on line
Love your setup! We inherited a huge batch of out of control vines with our new house. I got a lot off this year and we will prune in the fall, but were told not to prune back but about 1/3 or it might kill the vine. These suckers are all up and down my pecan tree and honey suckle runs all through as well! Fun job this fall to try and straighten it all out! Good luck with yours!
Wow, Christi! Consider it a blessing 🙂 I’m afraid mine are succumbing to Blight. Hopefully they’ll make it. Happy pruning!!
Pruning them back each year should prevent over weight of the posts. New growth and fruit doesn’t grow on old shoots. If the posts are at least 2 feet deep you shouldn’t have to worry about cold heaving. I have vines that are nearly 100 years old. The trunk of the plant is as big as my leg. I made lots of juice for jelly later this winter with my harvest. I can also make wine with it. Yum!