I’m DONE!!
Well, close enough, anyways.
I’ve been dying to show you what I’ve been up to. My weekend project turned into a week long undertaking. It’s hard to find time for painting and crafting in between running a home, tending to the animals, homeschooling and caring for three little ones. I’m SO glad to be pretty much finished.
I know I kinda already showed you what I was working on, but here are the before pictures again…
My Cluttered Laundry Room
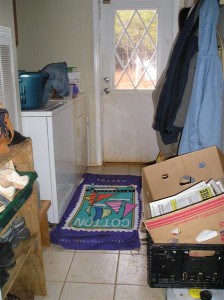
(Sorry the photo on the right’s a little fuzzy)
And this is clean for this room!!
Yeah. It was ugly. And cramped.
And to think this is our main entryway! How embarrassing.
I was so over it.
I was tired of having to change baby Xia’s clothes whenever she scooted into that filthy room. I was tired of re-washing clean stuff I’d just pulled out of the washing machine and accidentally dropped on the floor.
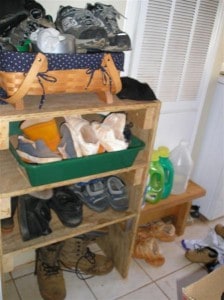
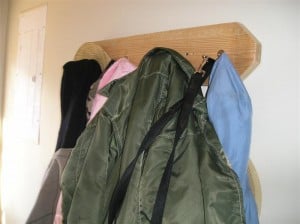
I was tired of endless woodchips and muddy boots cluttering the floor, and winter coats crammed onto the coat rack.
Is a clean, pretty room to do laundry in too much to ask for? It was time for a major makeover.
Only one problem. No money.
Seriously. Not a dime to spend.
What? No money you say?? Ha! I laugh in the face of poverty. Hahahaha…
I was not to be discouraged. It was just gonna take a little resourcefulness and creativity, that’s all!!
So, I got to work. First I dug through boxes of stuff we have stored in the attic of our storage shed. Then we headed over to Jerry’s parent’s house and my mother-in-law so graciously gave me full rein of her basement. Some may call her “collection” clutter… but me, oh no, I call it treasures! I was absolutely giddy with the stuff I found hidden among the piles.
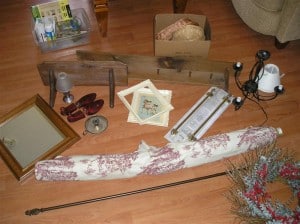
Here’s what I managed to scrounge up. Doesn’t look like much, but I had plans! And that big o’ roll of fabric there, that was exactly what I was hoping to find in Na-Na’s basement.
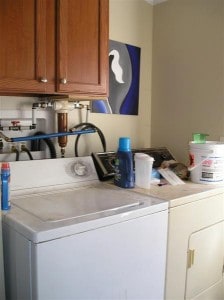
What exactly did I need all of that fabric for, you ask? Oh, well, you see that hideous contraption sticking out behind the washer and dryer? Yeah. I was tired of the world having to see that when they came to visit. It’s the water filter thingy for our well system… and it’s ugly.
Wanna know something else I think is ugly? That dryer. Sure, it doesn’t need repairs (for now). But really, I hated looking at it. And there was absolutely no way to hide it. Believe me, I considered every possible option.
And then it occurred to me, who needs a dryer anyways? I’ve been wanting to unplug it to get used to not having the convenience anyways, so what was I waiting for? Yes, it had to go.

So, first step- clean out the room. Bye-bye dryer.
Next step, turn trash to treasure.

Loved this coat rack shelf my mother-in-law had buried in her basement! Just needed a good paint job.

Found my old Christmas wreath in our building… what was left of it after the goats feasted on it, anyway. I loved the look of it, but the sun faded berries had to go.
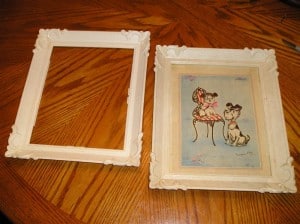
Another basement find. I loved the scalloped corners on these frames. Just needed a fresh coat of paint.

Boy was I thrilled when my mother-in-law brought out a mirror of mine I’d forgotten was at her house. I’d been wishing I could find a mirror for this project! I made a stencil to paint the word “Wash” on it, just for fun.
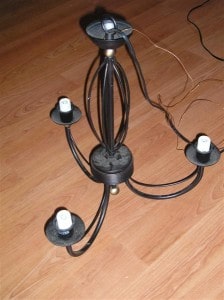
I had big plans for this chandelier I bought for like five bucks eons ago. I even had it all spray painted white, and had one of the shades re-covered, when my husband realized that I was missing a couple of necessary pieces. Bummer. I know I have them… somewhere. Guess this particular project will have to be finished another day.

I thought this fabric would be perfect for making the curtains I needed. My first curtains ever, I might add.
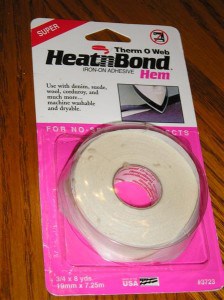
Lucky me was feeling especially ambitious after finding a roll of iron-on adhesive for no-sew projects. Woo-hoo!!
So after cleaning the room out well, painting the trim and door with some leftover white paint I found in our building, I was ready for the finishing touches.
Okay. You gotta scroll back up and look at the Before pictures one more time.
Got that image in your head? Okay good.
Here’s what it looks like now…
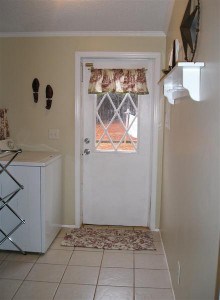
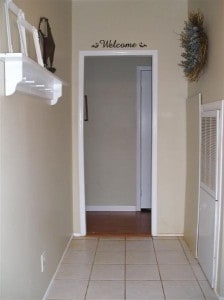
CLEEEEEEAN!! And much prettier too, if I do say so myself.
Okay, let me show you around.
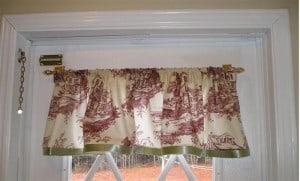
Here’s the no-sew valance I made for the backdoor. I pulled the green ribbon off of an old dress of Jada’s ’cause it was exactly the color I was looking for. The curtain rod was from my mother-in-law’s basement. It’s magnetic, and our door is not metal like I thought it was, so Jerry cut two squares of metal flashing and glued them to the door to hold the rod on. I don’t like the brass, but it’ll do for now. I’ll probably paint it if I don’t replace it.
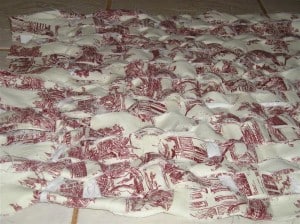
I really wanted a rug for the room as well. A cute rug. I asked Jerry’s mom if she happened to have one she didn’t want, and she didn’t, but she did give me the ingenious idea to weave my own! I used the same fabric the curtains are made of, and followed a no-sew woven rag rug tutorial. It took a day, but I’m pleased with how it turned out!
I’m not gonna leave this rug at the backdoor all the time though. I’ll keep it underneath my dryer rack so that it doesn’t get all dirty, and just bring it out for company. It’s more for looks than anything. And we track a lot of red dirt in around here!
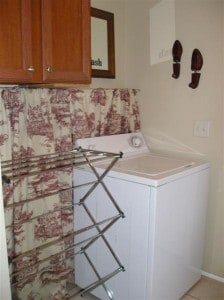
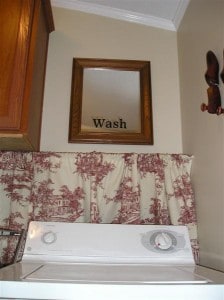
See the curtains I made to block all of the plumbing behind the washer? Aren’t you so proud of me?! I’m so happy not to have to see all of that anymore.
We moved the washing machine over to block the hole in the wall for the dryer vent, and replaced the dryer with my expandable clothes rack. I was a little nervous about not having an electric dryer anymore, but after a few days of it being gone, I have to say I LOVE it!!
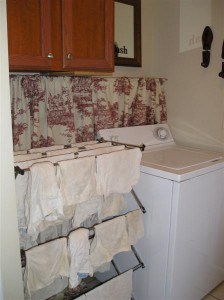
Here’s my new dryer in action. These cloth diapers will dry overnight hung here. And really, it’s not that hard to pull them out of the washing machine and drape them over the rod.
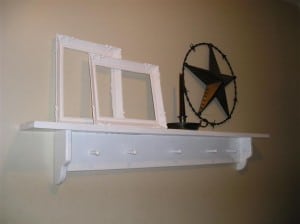
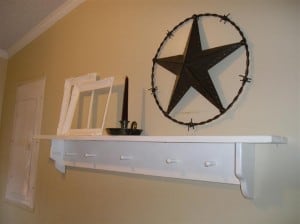
Here’s that shelf I painted. I just put a few knick-knacks on it to make it a little purdier. I love that the pegs are spaced out farther than our other coat rack, so our stuff won’t be so jammed together. Much better.

Wall decals are all the rage right now. And I thought a “Welcome” sign above the doorway would be really cool. Of course, with this being a zero dollar makeover, I had to make my own. No problem though. I just printed out what I wanted in the font I liked, added a graphic for the sides, and made a stencil to trace from cardstock. A little dark brown acrylic paint and a steady hand, and viola!

Here’s the wreath I fixed up. I hung it high, since the ceiling in this room is vaulted. Bringing the eye up will make the room seem larger.


Okay, okay, I know what you’re thinking. Sure, it’s all cleaned up and nice looking, but where’s all the stuff? Where are the winter coats, and the boots, and the firewood logs?
You don’t really wanna see my pretty new room all cluttered up again, do ya?
Don’t worry, it’s all going back in. I’m still working on a new shoe rack system though. Something cleaner, and more organized. Actually, this project has been assigned to Jerry. Thanks cutie! I’m gonna get him to make something that we can stack the wood underneath, along with the boots, and then have space for the shoes above. Whenever that’s done I’ll update my pics, -k-?
But even with the coats and shoes back where they go, this room is still 100% better than it was. And I intend on keeping it clean and organized. I can’t function in chaos.
I love what I’ve been able to do in this room! And anybody can do this stuff. If you are dying to redecorate a room but have no money, pool your resources! Scrounge through your house and see what you have that you might be able to turn into something better, ask your relatives if they have anything they want to get rid of, scour Craigslist and Freecycle for freebies… and be patient! What you need will come along if you just wait for it and use a little imagination.
So, there ya go! Zero dollars spent and a whole new look. Whaddya think?

A city girl learning to homestead on an acre of land in the country. Wife and homeschooling mother of four. Enjoying life, and everything that has to do with self sufficient living.

I love your site!! Thank you so much for sharing! I wish I were brave enough to forgo my dryer!!! I think I will start doing as many loads as I can drying on a rack! 🙂 My husband and I live on a farm with 2 little girls and are planning on homesteading! Thanks for sharing! I love learning about this! 🙂
So happy to have you here, Amanda!
Hey!! I absolutely LOVE your site!! I wish I were brave enough to forgo my dryer! 🙂 One day I will! Thanks for sharing all this! I love learning about self-sustaining! We live on a farm and are thinking about homesteading as well!!!
Hi, Kendra,
Crystal, from Mobile Home Living, sent me.
You’ve done a FABULOUS job! I just signed up for your email list so I hope to see more.
— Suzanne
Thank you, Suzanne! I hope you also found your way to my articles on our fixer upper home project, and the no-cost makeover I did to my boys’ room 🙂
Fantastic job!! You are such an inspiration!! Thank you!!
I love, love, love this! I’ve been redecorating my house as well lately and trying not to spend anything. So hard, but worth it. You’ve done a fabulous job…keep it up! 🙂
I love how you do so much with so little – I’d love to see what you could do with some cash…at my house! lol The laundry room looks awesome!
LOL, thanks JustAChick 🙂 I love a good creative challenge.
Thank you so much for sharing your redecorating ideas. What an inspiration you are…
You have a lovely home.
Starry
You go girl! Absolutely Lovely 🙂
You’ve inspired me! It looks great. My dryer hasn’t been working too great lately, so I have been looking at those dryer racks. I just didn’t have anyplace to put it. I didn’t think about getting rid of the dryer! Thanks for the inspiration.
Just found your blog today and I am in LOVE. Your home is amazing. What a testament to creativity and ingenuity. Your laundry room is wonderful. Can’t wait to read back through your posts.
Thank you Theresa 🙂
I love this! Toile is my favorite fabric!!! 🙂 I’m just itching to get some to go in my kitchen…but no $$! lol ;D
Great job! I love it! 😀
Kendra,
VERY impressive!! And all for free! By the way, I love what you did to cover the filtration system. Who says going off grid and being frugal has to be ugly? This is beautiful!
I LOVE this post. You have a nice sense of style. Wonderful transformation to the room. I got the link from your husband on Facebook, and originally read your preparedness post. I am at the stage where I am just entering into the world of gardening, food canning and preservation, more for an economical reason, but I find your thoughts very interesting. I’m sure I could pick up a few tips from some of your posts. I look forward to reading more. 🙂
Ashlee,
Glad Jerry sent you my way 🙂
LOVE IT!!! You’re awesome and so creative!
Thanks you guys, for all of the sweet compliments!! 🙂
I’ve got a quick question.
Where do you dry your sheets and blankets and other big things? That’s one thing that’s held me back from line drying as much because I have so many young kids in so many beds and, um, winter weather to work around (as in, bedding cannot be out of commission for the week+ it would take to dry since we don’t have extras of the bulky things like comforters).
Lanna,
Believe me, I totally understand. My Titus has decided he’s gonna be a bedwetter again (which stinks ’cause he was totally done with that for like a year!), so EVERY DAY it seems I’m washing sheets, a pillow case, and the two or three blankets he insists on sleeping with. Ugh. He’s in a toddler bed with obviously smaller sheets, so the smaller more lightweight stuff hangs on the racks indoors. The blankets get hung outside. Yes, I even hang when there’s snow on the ground. The only time I do not hang outside is during precipitation or absolutely freezing temps. I’ve found that even though it’s really cold outside, the sun still does its job. If it were raining for a week, the floor drying rack I have in the laundry room now is large enough to handle two blankets. I can also drape a blanket over the shower curtain rod.
That’s what I do anyways. If I were absolutely desperate I would string a line across my husband’s work building outside If you have a basement or garage you could run a line across the room there.
Hope that helps!
You are awesome at decorating!!!!
So cool that you have a clothes drying rack instead of a dryer. That is how it is at my house too. I love to see others that have gave up their drier. It is right not only for your wallet but for the environment as well.
Love it! This reminds me, i really should spend the weekend cleaning my laundry room… ugh
Wow!!! What a wonderful job you did! So clean and crisp!!!
If you ever change your mind about the dryer, think about this: Have your hubby buy a can of white appliance paint and spray that dryer white! It will look prettier next to your white washer!
I use both my clothes dryer AND two floor rack dryers…I just collapse these when not in use. Plus, I hang clothes outside on the lines strung between trees in the beautiful weather. You CAN have it all! Your family is growing so hang on to that dryer!
You inspired me today to create a plan for getting a kitchen window and a kitchen door’s window dressed. I’m doing this on a little money instead of zero money (because I have a little money for this project). So today I read your blog, then I went out and bought some clearance table cloths by Waverly and will cut these up as my fabric to sew curtains. I was able to get a floral fabric and a plaid fabric by the same manufacturer, so this will give some cottage farmhouse charm. It is something that needed to be done, and today you inspired me to develop a plan, go get the few things I needed, and this weekend I hope to make it happen.
You are indeed Sunshine on this snowy day!
God bless you and your dear family
Awww, thanks Saving the Canning Jars!! And thanks to everybody for your sweet comments. I am so blessed to know that I’ve inspired some of you to get creative in your own homes 🙂 Sounds like you guys have great plans ahead of you!!
great job! I don’t know about going without the dryer in the winter! I love hanging my clothes in the warm weather…You have done wonders with this area!
that looks SO nice!! just seeing the finished pics, i’d never have known that it was a zero dollar budget makeover. you are VERY resourceful! and you have a great eye for what things could be with a little tlc.
i think you are wise to get rid of your dryer. look at all the space you gained! i like to line dry my clothes all year round too. it’s better for the clothes, better for the environment, it’s just better!
GREAT job! i’m so inspired!
AWESOME JOB!!! You have inspired me. I think I will remove my dryer from my laundry room. I have two clothing lines and one dryer rack. I use them all the time but, must admit on occasion I give in and use the dryer. Removing it will keep me from doing that and create so much more room in my laundry room. I am going to try to do a laundry room makeover using no monies and only with what I have on hand. Hmmmmm, Where is that gallon off white paint I purchased off the clearance rack last year? On my way out to the workshop to find it:)
There is a website for making different furniture. All the plans are free the lady (Ana White) that comes up with the plans just asks that you not use the plans to make furniture to sell and that you post pics to her brag board of what you made. Check it out it might give you ideas for your shoe rack. http://ana-white.com/
By the way awesome job on zero dollars spent the room looks great.
Thanks you guys for the links to ana-white.com. She’s got some great stuff on there!!
Nothin’ better than purging disfunctional, ugly things out of your home. Congratulations 🙂
Nice job and very industrious. I remember that room. I was afraid that my shoes would be ruined and turn mud red. Next time I come, I won’t have to worry about my shoes. Great job and best of all it was free.
Papa
(Ad lib from Mimi-I wish you could transform Papa’s garage. This would really be a challenge!)
It looks fantastic! I’m so proud of my WONDER WOMAN! I don’t think there is anything Kendra can’t tackle & make it a success. AND WITHOUT SPENDING A DIME.
Great job! You are so creative and it looks so nice. Your laundry room is about the size of mine. It is hard to fit so much “function” in such a tiny space. You did well!
I love it! I did something similar with our play room! I’m really enjoying your blog!
Love, love, love it! I’m like you, can’t focus with disorganization around! Well done, Kendra!
That looks fantastic! I can’t function in chaos either and to me the kiddos seem to do much better when everything has a place to go. Now I just have to get them to put things in those places! I think I’m motivated to do a zero budget re-do of our basement now!!! Time to go ransack Mom and Dad’s attic!
Looks great, Kendra! And what a wonderful feeling of accomplishment you must have! Do you ever find yourself picking up some odd thing at a garage sale or somewhere, and you really don’t know why you’re getting it, you just know that you like it or feel that you’re “supposed” to get it, and you don’t even know what you’ll use it for? That happens to me occasionally, then I’ll put it away since I really don’t have a use for it at the time, then later when I get a project idea, I’ll suddenly know what to use that item for? Kind of like God’s helping me out behind the scenes, you know? Or maybe that just sounds silly, but that’s how it often seems to me. Anyway, I think your room turned out great! Good luck to your husband on the shoe rack–good idea to make better use of space by putting the wood underneath!
awesome!!!! You really did a great job. Have you ever been over to Knock off wood? Seriously awesome. http://www.ana-white.com she gives you the plans to make pretty much anything, including a closed pull out drawer thingy for shoes!
It looks amazing, good work! You should make another rug out of scraps for everyday dirt, and just wash it when it gets dirty.
WELL DONE!!!!
Ah! You’re amazing. Come do my whole house! 🙂
It looks AWESOME.
And some day, I really should send you some pics of my poor laundry room. I ga^e up on it 5 years ago. LOL
Hugs, You did a great job.
It looks fantastic! And all the fabric really makes it warm and inviting. 🙂
Awesome! I may have to redo my laundry room now!