Asparagus is one of my favorite – and one of the easiest! – vegetables to grow. It is one of the few perennial vegetables that can be grown in most climates, and can easily provide you and your family with food for fifteen or more years.
In fact, many older homesteaders I know claim that their little patch of asparagus has been producing spears for over twenty years!
You can grow asparagus just about anywhere, but it thrives in areas that have solid winter ground freezes or particularly dry climates.
The only places it’s next to impossible – though not totally impossible – to grow asparagus are super wet areas, like Florida and the Gulf Coast. Asparagus doesn’t like to get its feet wet!
Table of Contents:
Asparagus Fact Sheet
| Genus | Asparagus |
| Scientific name | Asparagus officinalis |
| Height when mature | 40 – 60 inches (100 – 150 centimeters) |
| USDA hardiness zones | 2 – 11 |
| How long until the first harvest? | 3 years |
| Annual or perennial? | perennial |
Why You Should Grow Asparagus
Asparagus, one of the first spring crops you can harvest, is incredibly nutrient dense. It is high in vitamins B and C, as well as crucial nutrients such as calcium and iron.
Homegrown asparagus is healthier for you than store-bought varieties, especially because it is fresher and typically not sprayed with pesticides or other dangerous chemicals.
Asparagus is one of the healthiest vegetables you can eat. A popular vegetable used in dishes around the world, asparagus is low in calories and high in taste. It also contains tons of essential minerals, vitamins, and antioxidants.
Just a half cup of asparagus contains:
- 20 calories
- 2.2 grams of protein
- 2 grams of fat
- 1.8 grams of fiber
- 12% daily recommended Vitamin C
- 18% daily recommended Vitamin A
- 57% daily recommended Vitamin K
- 34% daily recommended folate
- 6% daily recommended potassium
- 5% daily recommended phosphorous
- 7% daily recommended vitamin E
It also contains tons of other micronutrients, like zinc, riboflavin, and iron. Because of asparagus’ high nutritional content, it is widely viewed as a “superfood,” helping to treat the following conditions:
- Prevents cancer and reduces chronic inflammation
- Lowers blood pressure
- Helps promote digestive regularity and overall digestive health
- Reduces your risk of high blood pressure and diabetes
- Helps support a healthy pregnancy
- Can help you lose weight
- Reduces your likelihood of contracting a cold or flu virus
It does take some patience to grow because it doesn’t become fully established for around three years.
However, with a little bit of dedication, careful vigilance, and thoughtful harvesting, you can have a bounty of delicious, nutritious asparagus year after year.
Asparagus Growing Stages
There are only three stages of the asparagus plant lifecycle as it develops:
- The crown stage (which you plant in the ground).
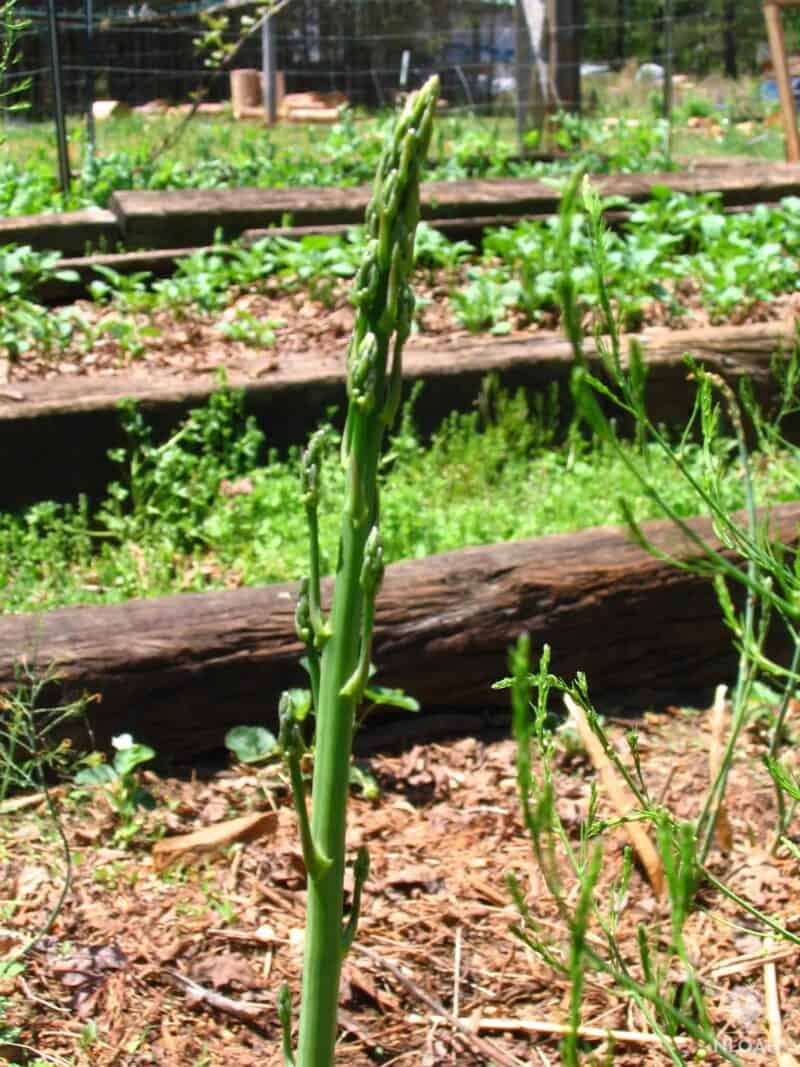
- The spear stage.
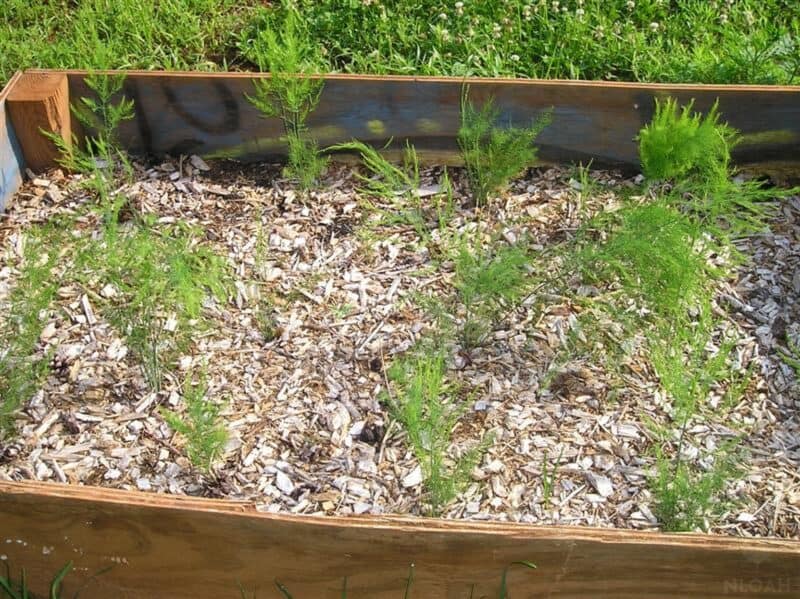
- The fern stage (you’ll be pruning the ferns in the fall).
- The dormant stage (in wintertime).
Planting
Asparagus plants like to receive full sun, although it can tolerate some shade. Sun helps the shoots develop more vigorously and also helps to reduce the likelihood of disease.
Again, since asparagus doesn’t like to be in shadier areas, too much shade can cause diseases and fungi to flourish, as the plants never fully dry out.
You should try to plant your asparagus in an area that warms up quickly and drains well. It’s important to plant in nutrient-dense soil as soon as the ground is workable.
You want to make sure you set your crowns in soil that has been amended with compost or other organic fertilizer, like compost tea. You won’t be able to add much compost after you’ve planted the asparagus, so you want to give it a good foundation for the next fifteen or so years of growth.
The best way to plant asparagus is in a specially- dedicated bed. This way, you can make sure that you won’t accidentally till or hoe up your asparagus while you’re preparing planting beds next spring.
Remove all perennial weeds and roots, and add plenty of compost. Consider a simple raised bed about four feet wide, or fence off a particular area of the garden so you know exactly where it is next season.
Now, you can choose to start asparagus from seeds, or from crowns. Starting asparagus from seed prevents the likelihood of transplant shock, which you have with nursery-grown crowns, and is also much less expensive.
Seed-grown asparagus plants can also produce terrific yields that surpass those of bare-root plants. However, seed-starting asparagus is extremely challenging.
If you live in a northern climate, you should start your plants inside in February. Sow seeds in newspaper pots, with only one seed per pot, and make sure they are in a sunny location.
You should also provide some sort of lower heat, like a heat tray, to help the seeds sprout. They need temperatures of nearly eighty degrees in order to sprout!
Once the seedlings have emerged, you can lower the temperature. Seedlings can be planted once the last frost has occurred.
When you order crowns online or through a seed catalog – or if you purchase them through a nursery – you will likely receive year-old crowns that have well-established root systems.
Don’t be tricked by companies that offer to sell you two-year-old crowns. While a one-year-old crown is a bargain because you will have a head start over seed-started plants, a two-year-old crown won’t be as hardy and is more likely to suffer transplant shock.
When you receive your crowns, plant them immediately if the ground has warmed up. If it hasn’t, warp them in sphagnum moss or pack them in loose dirt until you are ready to plant. Don’t wait more than a few weeks – these crowns are incredibly delicate.
There’s no hard-and-fast rule for how much you should plant – it does not depend on nearby asparagus plants for pollination – but a good rule of thumb is to plant ten plants for every person in your family.
Asparagus takes a long time to get established, so you want to make sure you have enough to last for years to come.
To prepare the planting area, dig a trench about eight inches deep and a foot wide. Place some compost in the bottom of the trench, forming a small mound.
Insert the crowns, about a foot to two feet apart, atop the mounds. Use your fingers to separate the roots so that they sprawl across the piles. Then, cover the crowns with a couple of inches of soil, and then fill in the rest of the trench with the remainder of your compost.
Within a few days, your spears will start to emerge. Cover them with more compost as they arise, and make sure you are pulling more weeds and adding small amounts of compost.
Best Asparagus Varieties
There are several different high-quality varieties of asparagus you can plant, but what you should remember is that asparagus plants are monoecious.
This means that each individual plant will either be male or female. Some varieties are consistently more one “gender” than another.
Jersey Knight and Jersey Giant produce primarily male plants. Male plants are generally more productive because they don’t have to use some of their growing energy to produce seeds. If you want a high yield, an all-male asparagus variety if the way to go.
Up until the last couple of decades, when you purchased asparagus plants, you would receive a mixture of male and female plants. Now, many asparagus plants can be purchased in male-only varieties to improve your yields.
There are also multicolored asparagus varieties. These are great if you have a hard time getting your kids to munch on green vegetables!
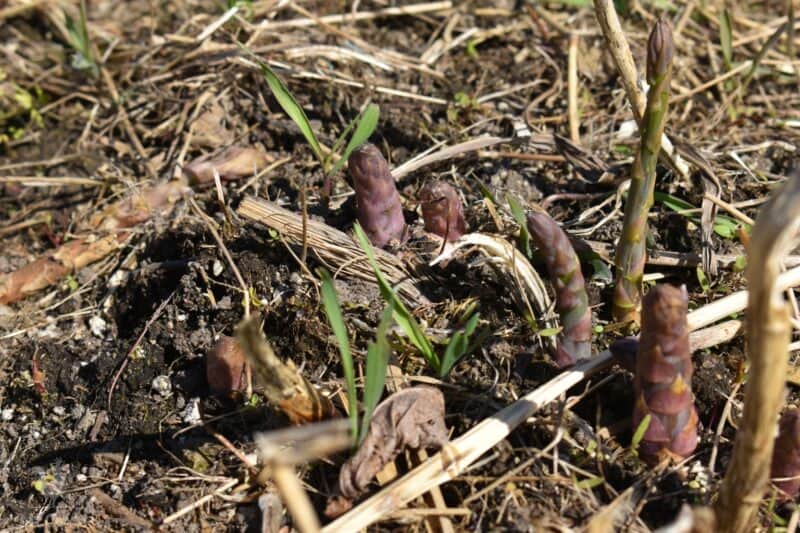
Heirloom asparagus varieties as well as purple plants, like Purple Passion, are fantastic for adding some colorful variety to your diet. Plus, if you plant multiple varieties of asparagus, you’ll have plenty to preserve in the upcoming seasons.
Some people also enjoy white asparagus, which has a milder flavor than green asparagus. I used to think that this was a separate variety of asparagus altogether, but it’s not! You can make white asparagus from any variety simply by blanching the spears. To do this, all you need to do is mound soil or mulch over the bed just before the spears emerge.
Apollo is another asparagus type to consider. This plant performs well in cold and warm climates alike and is very disease resistant. Another disease-resistant asparagus type is UC 157.
This hybrid asparagus plant performs quite well in warm weather and offers both male and female plants. Viking KBC also offers a mixture of female and male plants, and it produces exceptionally high yields.
If you are looking for an asparagus plant that will resist most common diseases, like fusarium rust, you should consider Atlas. This vigorously growing variety of asparagus resists most diseases and can perform quite well in hot temperatures.
Mary Washington is a popular heirloom variety of asparagus. It grows long, deep green spears with purple tips. It produces in a very uniform fashion and is a favorite of American gardeners.
Precoce D’Argenteuil is a less common heirloom variety in the United States but it is commonly grown in Europe. It produces exceptionally sweet, rosy pink stalks.
How to Care for Your Asparagus
It goes without saying that you should be careful to water your asparagus throughout the growing season. Asparagus likes to stay moist, but be careful about overwatering, as it’s easy to kill these delicate plants with too much water.
You can also continue to add compost every few weeks during that first season. Whatever you do, do not harvest your asparagus yet! It may seem tempting to pull a few tasty shoots to nibble, but it’s not ready yet, and harvesting your asparagus prematurely will ruin all of your hard work.
You can add mulch around your developing asparagus plants to help conserve moisture and reduce weed production. Just make sure you wait to mulch until after the spears have appeared.
After the asparagus has been in the ground for a year or so, you don’t have to worry about weeding too often, as the spears tend to crowd out most weeds.
They will also develop super long, fleshy roots that extend deep into the ground, so they’ll be hardier against drought and overwatering.
The same theory applies to fertilizing. After the first season has passed, you really only need to add a small amount of fertilizer, and just in the spring. Simply add a liquid fertilizer like compost tea to the tops of plants, or add a side-dressing fertilizer such as packed compost.
Once autumn arrives, it may appear as though your plants have died. They haven’t!
They are simply going to enter their dormant stage. What you need to do next is mulch them heavily to protect them from the approaching winter.
Remove all the dead pieces of asparagus and then cover the plants with two to three inches of mulch. You can use any kind of mulch you would like, but some of the best types include leaf, straw, or hay mulch.
Asparagus plants are usually able to weather whatever winter throws at them, but you might notice that your plants become soft or withered throughout the cold months.
If this is the case, they can be frost-damaged. Adding more mulch can often help to mitigate or prevent this problem altogether.
Common Pests and Diseases
The following spring, you might notice that there is still fernlike foliage remaining on the plants. Get rid of these by gently pruning them off. This growth can harbor diseases and insect larvae between growing seasons.
Common diseases that affect asparagus plants include Fusarium wilt, which causes lesions at the soil line, and crown rot. Both diseases can be prevented by practicing good garden sanitation, both during the growing season as well as between seasons.
Asparagus aren’t frequently affected by pests, but you may notice them more once the asparagus has produced green, healthy foliage.
This foliage is absolutely necessary for your asparagus plants to produce strong roots and a bounty of spears, but it is also attractive to pests.

Asparagus beetles are the most common pests. They chew on spears in the spring and can be removed by hand-picking or by dusting with homemade insecticidal soap.
You might also notice the asparagus miner, which produces zig-zag-like tunnels on the spears. This pest, unfortunately, can only be removed with the complete eradication of the infested ferns.
Asparagus aphids are also common. These pests look like dark flies with pale spots, and you’ll be able to see them in your asparagus bed with ease.
They are most common between April and July, and because these pests lay their eggs on the tips of young stems, they can reproduce rapidly and cause your affected stems to die prematurely.
Using an insecticide and removing leaves in the winter will reduce your risk of infestation.
Botrytis is an unfortunate fungal disease that causes your asparagus leafage to die too soon. When this happens, your asparagus plant is unable to store nutrients for the following season.
You might see this fungus appear at any stage of your plants’ development, and you may need to utilize chemical control. Engaging in proper watering techniques can help prevent the disease from setting in.
Another common disease is fusarium root rot. This illness is a soil-borne fungus that will cause your plants to turn brown, wilt, and experience stunted growth.
You might see oval-shaped rot spots on the fleshy roots of the plant, and even the hair roots will die. Usually, disturbing the ground layers and water in the roto zone cause this disease.
Starting with healthy plans and rotating your crops each season before you plant asparagus can help prevent the likelihood of infestation.
Can You Grow Asparagus in a Container?
If you’re pressed for space, know that you can easily grow asparagus in a container. It makes a wonderful addition to a kitchen garden and once your plants become established, you can expect a healthy crop for years on end.
Although asparagus will grow best outside in zones 4-8, you can grow asparagus in tight spaces, too.
However, keep in mind that the plants will require a few years to get established and that this can take even longer when you are growing in asparagus.
To grow asparagus, you will need to select a container that is at least 18 inches deep and 12 inches wide. The larger the container, the better, as you must plant the crowns quite deeply.
If you don’t have any existing drainage holes in the bottom of your container, cut some. This will prevent root rot and other fungal growth. Fill the bottom two inches of the container with gravel and then add potting soil and compost to fill the container.
You should place the crown in the container by following the instructions, usually about six inches deep. Water the crowns well and put them outside in a sunny location that receives at least eight hours of sunlight each day.
Your shoots should appear within a week. Let them grow and become established during the first two seasons.
Even though you are growing in a container and won’t have to worry about weeds, you should still mulch around the shoots to make sure they retain moisture appropriately.
You can leave these hardy perennials in containers outside throughout the fall and winter – just remember to mulch if there’s a frost or freeze.
Otherwise, your dormant plants will start growing again in the spring when the weather warms up.
Harvesting
This growing and maintaining process will essentially repeat itself over the next two years. This will allow your asparagus crowns to become well-established.
After the third season, it’s safe to harvest a few spears at a time from each crown, but you should only cut spears for a few weeks at a time during the growing season – don’t cut more often, as this can stunt the plant’s growth.
Once you’re well into your fourth year, you can start harvesting spears in early spring and continue for about six to eight weeks. Stop harvesting when the plants become thinner in diameter than a lead pencil.
This is usually sometime in midsummer, but this depends on your climate, of course. Once your plants are several years old, you may find that you need to harvest spears every few days, or even a couple of times a day!
When you begin to harvest asparagus, be careful doing so. Cut spears that are six to eight inches at ground level. Don’t break the spears off below the ground, as this will cause irreversible damage to the crown.
You’ll know your harvesting season has passed when the spears produce pretty yellow flowers.
At this stage, your asparagus will look more like a fern than a vegetable. Then, all you have to do between seasons is re-mulch, and wait!
How to Use Asparagus
Asparagus is highly versatile and nutritious for families. You can eat it raw, steamed, baked, or in recipes like pasta, soups, or salads. I like to blanch and freeze my asparagus, although many people also can it once they have a big enough batch.
Keep in mind that small spears are better tasting than large ones, so once your asparagus has become well-established, the more frequently you can harvest, the better.
This beauty isn’t just delicious – it’s also extremely attractive. Many people use asparagus as an ornamental plant, lining their beds, hedges, or borders with these babies to create a show-stopping appearance when it produces gold foliage in the fall.
What uses do you have for asparagus? Did you have a hard time getting it started?


Rebekah is a high-school English teacher n New York, where she lives on a 22 acre homestead. She raises and grows chickens, bees, and veggies such as zucchini (among other things).
I live in South Florida. My asparagus plants are 2-3 years. I’ve let them all go to ferns but not sure what to do with the ferns. It’s now almost May. should I leave as is? and trim back next winter for spring harvesting?
Thanks for the article!
I have two beds of asparagus that are several years old and doing very well.
I have transplanted and cut back asparagus at every stage of growth with good success. It just wants to live. When we lived in northwest Arkansas, my husband dug some up from the side of the road in summer and brought it home. We planted it and it did great. It wants good, deep, fertile soil, but will persevere where ever it winds up. You can harvest it until it is the size of a pencil, then let it grow unmolested and allow its roots to build up next years crop.
I have heard of a way to extend the harvest by harvesting 1/3 of the planting, letting the rest grow. When the first cutting is done, go to the 2nd 1/3 and cut it to the ground. Harvest it until the shoots become the size of a pencil, then let it grow, go to the last 1/3 and proceed as before.
I started off with closer to 125 plants back in 2008… I was trying to garden my stubborn little girl out, but she wasn’t having any of it. She decided to wait until 41w6d before making her appearance, but the garden sure was planted up nicely that spring (now, the weeds took over after that, but still). I like asparagus, just not the $3-$5/lb price around here.
Kendra, I just let ’em go a la Euell Gibbons’ experience. I’ve tried transplanting some as I wanted to use the former-asparagus space for fruit trees, but then at my elderly folks’ apple farm they have random asparagus popping up underneath all the trees (!! talk about multipurpose!) and they all co-exist nicely together. So I’m just leaving the rest of asparagus there. I figure mother nature will thin ’em out if need be, plus when you start harvesting they don’t get near as floofy and Christmas-tree looking. It’s really a trip when those ferny asparagus ‘trees’ get taller than my kids.
As for the male/female thing… I don’t really yank female plants. I know some folks do (like farms) because they prefer the bigger, wider asparagus stalks to the skinnier female ones. Granted, it is nice to have a bigger harvest, but my yard’s such a smaller scale that I’m good with half my 100 plants being girls (plus then I can still collect seeds when I want to!).
Lanna,
I’m not sure how many plants I have out there right now, but YOU GO GIRL- 100 plants! I guess I’ll just leave them until Spring, and maybe I’ll thin the females to make room for more males eventually 😉 Thanks again for your advice!
I’m with Jessica – we will see if mine survive after having 17 chickens scratching at them over the past month! DOH! Why did I let them in there? Good thing I have seeds that I can plant and then fence in the area next Spring. Good luck with yours. Already alot of great info from Lanna (thanks Lanna!).
I agree to wait until they are brown and die back before cutting them. If you wait, you may notice the red berries. These grow on the female plants. The male plants are the ones that produce asparagus and those are the ones you want to keep. I let mine go to seed and move the babies in the spring to make sure there is enough space for them all to grow. Best of luck!
Jenny,
I have noticed at least one of the plants with berries at the top. Thanks for the advice!!
I have always just let it go. New asparagus will pop up in the spring. I have cut the old stuff down in the spring if it did not die back, but most of mine usually did. I have transplanted it several times after it was established and it has always thrived. Now if it will thrive even when the new puppies have dug up parts of it, I will be really impressed!
We were told to leave it till spring and just before the last freeze trim it down., that signals for them to start growing again.
Thanks, Cris!
They’ll start turning yellow/shrively/dying back (like those ones on the corners) once you have a hard frost or two. It’s totally fine to leave them and just cut off the above-ground stuff in the spring. If you have a certain type of bugs down there, I know some folks take their flame thrower and take care of the tops and the top layer of soil to make sure whatever critter it is keeps their distance.
I’m kind of slow/lazy, so some of the old ferny stuff doesn’t get pulled/culled out until some of the new asparagus shoots are 4-8 inches tall. That’s how I’ve ended up with some new asparagus self-seeding itself every so often, by just leaving it there to do it’s thing (Mother Nature’s smarter than I am, that’s for sure).
If you have some female plants, you should have red berries somewhere around there. If you want, you can collect the berries, and bust ’em open to collect/dry the little black seeds for later.
Thanks, Lanna! That’s really helpful. Do you know anything about thinning them out? It seems like I’ve heard something about only having so many male/female plants, and pulling the rest. Do you know? I haven’t had much luck looking online.
I have some asparagus that looks just like yours. I can’t wait to hear what the comments are because I don’t know what to do with mine either. It’s so pretty, I thought about using some of the tops in a flower arrangement.