Tallow? Before I get into the “how to”, let me first answer a question many of you are likely pondering at this moment.
Tallow is another name for rendered beef fat. Rendering tallow is the process of taking the hard fat from the cow, mainly from around the kidneys and loin area, and turning it into a shelf-stable fat that you can cook with, add to animal feed, or even make soap and candles.
At room temperature it is solid, and can be stored without refrigeration for extended periods of time.
Here’s a fun fact – tallow isn’t the only animal fat you can process yourself at home. You can also render other fats, too. Rendered pig fat is called lutter, rendered butter is ghee, and rendered chicken fat is schmaltz.
People have been rendering their own fat for centuries but the process is one that has fallen out of popularity in recent years.
Vegetable oils took over as it’s much easier to buy a gallon of canola oil at the store than it is to render your own fat! In many cases, though, tallow is healthier than vegetable oil, since it’s far less processed.
Especially when made with grass fed beef from a local farmer or a local butcher, homemade tallow is higher in many vitamins and minerals, including vitamin A.
It is also quite affordable – and easy to make.
What Is Tallow Good For?
Tallow is a very stable fat, perfect for frying. Traditional cultures value tallow for its health benefits (it’s one of the good fats for your body).
I use it when I fry eggs, turkey bacon, and chicken sausage. I just put a tbsp or so in the pan as it heats up, to help these foods cook without sticking to the pan.
I also use tallow to season my cast iron pans, and to keep them greased after each washing. If you do any deep frying… I came across a hush puppies recipe I wanna try… tallow is a perfect fat to use for that as well.
Tallow has numerous benefits. It’s a great source of conjugated linoleic acid, or CLA. This is a fatty acid that can help with fat loss, ironically. It’s also rich in vitamins E, D, A, and K. It has a high smoke point, making it good for frying (as mentioned above).
Since you can grow your own animals and render your own tallow at home, it’s also more local and sustainable than other kinds of fat.
Where Can I Get Beef Fat?
Every year we buy beef in bulk from a farmer friend who sends his steers to the butcher for processing. They trim the fat from each cut of meat, and package it separately. I always request the fat from our portion of the order.
If you don’t have access to a farmer, the meat section at the grocery store might have some fat laying around that they wouldn’t mind letting you have. Doesn’t hurt to ask!
Of course, you can also raise and butcher your own cattle for tallow, too. Ideally, you will want to make tallow made out of the leaf fat of an animal. It is the mass of fat that you’ll find around the kidneys of an animal. It is cleaner and more mild tasting than other kinds of fat.
If you do your own butchering, you’ll find this fat, again, around the kidneys. It looks somewhat waxy and can usually be pulled out in one fell swoop. Just refrigerate it or freeze it until you are ready to render it down.
How Long Does Beef Fat Take to Render?
Rendering beef fat is a process that can take anywhere from a few hours to a few days, depending on how much fat you are rendering and the method you are using. If you are rendering a large amount of fat, it will take longer than if you are only rendering a small amount.
Additionally, if you are using a slow cooker or crockpot to render the fat, it will take longer than if you are using a stovetop method, but you won’t have to babysit it. The important thing to remember is to cook the fat slowly and gently, so that it renders properly and does not become charred or burned.
Rendering Tallow: Two Methods
I rendered beef tallow for the first time last week. I’ve had a little over 10 lbs of fat sitting around in the bottom of our freezer from the last time we bought 1/4 cow from our farmer friend, which I’ve been needing to process.
We’ll have another order of beef coming to us in about a month, so I’ve been working my way through the freezer, trying to make room for the new meat.
It sounds a little intimidating at first, but rendering fat is super easy. Basically you’re just melting it down, straining off the impurities, and storing it up for cooking, soapmaking, or candles.
Here’s a little pictorial…
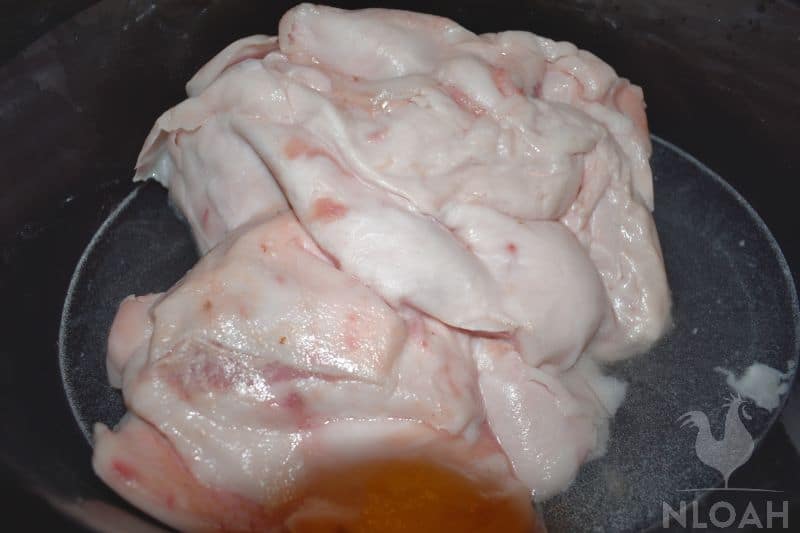
This is what the fat looks like when it comes back from the butcher:

It’s vacuum packed in plastic to keep it from getting freezer burn. I had to let it mostly thaw out in the fridge overnight before I could start cooking it down. I’m lucky because my butcher cuts it into chunks for me. However, if that’s not the case, you’ll need to chunk it up yourself.
You do want it to remain partially frozen so that it’s easier to cut into chunks. Ideally, you should cut the fat into 1-2″ pieces so that it melts down more quickly.
Some people recommend that you cut off any meat from the fat before melting it down, and other people say not to bother because the meat will just cook off. I went with the middle ground and cut off meat if there seemed to be an excessive amount on the fat, leaving the minor stuff alone.
There are essentially two methods you can use when rendering tallow – the crockpot method and the stovetop method.
I decided to try rendering in the crockpot and the stovetop to see if there was any difference, or if I had a preference for one or the other.
Rendering Tallow With A Crockpot
For this method, you can use a slow cooker (like a Crock Pot) or a Dutch oven…
Items Needed:
- 5-6 lbs tallow (or whatever you have available)
- Cheesecloth
- A slow cooker
- Clean glass jars (wide mouth quarts work best but you’ll note I used regular in my pictures – it was all I had left after a busy canning season!)
- Water (optional)
Prep Time:
- 30 mins
Cook Time:
- 5- 12 hours (depending on wet vs. dry method)
Total Time:
- 5 hours, 30 mins to 12 hours, 30 mins
My crockpot held 5 lbs. of fat. I recommend rendering as much tallow at a time as you can, since this is a time-consuming and messy activity that you probably don’t want to do every weekend!
There are two ways you can render tallow – a wet rendering and a dry rendering method. There are benefits and disadvantages to both.
Wet rendering is best if you want to leave your fat unattended. When you’re dry rendering, you’ll need to stir and monitor the fat almost constantly.
It is also easier on the fat so it is not as likely to burn it. It does take longer to render, though, and you’ll have to take one extra step to get rid of the water.
Some people say that rendering tallow in this way can cause it to go rancid, but I’ve never found that to be true.
When rendering in the slow cooker, set the temperature on low. If you’re wet rendering, add just enough water to cover the fat.
If you’re dry rendering, all you need to put in the slow cooker is the fat. Let it go for a few hours and stir every few hours. The fat should render out over the period of several hours (up to a day, in fact).
You’ll know your wet-rendered fat is finished when you get the feel that most of the meat chunks have given up all their fat content.
They’ll be limp and lifeless. You won’t have the dry cracklings like you will with the dry-rendering method, so it can be a bit tougher to figure this out.
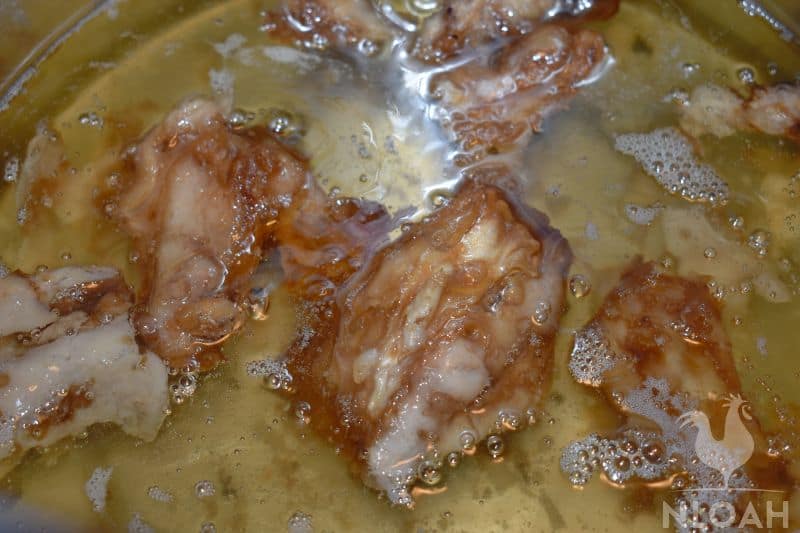
Here’s what the crockpot looked like as the fat was melting down:
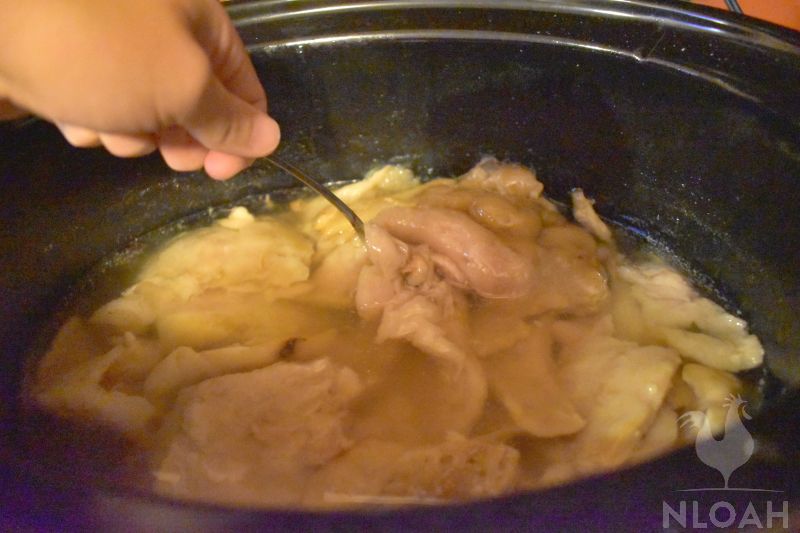
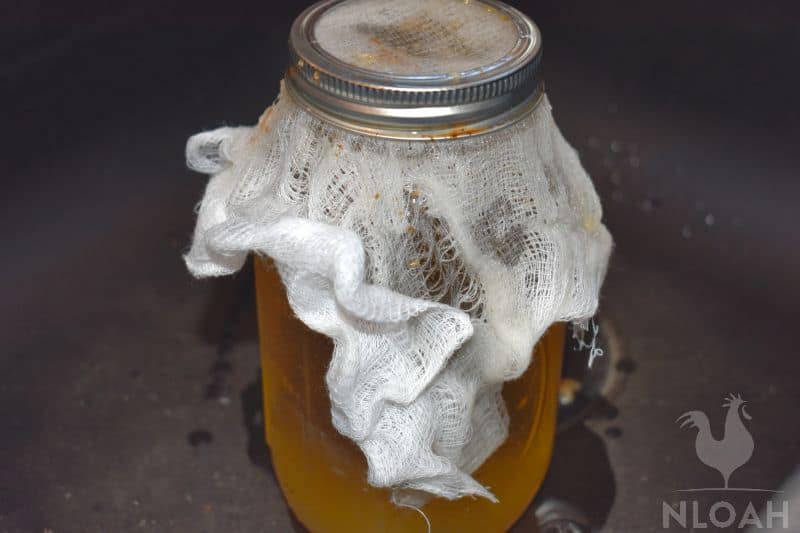
When most of the fat has turned to liquid, strain it through a cheesecloth or a fine-mesh strainer to get every bit of solid pieces out. This is done for both the wet and dry rendering methods:
The only difference is that, when the fat solidifies, there will be some water leftover with the wet rendering method. That’s not a problem – you’ll simply skim the fat off and discard the water.
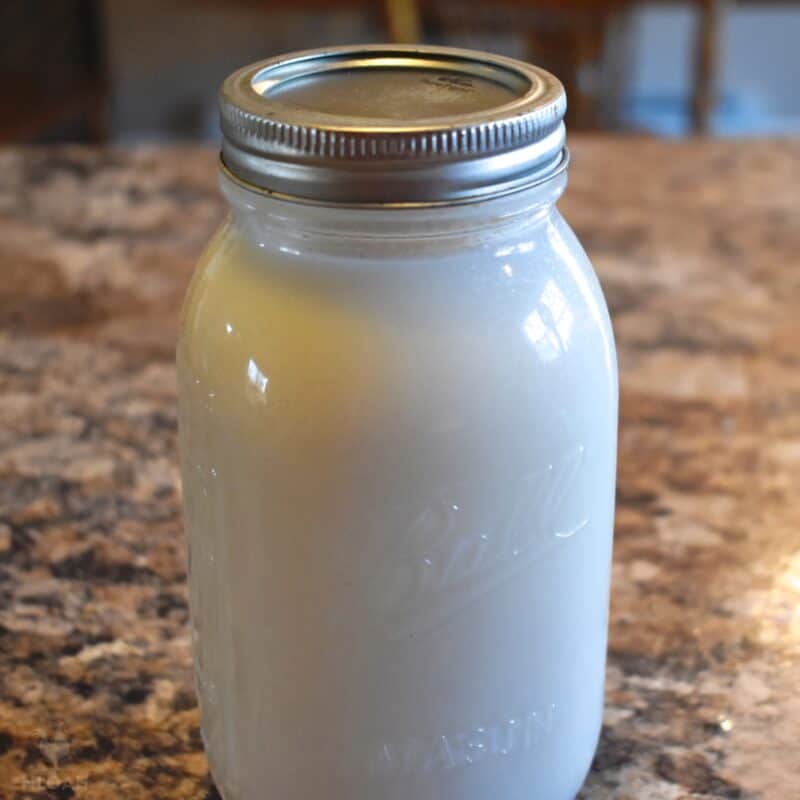
Otherwise, simply strain the fat through cheesecloth into clean quart jars. Let it cool in the refrigerator or at room temperature. It should be a creamy white when finished.
When most of the fat has turned to liquid, strain it through a cheesecloth or a fine-mesh strainer to get every bit of solid pieces out.
I put the leftover fat back in the crockpot for another day and was able to get almost another quart of tallow from it. The meat that remained was cooked, and although it’s safe for you to eat I chose to feed it to the dog- it was still pretty fatty.
Rendering Tallow On the Stove
Items Needed:
- 5-6 lbs tallow (or whatever you have available)
- Cheesecloth
- A large stock pot
- Clean glass jars (wide mouth quarts work best)
- Water (optional)
Prep Time:
- 30 mins
Cook Time:
- 3-5 hours (depending on wet vs dry rendering)
Total Time:
- 3 hours, 30 minutes to 5 hours, 30 minutes
My large stockpot held about 6 lbs of fat. Fill up the pot and turn the heat on to medium.
Agan, make sure your fat is chopped up into pieces. This will help it melt faster. Add a bit of water, if you are using the wet rendering method, but just enough to cover the pieces of fat. Bring the fat to a low boil and simmer it for several hours.
Be careful about bumping the heat up too much. This will cause it to splatter and crackle, burning everything it comes into contact with.
You don’t have to stand by the pot the entire time you’re rendering, but you should keep an eye on it and stir occasionally. In most cases, the lower the heat, the better. This is where using a slow cooker can be advantageous.
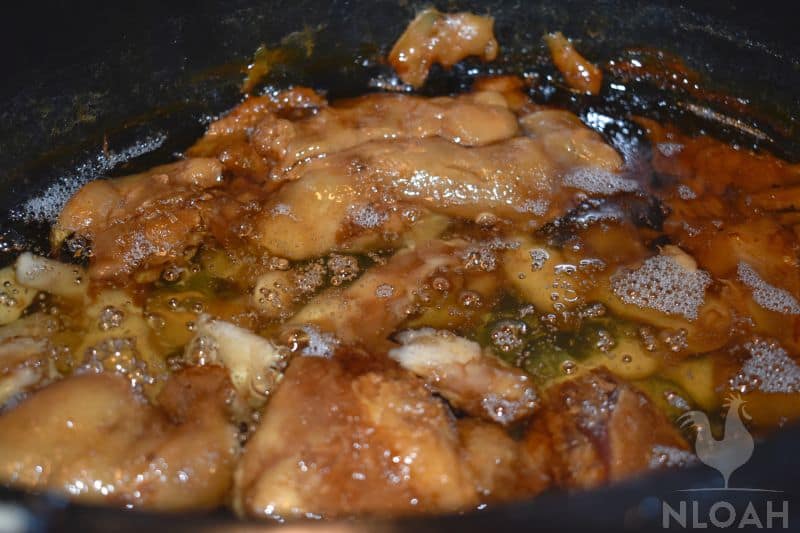
As the fat melts, you can ladle the liquid into containers. Alternatively you can wait until all of the fat has melted and process it all at once. When the fat is finished, the remaining pieces will be translucent and the liquid will be dark.
Take out your trusty cheesecloth and pour the fat through the cheesecloth into your quart jars. The fat that’s leftover is the cracklings. Again, you can eat these or discard them.
Depending on how “clean” your tallow is rendered down, you might want to pass it through the cheesecloth once more to catch any remaining small particles.
Tallow Storage Tips
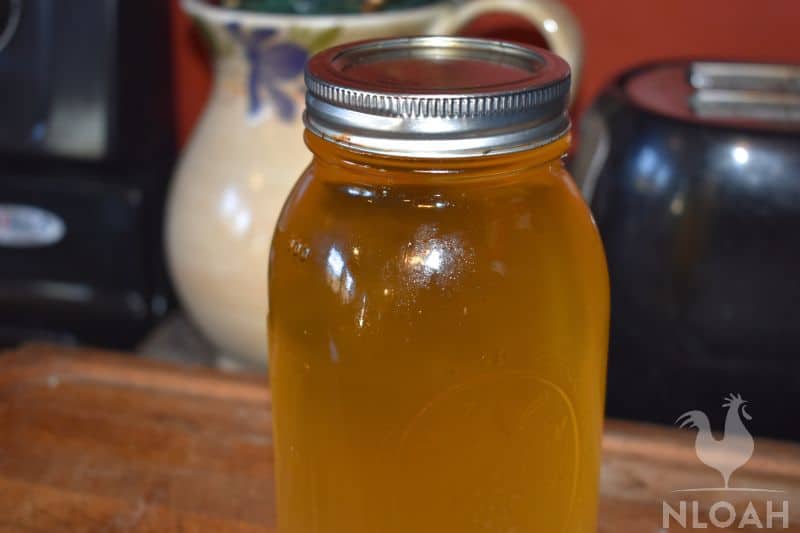
Here’s what the tallow looked like before it cooled. I was worried because it was such a dark golden color, and all of the pictures I’d seen of tallow were white. Don’t worry – it will turn white as it cools.
I put the lids and rings on the jars while they were still hot, so that the lids would seal. Not something you have to do, but I felt like it might help preserve it a little better that way. You definitely want to store tallow in an airtight container to keep it from spoiling.
Let the tallow cool and harden overnight. You may want to put it in the refrigerator to help it firm up faster, but you certainly don’t have to.
It’s okay if there’s some separation when the tallow cools – you might notice the water resting on the bottom of the container with the hardened tallow on top. You can simply separate it off.
I was thrilled the next day when I checked on my tallow and it had solidified and turned a beautiful creamy white. From about 11 lbs of fat I ended up with 4 quarts of tallow.
How Long Does Rendered Fat Last?
Rendered fat will keep for up to six months when stored in an airtight container in a cool, dark place.
However, it is important to note that rendered fat will go bad sooner if it is exposed to light or heat. If you are planning on storing rendered fat for longer than six months, it is best to keep it in the freezer. Frozen rendered fat will keep for up to a year.
If you keep tallow in the fridge it will last longer, though again, it doesn’t require refrigeration. I’ve got most of my jars sitting in my canning pantry, since I don’t have room in the chest fridge for them.
I suppose if they start to spoil before I can cook with them, I’ll use them for another project like soap or candles.
In fact, when used in soapmaking, tallow is great because it helps give the soap a creamier, more stable lather!
If your tallow smells a bit mean like when it’s cooled, don’t panic. Most of the time, that’s not an indication that it’s gone rancid. You just need to melt it and strain it through the cheesecloth again to process it down a bit more. This usually gets rid of the odor.
In addition to storing tallow at room temperature or in the refrigerator in a mason jar, you can also freeze it. If you keep it in the quart jars, leave a bit of headspace to allow for expansion. You can also let the tallow harden and cut it into chunks.
These can be frozen individually in bags so you can use just the amount you want without having to thaw the entire batch.
Can You Overcook Beef Tallow?
While it is possible to overcook beef tallow when rendering it, the process is not as delicate as one might think. The key is to heat the tallow slowly and evenly, so that it has a chance to render properly. If the tallow is heated too quickly, it can become bitter and hard to work with.
However, if it is cooked slowly and carefully, the resulting product will be rich and flavorful. In addition, it is important to strain the tallow before using it, in order to remove any impurities that may have been present in the meat.
Can You Render Other Types of Fat?
While beef fat is the most common type of fat used for rendering, it is not the only option. Pork fat can also be rendered to produce lard, though it of course has a slightly different flavor.
Lamb fat can also be used, although it may produce a more intense flavor. You can also render fat from wild game, like bear or elk.
Render times will vary depending on the type of fat being used, so it is important to consult a recipe or cooking guide. In general, however, the process for rendering fat from any type of animal is similar.
Can You Render Fat in the Oven?
Can you render fat in the oven? The answer is yes, but the slow cooker or stovetop are generally considered the best methods.
Oven-rendering is a slow process, and it’s not the most efficient method. The low, even heat of a Crock-Pot or stovetop renders fat much better.
But if you find yourself in a pinch and need to use your oven, here’s how: Place the fat on a wire rack set over a parchment paper-lined baking sheet and roast in a 200°F oven until melted and golden brown, 4 to 6 hours. (Check it occasionally to make sure it’s not smoking.)
Once cooled, strain the rendered fat through a fine-mesh strainer into a clean jar; discard the solids. Use immediately or refrigerate for up to 3 months.
Which Method Do I Prefer?
Since the rendering process continued through the night and into the next day, the Crockpot ended up being my favorite rendering method. The stovetop worked just fine, but I don’t like leaving the burner on overnight for safety reasons.
Next time I render fat, I’ll throw it all in the crockpot. Although, once we go off-grid I’ll have to start rendering over a wood cook stove or a fire like they did back in the day. A post for a future time.
There is even a method of rendering tallow that involves baking it in the oven at 250 degrees for several hours. I don’t recommend this method, as it requires a lot of stirring and a lot of monitoring to avoid burning the fat. Plus, you’ll probably make a mess of the inside of your oven!
Anyways, those are just my observations. Have you ever rendered tallow? What’s your favorite way to use it? Be sure to pin this to your favorite Pinterest board for later!
FAQ
The exact temperature at which fat renders can vary depending on the type of animal and the method used, but it is typically between 200 and 250 degrees Fahrenheit.
As the fat renders, it will start to turn from a solid to a liquid. You can tell that the fat is fully rendered when it is completely liquid and there are no chunks of meat or fat remaining.
Beef tallow has a relatively high temperature. It will begin to smoke at around 400 degrees Fahrenheit (204 Celsius), and it will reach its flash point at around 500 degrees Fahrenheit (260 Celsius).


A city girl learning to homestead on an acre of land in the country. Wife and homeschooling mother of four. Enjoying life, and everything that has to do with self sufficient living.
Kendra, did you add water in the crockpot cooking method? Ir do it dry? And how long did it take to render?
just a quick word to tell everyone my testimony I never believed in spell casters until my life fell apart when my lover of 4years decided to call it quit. I was so devastated that i had an accident that left me bedridden. After 9 months of emotional pain and languish, a friend of mine introduced me to a certain spell caster, this was after I have been scammed by various fake spell caster. I was introduced to dr_mack@ yahoo. com. In less than 3 days, i saw wonders, my Lover came back to me and my life got back just like a completed puzzle… am so happy.. thanks to dr mack for saving my life.he is the best and kindest spell caster I’ve ever met! Thanks, thanks thanks!!!!!!!
Do you find that tallow leaves a waxy film on food? I haven’t found a food use for tallow yet that I like. I wish it were a better substitute for lard, not that I don’t like lard, but sometimes beef fat is easier to come by. We haven’t tried using it in baked goods yet. Maybe if the fat were incorporated in things it wouldn’t leave that greasy-waxy film.
I’ve rendered pig fat on the stovetop. I imagine the crockpot would take some of the smokiness out of the process. I will definitely try that method next time.
I rendered tallow a few years ago. My husband said if I ever wanted to do it again I’d need to do it outside 🙂 it did smell really strong and unpleasant. I used some to make bread but the flavor was so strong even then that I couldn’t bring myself to cook with it again. I much prefer cooking with lard. But I’m still glad I didit. Such a neat process watching it change from yucky chunks of fatty meat to usable fat. I’d loveto try it with other meats.
Ooops, I forgot to tell you to cover the bowl with plastic wrap then microwave.
You are right, we don’t own a microwave, but good to know! 😉
Hi Kendra, Did you know that you can render lard in the microwave? I think that I remember that you got rid of yours but you can always use someone elses 🙂 I have the butcher grind it otherwise small chunks like you. Start to finish in an afternoon!
Just fill a large bowl with your fat chunks. Sprinkle with 1 tsp of baking soda. (This makes it white as snow) Microwave on high until all the fat is melted. All the fibers and any wierd stuff will float on top. then strain and can. To be extra safe I always waterbath mine for 15 to 20 minutes. it stores great for years. Any jars that look “iffy” after a few years I use for soap or just hang on to for soap or candles later. I have jars that I sealed 15 years ago that still haven’t lost their seal. But I don’t think I’d eat it, ha! Thanks for all your hard work. Oh, and Kenny says hi.
Hi, Kenny! 🙂
When we get a whole beef, it doesn’t come with the fat, but it does come with the bones. I make a really big pot or two of beef broth to can. I include also the short ribs because they have been just too fatty for our liking for meat. I also include make a chuck steak or two for flavor. After the broth is done cooking, I strain out the bones and meat and set the broth outside (I make sure it’s a cold day before I start the whole process) so the fat solidifies on top.
Next I pull off the fat and scrape the bottom if there’s gunk on it. Then I do add it with some water to “wash” it. I repeat the setting outside process. I also save other beef fat from cooking if something has been particularly fatty.
I don’t use it for cooking, but we did make soap last year. It smelled better than my grandma’s used to 🙂
I think I read that from a book I have about making soap. Anyway, food for thought about the leftovers of your cooked fat, I took mine and roll in a little peanut butter to make balls and then hung out for the birds to eat. They loved it. Course I’m sure the dog did as well. Just a thought!
Im wondering if saving that fat that comes from beef chuck that i cook would be helpful.
Karen,
I’ve made candles with leftover cooking fat 🙂 But I don’t think it’s the same as the hard fat you make tallow from.
A few years ago, I rendered a bunch of beef fat for making soap. I did my research on how to and it instructed me to wash the oil after I rendered it down from fat to oil. I followed the process you did up to the point of putting it in jars, then returned it to a pot and for every part of oil, I used 2 parts of water. I cooked it like this for about 2 more hours. Then poured the oil and left over water into a glass bowl, placed in the fridge and left it overnight. Next morning, the tallow was so pretty and white. Tallow to top and water on bottom was dumped. I scraped off bottom of tallow to remove any left over particles that came through my cheesecloth. Yours looks great so not sure if the washing is necessary. You can do chicken fat and pork fat like this too, although I never have. I never knew you could use this fat for cooking and such. Nice to know and I have plenty of tallow still left. Thanks for the information. Amazing how useful basic scraps that most folks toss are to some of us.
Elizabeth,
I wonder if washing it would make it last longer?? I didn’t come across anything suggesting that you should wash, it in my research. Very interesting. Thanks for sharing that!