Either you’ve hatched some chicks out in an incubator, you’ve picked up a few chicks locally, or you’ve mail-ordered day old chicks from a hatchery… Now what? It’s time to build a brooder box!
Actually, in a perfect world you would have the brooder box ready and heating up a day before your chicks arrive.
This will give you plenty of time to play around with the temperature of the box, and adjust any settings to make sure it is an ideal environment for your newborn chicks.
You might consider purchasing a cheap thermometer so that you can monitor the temperature of the brooder directly under the heat source, as well as in the corners.
There are a few very basic things you need to know when building a brooder.
Some people like to make it very technical and scientific, but I’m gonna give it to you in just a few simple steps- because building a brooder box (just like with nesting boxes) doesn’t have to be complicated.
Table of Contents:
What is a Brooder Box?
A brooder box is a small enclosure used to house young chicks. It is typically made out of wood or plastic, and it has a wire mesh top to allow for ventilation. The box is lined with bedding, such as straw or pine shavings, and it has a heat lamp to provide warmth.
Chicks will stay in the brooder box until they are old enough to be moved to a coop or chicken run. A brooder box is an essential piece of equipment for anyone who is interested in raising chickens.
DIY Brooder Box: Comprehensive Tips to Make Your Own
Ready to make your own brooder box? Here’s a list of all the tips you need to keep in mind when building your own (rather than spending the money to buy one at the store).
1. Gather the Right Equipment
First, you need to start by putting together the right equipment. Here’s what you’ll need:
- A container/box (specifics to follow)
- Bedding
- A Heat Lamp and Heat Bulb
- A Thermometer
- A watering base
- A feeder base
- Two 1-Quart Jars (for feeder and waterer)
- Chick Starter Feed
- Baby chicks
2. Choose the Right Container
You could go the more expensive route and buy a heated poultry brooder, but you’d save some money by making your own out of whatever you have on hand if you are able to do so.
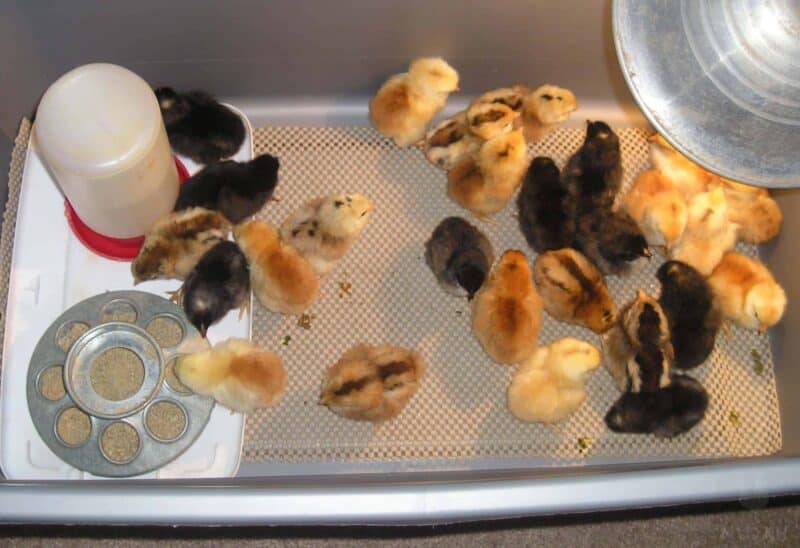
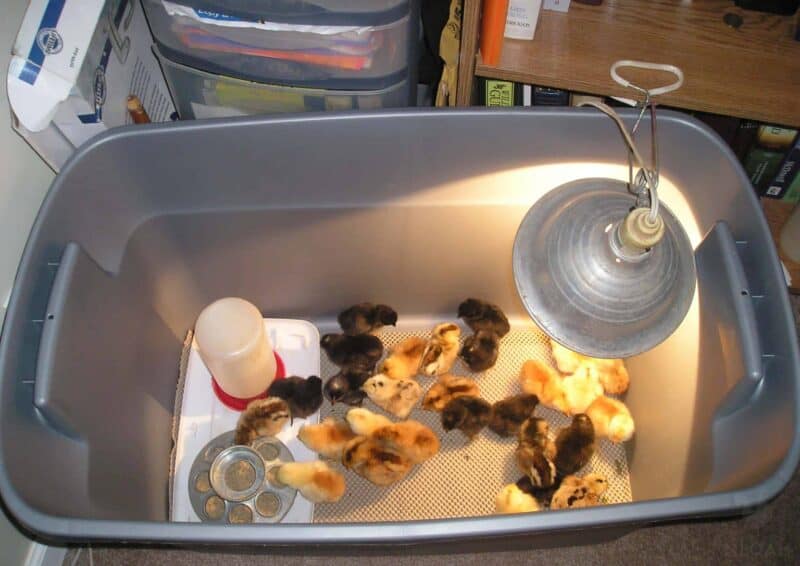
Most people use either a cardboard or wooden box, or a plastic storage tote like I have pictured above. Ideally, you should make your brooder out of a material that will not rot exceptionally fast, and that can be moved easily once your chickens have grown.
However, almost anything about a foot deep will do. Taller is better, because as your chickens grow they will learn how to jump – you don’t want any escapee chickens on your hand!
This is especially true if you are raising your chicks in an area where pets or other potential predators can get at them.
(Side note: In the picture above, the chicks are a little bit too crowded. I actually had more than I expected to hatch out of the incubator, and ended up moving these babies to a larger box. But at least you can get an idea of my setup.)
I’ve seen people make a brooder in a standard bathtub by lining it with plastic, then adding newspapers and pine shavings for bedding. An old baby playpen might also work well.
Kiddie pools are another inexpensive option for a homemade brooder. Practically anything with walls around it will do.
3. Keep Size in Mind
Size- For the first four weeks, baby chicks need about 1/4 square foot of space per chick. From four to eight weeks, baby chicks need 1/2 square foot of space per chick.
I’m not saying you should calculate space needed exactly, but just eyeball it using this recommendation as a general guide, and make sure your chicks aren’t on top of each other in the brooder. If they’re crowded, they can smother each other to death by standing on top of each other.
Crowded chicks are also more likely to become aggressive towards each other. You want to avoid this as much as possible, as pecking behaviors started early can become a major problem later on..
Anything 12″ deep will keep baby chicks from escaping for several weeks without the need for a cover. If you go much less than that, by about three weeks of age the chicks will be able to fly out so you’ll need a cover.
Some people like to put hardware cloth over the top of their brooder to keep their chicks from flying out, or to keep children, cats, or other animals from bothering the chicks.
4. A Cover Might Be a Good Idea
If you do decide to cover your brooder, just make sure that there is plenty of ventilation going on. A good option is a roll of chicken wire nailed to a few boards to keep it secured, but also easily removable so that you can feed and water the birds.
5. Find the Best Location for a Brooder Box
We usually keep our brooder in the house until we can’t stand the smell and the peeping-all-night-long, by which time the chicks are usually a few weeks old and we can move them to a separate pen out in the chicken run.
When we’re ready for the chicks to go out, we put a heat lamp in the outdoor brooder and move the babies there. Mainly, we keep the chicks indoors for the first few weeks so we can keep a close eye on them, and for the kids to enjoy watching.
If your brooder will be outdoors from day one, make sure it is in a dry and draft free location. Cool air will chill your baby chicks and will quickly kill them. If your brooder is in a location like a barn, make sure predators, like barn cats, can’t get in to kill the birds.
Wherever you choose to put your brooder, keep in mind that power is always a concern as you need to keep the light on at all times.
6. Don’t Forget About Bedding
What you put in the bottom of your brooder box is important. Bedding is necessary to keep your chicks from walking in their own filth. It is also important that your chicks are walking on a non-slippery surface.
If your chicks slip around, they can develop splayed legs, a crippling debilitation.
Hardware cloth (wire) does not make a good flooring for a brooder. It is hard on baby chicks’ feet, they can get stuck and injured in it, and it also prevents them from building up an immunity to coccidiosis. Wire flooring is not a good option.
There are several bedding materials which are perfectly suitable for baby chicks:
- a thick layer of newspaper underneath strips of paper towels
- old rags (avoid terry towels as baby chicks can get their feet stuck in the loops)
- shredded paper
- untreated pine shavings (NEVER use cedar, the oil is toxic to chicks as it affects the respiratory tracts – shavings work well as they can be made on your own property and also teach the chickens to scratch
- dried grass clippings (from unsprayed yard)
- chopped, dry leaves
- straw
- peat
- sand (make sure you get the right kind of sand, as play sand or other fine-particled sand won’t work well and can cause respiratory problems – you want construction-grade sand)
- puppy pads
- a non-adhesive Non-Slip Shelf Liner
My favorite bedding to use at this point is the shelf liner. It makes a nice, thick padding, and it’s washable which makes it a very inexpensive option if you reuse it over and over.
And unlike wood chips and other materials which constantly get into the chicks’ food and water, the shelf liner stays in place and doesn’t make a bigger mess.
You can even purchase it in different colors if you’re feeling extra trendy! Shelf liner and kitchen papers decompose easily in the compost and prevent the chicks from slipping.
Another bonus of shelf liner is that it is easy for chicks to distinguish the food from the floor. They are less likely to accidentally eat bedding this way.
Whatever you use, make sure you never let it get too wet or stay dirty for too long. In the first few days, make a point of cleaning it regularly.
Bacteria, like Coccidia, which is lethal to chickens, spread quickly in warm, wet locations. Ideally, you should clean your brooder every couple of days.
This will also help prevent your chickens’ feet from becoming dirty and, well, from making your entire house smell if you’re keeping the brooder inside!
A word of caution about newspaper – many people use this inside their brooders as it is inexpensive and easy to come by. However, newspaper can be slippery to newly hatched chicks, and can cause spraddle leg.
This condition is similar to a dislocated leg and is impossible to reserve. Try to use bedding other than newspaper whenever possible to help prevent this.
7. Add a Heat Lamp and Thermometer
Baby chicks need heat. They will die without it. In nature, the mother hen uses her body to keep her baby chicks warm during the first few weeks of their lives. You need to replicate this warmth in your brooder.
Heat Lamp Options
Like brooders, there are several different options when it comes to your heat source, ranging from expensive infrared heaters to the common household light bulb.
Don’t feel obligated to spend a fortune or buy the most “promising” product on the market. Your heat lamp doesn’t have to be anything fancy. We like to use a clamping lamp so we can clip it up and hang it over the brooder.
Whatever you use, you do want to make sure that the fixture doesn’t get too hot when kept on constantly.
You also want something that can be secured, and won’t fall onto the chicks or into the bedding. You can pick up a heat lamp at a farm supply store, or order one online.
Not to scare you, but there are multiple stories and news reports floating around online about brooders that have caught on fire as a result of a poorly secured heat source.
These bulbs can get extremely hot, and brooder bedding tends to be made out of flammable materials (such as wood shavings or paper products). Therefore, if your heat lamp falls, you run the risk of a major fire.
Keep in mind that that’s not the only hazard. Heat lamps tend to gather dust as the chickens grow and develop feathers. This dust can also get hot and, in rare circumstances, ignite.
The best way to avoid a fire is to make sure your lamp is secure at all times, and to also purchase a bulb with a guard. The guard will help keep some of the hot bulb off the flammable material if it does happen to fall.
Better yet, cover your brooder with a wire or mesh lid so that if the bulb falls or gets knocked over, it won’t land on the bedding or the birds.
As your chickens grow, they will become extra flighty and can fly into your heat lamp, knocking it down no matter how well you have it secured.
A lid will perform double-duty, preventing the birds from flying out and knocking over your lamp, and also from running amok outside of the brooder.
Do your research and buy the heat source that will work best for your brooder location, power source, preferences, and budget.
If you’re storing your brooder in your home, I would personally opt for the safest (read: most expensive) heat source available, because you definitely don’t want to run the risk of catching your house on fire in addition to your brooder in the worst case scenario.
There are plenty of options out there to maximize your safety, such as chick heating plate kits. These kits are expensive, but they are more similar to the heat provided by a mother hen, and not only keep your brooder fireproof but also help your chicks grow and feather out a little bit faster – a win-win.
Otherwise, here are your choices for a heat source.
Heat Lamp Bulb Options
Again, there are choices here. Typically, you would use one of the following types of bulbs…
- Incandescent bulbs– Otherwise known as regular ol’ household bulbs. This is what we use. Don’t use anything less than a 75 watt bulb to start with though, or you won’t get enough heat. If you live in a cold location or have your chickens in a damp environment, this might not be sufficient.
- Incandescent floodlight– Designed for outdoor use; also a good option for a broader swath of light.
- Halogen bulbs– These last longer than incandescent bulbs, and provide more heat for less energy.
- Infrared Heat Lamp Bulb (red or white)- More expensive, but they last longer and provide more heat than regular bulbs for less energy. Some say the red glow helps prevent chicks from pecking each other, but I’ve never had a problem with this. A 125-watt bulb or greater should be sufficient.
- Ceramic bulb (or ceramic infrared heat emitter)- More expensive, but it does not emit light, only heat. It will last much longer than other bulbs, and uses less energy. You’ll need a 100-watt ceramic bulb.
Heat panels are definitely more efficient than a lamp, and there is no fear of them falling over. These are adjustable so that as the chickens grow older, you can raise the legs to provide them with more room and a cooler environment.
Personally, I’ve found our clamping lamp with a 75 watt regular household bulb to work just fine.
Thermometers
You’ll also need a thermometer in your brooder box to tell you what temperature it is under your heat source. Keep the thermometer directly under the light for best results.
Heat Requirements:
- Start the brooder at between 90-95*F, and reduce it by about 5*F every week until the brooder is at about 70*. You can reduce the heat by raising the lamp or heat source, or by switching to a lower-watt bulb.
- If the room they are in is already warm, or if it’s warm outdoors, you won’t need as much heat. Keep an eye on your chicken’s behavior to get the best idea of how they are regulating their body temperatures.
- Keep a steady temperature day and night.
- Chicks need a steady heat until they’ve completely feathered out, meaning they’ve lost the baby fluff and their true feathers have grown in.
- Generally, you can plan on having your chicks under a light for 3-6 weeks, depending on their breed, how many you have, and the weather. (The more chicks you have, the more body heat they generate.)
TIP: Watching your chicks is the best way to know if you need to adjust their heat. If the chicks stay huddled underneath the light, they’re cold, and you should either lower the light source or increase the bulb wattage.
If the chicks stay as far as they can from the light, it’s too hot. You know your chicks are comfortable when they’re active and spread out evenly around the brooder.
8.Don’t Forget the Waterer
Before your chicks arrive, you want to be sure you have a proper watering container and feeder ready to go.
If you’ve mail-ordered chicks, it is recommended that you put a little sugar in the water to give them a boost of energy.
Sugar Water
Mix 1/2 c. table sugar into 1 qt. of water for 1-2 days.
When you fill the chicks’ watering container, use lukewarm water (test on the inside of your wrist, like you would a baby’s bottle). Cold water will chill baby chicks.
You can buy one online or at a farm supply store, or you can make your own. There are plenty of tutorials online for making one out of recycled materials.
Watering nipples are also an option, although young chicks don’t always take to this right away, so you may need another waterer until they learn how to use the nipples. .
You basically need something that won’t spill, and that isn’t big enough that the chicks can get in it and drown.
If you have a larger waterer, consider partially filling it with small stones so that the chickens can’t fall in (think larger stones, though, because they might accidentally eat smaller ones).
Your chickens will need fresh, clean water at all time. A rule of thumb is that every four chickens needs about a quart of water every day. However, this will vary depending on the weather, the brooder location, and how active your chicks are.
TIP: When your baby chicks arrive, dip each one’s beak into the water to show it where the water is. They don’t have to drink, but at least now they know where they can go to drink when they’re ready.
You might also consider adding a teaspoon of Terramycin per gallon of water. This is especially important, as is sugar, to add to your water if your chickens were bought as day-old chicks and mailed to you.
It helps reverse some of the stress of shipping and boosts your chickens’ immunity – a must if you are introducing them to an already-started flock.
9. Feeding Chicks in the Brooder
You’ll also want some chick starter feed to fill your feeder with.
Starter feeds are those with proteins between 10 and 20 percent. They are specially formulated to provide your chicks with all the nutrition they need.
If you are also raising game birds, like turkeys or pheasant, you will want a higher protein content (closer to 24 percent).
Chick starter should be used until the chickens are around ten weeks of age, at which point you can transition to a grower and then layer or broiler feed (depending on the purpose of your chickens).
And then the feeder!
Whatever you use, it’s best to have a container that won’t spill, and that the chicks can’t walk around and poop in.
While you don’t need to feed your chicks within the first twenty-four hours or so (even slightly longer if you incubated your chicks yourself), as they are still receiving benefits from their yolk while in the egg and shortly after, you should provide steady access to feed after the first few days.
For both your feeder and waterer, paying attention to the material the item is constructed out of is important. Galvanized metal containers are great, but if you’re sterilizing them with vinegar, this can be dangerous as it causes the container to leach harmful chemicals.
Plastics are now the most common material used by professional farmers and backyard chicken owners alike, largely because they are nonporous and do not allow bacteria to seep through.
They are cost effective and won’t rust, making them ideal for multiple years of use.
*Be sure to keep the food and water containers filled at all times. Never let them run out of either, as this can be devastating to your flock.
10. Introducing Baby Chicks to the Brooder
Your brooder box is ready and your chicks are eagerly awaiting their new home. Make sure that clean bedding is down, the food and water is in place, and the heat lamp has heated the box to 90-95*F before putting the chicks in.
If hatching chicks in an incubator, allow them to dry off completely before putting them in the brooder (this can take anywhere between twelve and twenty-four hours, but keep in mind that it’s find to leave the chicks in the incubator for this period – they have plenty of nutrition left over from the egg).
Mail-ordered or locally purchased baby chicks will be ready to go straight into the brooder box.
Disclosure: if you visit an external link in this post and make a purchase, I may earn a commission. Read my full earnings disclosure here.
A really good resource you might want to get your hands on is Hatching & Brooding Your Own Chicks by Gail Damerow. This is by far one of my favorite chick raising books.
Some Easy DIY Brooder Box Ideas
Still looking for inspiration? Here are some fun (and easy!) brooder box designs you can use.
1. Cardboard Box Design
Cardboard boxes are inexpensive and easy to find, and they can be easily adapted to the specific needs of your chicks. For example, you can add or remove ventilation holes as needed, and you can line the box with newspapers or other materials to help absorb moisture and keep the chicks warm.
In addition, cardboard boxes are lightweight and easy to move, so you can easily create a mobile brooder box that can be moved around your farm as needed.
Here’s an easy design for a cardboard box chick brooder.
2. Plastic Tote Brooder
A plastic tote makes an ideal brooder box for chicks because it is sturdy, easy to clean, and affordable. Unlike cardboard boxes, plastic totes will not collapse if the chicks accidentally bump into them.
They are also easy to wipe down and disinfect if necessary. In addition, plastic totes are much less expensive than purpose-built chick brooders. As a result, they are an excellent option for anyone looking to raise chicks on a budget.
Plus, they can be reused year after year, making them a more environmentally-friendly choice than disposable options.
If you want to go the plastic tote route, here’s a simple plan you can follow.
3. Stock Tank Chick Brooder
Cardboard boxes are inexpensive and easy to find, and they can be easily adapted to the specific needs of your chicks.
For example, you can add or remove ventilation holes as needed, and you can line the box with newspapers or other materials to help absorb moisture and keep the chicks warm.
In addition, cardboard boxes are lightweight and easy to move, so you can easily create a mobile brooder box that can be moved around your farm as needed.
There’s not much you need to do to assemble a stock tank brooder for your chicks, but here’s an easy plan you can follow.
4. Dog Crate/Kennel DIY Chick Brooder
A dog crate or kennel can make an excellent chick brooder box. The wire walls provide good ventilation, and the sloped floor helps to keep the chicks dry.
Most importantly, the crate will keep the chicks safe from predators. If you choose to use a dog crate as a chick brooder box, be sure to remove any sharp edges and cover the floor with straw or other bedding material.
If you decide to go this route, here are some tips for how to set up your brooder.
5. Homemade Wooden Brooder Box on Legs
This type of box provides a spacious, comfortable environment for chicks to grow and thrive. Plus, it’s relatively easy and inexpensive to build.
Here’s a simple design and plans you can follow if you want to build your own.
6. Kiddie Pool Brooder Box
A kiddie pool is an inexpensive and easy-to-use option for creating a brooder box. The sides of the pool help to keep the chicks contained, while the shallow depth ensures that they can’t accidentally injure themselves. A kiddie pool can also be easily outfitted with a heat lamp to provide the chicks with warmth, and the plastic material is easy to clean and disinfect.
Follow these tips to set up your brooder.
Creating a Brooder Box is Easier Than You Think!
As you can see, creating the perfect brooder box can be as expensive or inexpensive as you want it to be. A 100% homemade set up can be just as efficient as anything you could buy from the store. So don’t feel like it’s beyond your budget to raise chicks!
With good care, your baby chicks will thrive in their new home. During these next few weeks, be thinking about where you’ll be moving your babies once they’re old enough to live without the additional heat.

A city girl learning to homestead on an acre of land in the country. Wife and homeschooling mother of four. Enjoying life, and everything that has to do with self sufficient living.
Thanks for the Info Kendra!! We might be getting chicks soon and this is this the exact information I needed for it!!!
So I read this post after reading another person’s website and one has clearly been copied from the other. I have no way of knowing who copied whom, but they offer the exact information – just reworded. The big give away is the part about the “bacteria” coccidia. Coccidia are parasites, not bacteria. I find it highly unlikely that two sites would be so identical, and contain the exact same error. If you were copied and are concerned about it I can give you the name of the other site.
Aside from that, very useful information, thank you for sharing.
RP,
Can you please share the link from the other site? Thanks.
I am agreed with you.I also think a brooder doesn’t have to be expensive. We use a large wooden box that some equipment was delivered in once. Ducks are very messy with the water. I use a bunny water bottle instead of the poultry dish kind.If you had more insight i will greatly appreciate it. Thanks for the sharing such a useful article.
Is there anything/invention that the chicks can go under ie a fake mother hen?
Thanks
One can also use “puppy pads” to line the brooder. I have “lost” chicks in the past because they ate the saw dust or “did the splits” on newspaper. A “lifetime supply of pads” at Tractor Supply cost about $20.
I read somewhere “honey water” for newly arrived chicks rather than refined white sugar. I don’t know if it makes much difference, but my chicks always get honey after their big trip from OH to CA. I want them to know, “This is how we do it in CA!”
Additional information you might add is to check the chicks for “pasty butt”. I remember discovering this when I found one dead. This is not a fun task, but it doesn’t last for more than a few weeks: examine them and if the exhaust is pasted over, dip the butts into warm water until loose enough to remove the paste. They complain about it loudly; but they will thank you later.
Very useful and intersting article Kendra! You invested a lot of time writing, photographing and laying it out.
Can I use a small woolen cloth for the chicks instead of a lamp
Chicks really need to be kept at about 95-100 degrees when they are first born. Then reduce the heat by about 5 degrees a week after that. The light will help do this. The cloth will not. If the chicks are cold they will tend to bunch up under the light. If they are to hot they will stay farthest from the light.
Excellent advice and perfectly accurate, thank you.
I have a question about chicks and brooders for which I have not been able to find an answer researching on the internet. I have 50 meat chicks which arrived 4 days ago. I am raising them with a friend who used to have chickens a long time ago when he was a kid, but I am a complete newbie.
We repurposed an old wooden box to use as a brooder. However, we put the box upside down and cut a whole in the top for the heat lamp. The heat lamp hangs from the ceiling. The box only has three sides, so we made a fourth wall, but left a door so they can get in and out of the brooder box. The brooder box is in a 8 by 8 foot covered pen. From day one, we let the chicken enter in and out of the brooder box to run around the pen and they seem to enjoy it. My question is: Is it ok to let them run around the pen? Every brooder box I have seen has the chickens completely enclosed. What are the pros and cons of our setup? So far, the chicks are doing well. We lost one chick the first night, but none since.
Loved the above article, btw. Thanks for your answers….
Mark
I’m trying to envision your setup based on your description. It sounds like the chicks would be fine. It’s okay to let chicks run around in a larger area as long as there is a heat lamp they can get underneath if they get chilled. It has been my experience that the chicks will get closer to the heat if they get cold, and will move further from the heat if they’re too hot. So having a larger area for them to run around in should be fine as long as they can freely access the heat lamp. Hope that answers your question. 🙂 Good luck!
I started with six chicks, exactly 48 hours ago and already know the following:
1. Don’t over think it. The chicks will let you know when they are too hot or too cold.
2. Chicks are much more civilized than humans. They don’t take affront when a friend pushes them out of the way to get to food/water. They love to see what their friends are up to.
3. Common advice on the web is to feed and water several times a day. That is simply not needed unless you have LOTS of chicks eating from the same feeder.
4. Yes, they sleep alot, in broad daylight. And, they wake up in a flash even when you just pass by, since you look like a predator. Walk slowly around a brooder box.
5. When they are quieter, that does NOT mean they are having problems. Quite the contrary, I noticed that the chicks were LOUD for the first hour or so after getting them from the hatchery, then settled in and now let out much quieter contented cheeps once in awhile.
Love to read all the good info~I am a first-timer~have 2 silver-laced Wyandotte chicks now 4 days old~more on the way~made the brooding pen in the coop itself which turned out to be excellent. Rounded the corners with cardboard and layed down about an inch of pine shavings (floor bottom is aluminum)covered with x-large dog training pads~top part grippy paper and bottom side plastic~diapers. Absolutely wonderful~absorbs any liquid and I just change pads every morning. I also invested in Eco-glow incubator~wonderful also. Took chicks a couple of days to acclimate and I monitored them going underneath as they tried to get in from the sides. Now, they know exactly where to go to to get warm and just use a 25 watt bulb to simulate daylight. Another 250 watt bulb also as a back-up in case temps drop at nite too much. They are healthy and thriving.
Hi, I am getting ready to put my doodles outside, but would like to add that my brooder box is wonderful. It is one of the heavy octagonal cardboard watermelon boxes. The rounded corners keep them from trampling each other. I have very little smell and they are 6-weeks-old and in my house. I am practicing the deep litter method, so everyday I add more pine shaving on top of the old, and it works. This is my first experience with raising chicks and it has been really enjoyable talking and petting them all day long. 🙂
question on hatching can I take turner out three day before hatch eggs lay the on wire
Yes Herman. That’s what I do.
Thanks so much for this valuable information and pics- we are first time
backyard chicken raisers and our very first peeps are on their way
right now- waiting for a call in the morning to come pick them up at the
Post Office so was just double checking my brooder was set and found this site. Definitely
bookmarked!!!
Thank you very much for the post with pictures. Am also raising chickens. I love Bramah. They are so lovely (y)
This is my first time getting chickens, and I am so excited!!!
They are so cute, who wouldn’t want one?
But they are a lot of work, so I did my homework, naturally 😉
I have read and researched practically anything about chickens. The only thing I am most worried about are diseases they could get.
Anonymous- just do your best to keep them clean and well fed, and be careful not to introduce new chickens to the flock without a 2 week quarantine, and you’ll do fine. Sometimes no matter how hard you try, they do get sick. Just do the best you can do and have fun. 🙂
We got two chicks for Easter. I have them in the house but I have read this is dangerous to the health of the family. It is cold here now and tho I have grown chickens and could put them outdoors, it is too cold even with a heat lite. Are we in danger of getting sick? I try to keep them as clean as possible but the laundry room is right off the kitchen. Worried I have contaminated the area with salmonela. Also have the bin and clamp lite set up but worry this might get too hot. What do you think. Is checking the area safe enough just to see nothing is getting too hot.
I am also a first time chicken owner and I Am in zone 5 in the Great Lakes region. We are raising our chickens indoors as well. All of my research along with information from my farmer mentor said indoors is fine. So when it’s appropriate I will be hardening of my chickens along with my tomato plants. Lol but until them they are in the house!
Thank you so much for these helpful tips, we have always enjoyed chickens but never got them as baby chicks. This year we are and I found your article very helpful in preparing me for them. 🙂
I’m so glad it was a little helpful, Phallin. Good luck with ’em!!
Hi Kendra, I really enjoyed your article on raising chickens. These are some terrific ideas I can pass along to my friends who raise chickens. Loved reading the article. I will be reading more of your chicken related articles. I am looking forward to following along.
Charles K.
Chicken Review
great post! we hatched chicks a few years back and used a big cardboard box, had them in our den. Also incubated quail eggs. That was a lot of fun!
I used a large cardboard box that I got from the produce department (had watermelons displayed in it) for my first brooder, and lined it with a shower curtain. It was free, and there was plenty of room for the 40+ chicks that I ordered. I did splurge on the Eco-Glow brooder this year. I was worried about the danger of fire with the other kind, and I found that the chicks were a lot quieter without a light bulb on all the time.
Mel,
Well, there would be an advantage to having the chicks quieter, especially if they’re in the house 🙂 A shower curtain is a great idea for a liner!! Sounds like you’ve created a nice place for your babies 🙂
Howdy, My suggestion is about raising baby ducklings and their water. Ducks are very messy with the water. I use a bunny water bottle instead of the poultry dish kind. I show my ducklings how to use the ball and they figure it out fast. I have raised ducklings for 3 years using these hanging bottles. Life is a lot dryer and cleaner for them and us.
Ruthlynn,
Oh wow, that’s a great tip! I have no experience raising ducklings, so I’m grateful for advice from a pro 🙂 I would have never guessed you could teach ducks to drink from a rabbit water bottle. Very cool.
I made mine from an old baby bed we picked up at an auction for $1.
http://paulaoretirement.blogspot.com/2013/05/moving-day-went-very-good.html
Looks great, Paula!! What a great score 🙂
Great post, lots of detail, I agree, a brooder doesn’t have to be expensive. We use a large wooden box that some equipment was delivered in once. We made a mesh lid to keep the dogs out. Can’t buy incandescent light bulbs in Australia anymore (!) so we had to get a ceramic bulb, and also got a cheap temperature controller, which makes life less stressful (don’t need to worry about cooking the chicks!). I have seen really good setups that have the feed and water outside the brooder, with mesh for the chicks to access, but not spill everywhere. Doesn’t work with our wooden box, but would be a good idea, ours gets messy very quickly. Recently I’ve been trying the “deep litter” method too, where you just keep adding wood shavings instead of scooping out the old ones, seems to work ok and is way easier!
Sounds like you’ve got a nice setup, Farmer Liz!