This year I thought it would be fun to try growing “field peas” for the first time. Although they’re called peas, they’re really more like beans, in my opinion. I wanted to grow them particularly to experiment with drying and storing them.
I chose cowpeas, also referred to sometimes as black-eyed peas, mainly because they were right for my planting zone. Also, they add nitrogen back to the soil, they grow well in poor conditions, and they can tolerate shade, so they seemed like a good choice.
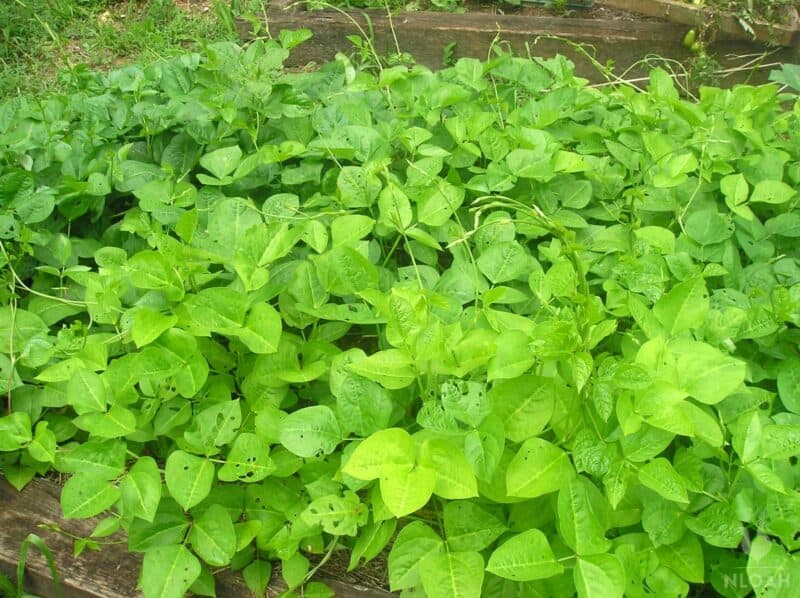
Cowpeas are well-known garden plants in the south, but I was surprised to learn that, in other parts of the country, they aren’t nearly as popular! They deserve way more attention than they usually get, though.
Cowpeas are divine tasting, with long, slender pods that are filled with lots of seeds.
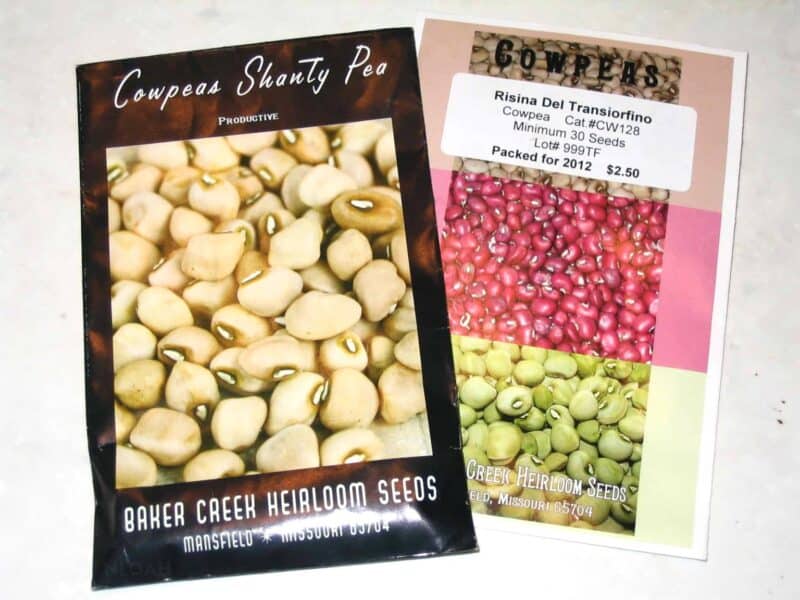
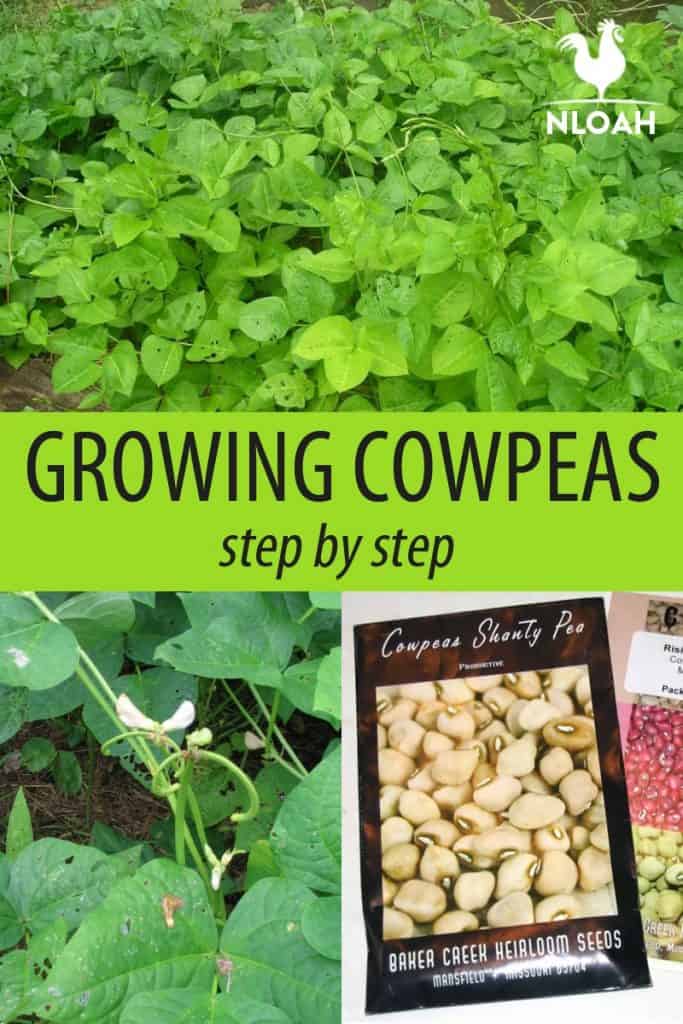
When I first decided that I was going to plant them, I had to choose the perfect type for my garden. I went with the Shanty and Risina Del Transiorfino varieties. I’ll share more about what I thought of each of these in a little bit.
Table of Contents:
How To Plant Cowpeas
I love planting peas/beans. It doesn’t get much easier than this.
You can plant directly outdoors, as soon as the danger of frost has passed. Water your seeds before planting them to speed up their germination, and keep in mind that, while you can start your cowpea seeds inside and then transplant the seedlings, there’s really no reason that you have to do this.
How to Grow Cowpeas from Seed
Cowpeas germinate and mature quickly, so you won’t be getting that much of a head start by starting your seeds indoors. In addition, many gardeners recommend not starting these plants indoors because the roots can be easily damaged when you are transplanting them.
Start with a fresh garden bed, nicely weeded with the soil loosened and ready for planting. You will want to fertilize with aged compost and turn the soil under to a depth of eight inches. Use a rake to remove clumps of grass and large stones.
Cowpeas are legumes, so they will benefit from a soil inoculant applied prior to planting. This should be an inoculant that is designed specifically for beans and peas. Check with your seed company before doing this, though, because some companies automatically inoculate seeds before shipping them.
Inoculants are beneficial because they enable the plants to uptake nitrogen from the air and use it as fertilizer. This way, you will see an increase in the yield and quality of your crop.
Where to Plant Cowpeas
Cowpeas are a warm-season annual legume that are typically planted in the spring. They can be grown in all parts of the United States, as long as they have full sun and well-drained soil.
Cowpeas can be used as a cover crop or green manure, as they are able to fix nitrogen in the soil.
When planting cowpeas, it is best to sow the seeds directly into the ground, as they do not transplant well.
When to Plant Cowpeas
The best time to plant is after the danger of frost has passed, ideally in late spring or early summer. Sow in a sunny spot in fertile soil, ideally after the soil has warmed. Seeds have the potential to rot in colder, wetter soils.
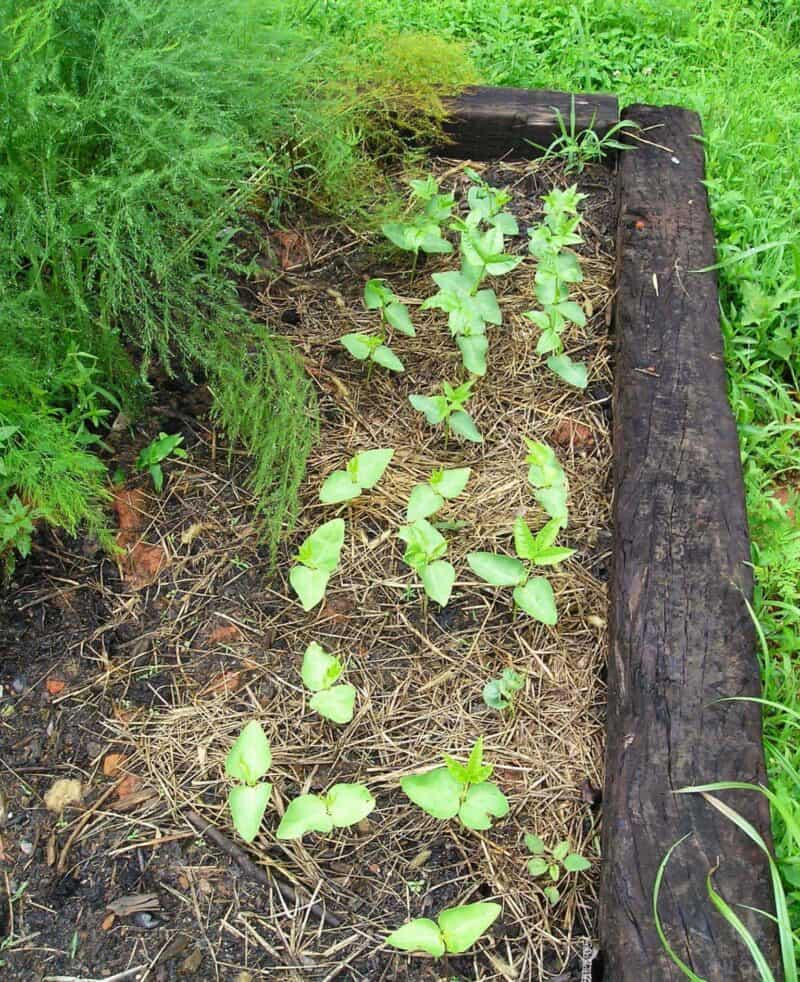
Stick the seeds straight into the dirt, planting about 1 in. deep and 4-6 inches apart, in rows 18 in. apart. Tamp the soil down firmly.
Water thoroughly, then wait a few days for the seeds to germinate. You should see sprouts growing up through the soil in no time!
If you’re an impatient gardener like me, you can fill the time from sowing to germination by planting a crop in succession. In fact, you can sow bean seeds once every two weeks to ensure a constant crop of beans!
Once your seedlings emerge, just make sure you thin them to about 10 to 12 inches apart. Do this when they are a couple of inches tall.
Caring for Cowpeas
Once the plants are established, they’ll start forming pretty little flower buds. From these the cowpeas will begin to grow. You can see some young pods forming underneath the blooms here.
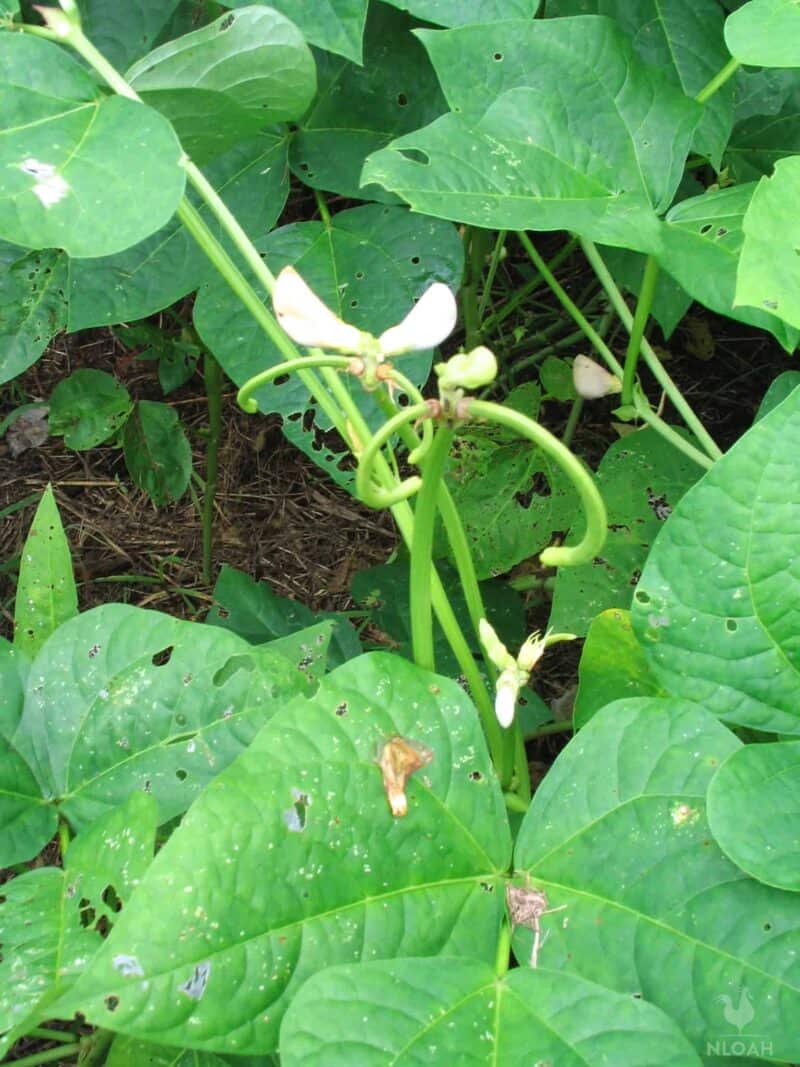
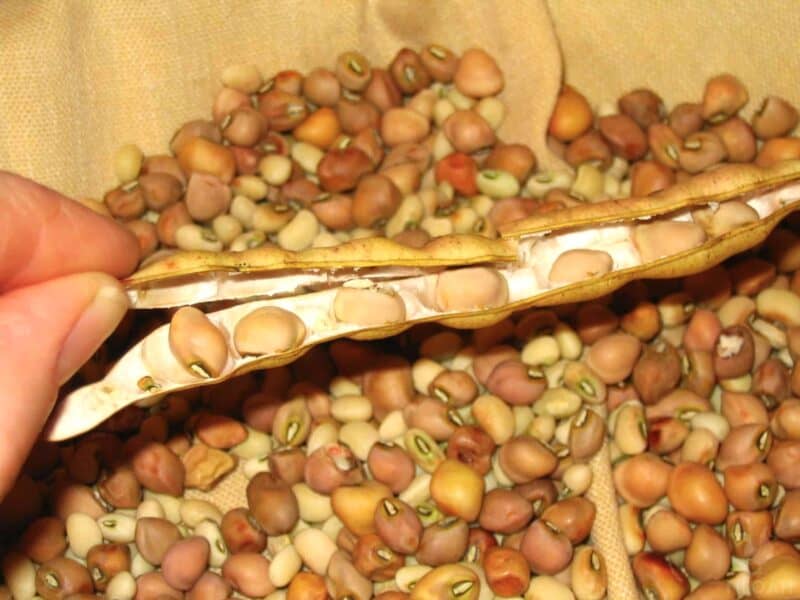
The pods will continue to grow, getting larger and filling in with round little “peas”.
Weeding
There’s not much you need to do to care for your cowpeas. In fact, these plants are pretty self-sufficient! However, you will want to do your best to keep weeds under control, especially when your cowpeas are young and tender.
They will easily compete with other plants for water, nutrients, and space, so it’s essentially to weed often or use some other method of keeping weeds out.
I find it extremely helpful to use mulch around my cowpeas. Not only does organic mulch, like straw or wood shavings, help keep out weeds, but it also helps retain soil moisture and nutrients. Apply mulch about two or three inches deep and keep reapplying as needed during the growing season.
You will want to avoid disturbing the soil around the plants as much as possible. This can be tough to do when you are weeding, especially if you need to pull up a plant with deep taproots.
If possible, try not to pull up weeds like this. Instead, smother it with mulch. This will prevent the damage that is caused when you accidentally yank up the cowpea plant with the weed!
Watering
You will also need to keep your cowpeas well-watered during dry weather. The plants need roughly one inch of rain each week during the growing season.
You can use a rain gauge to monitor water levels, but the best way to keep your plants consistently moist is to use a drip system or soaker hoses that will deliver water right at the soil level.
Watering with sprinklers is fine, too, and is the preferred method for many gardeners. However, the problem with watering with overhead sprinklers is that it can lead to fungal growth.
When the leaves of your plants don’t have time to dry off during the day, you run the risk of diseases developing.
Fertilizing
Cowpeas are a relatively hardy plant and can tolerate poor soil conditions, but they will benefit from regular fertilization.
The best time to fertilize cowpeas is in the early spring, before they start to produce flowers and pods. A general-purpose fertilizer such as 10-10-10 can be used, or a fertilizer specifically designed for legumes.
When applying fertilizer, it is important to follow the manufacturer’s instructions carefully to avoid overfertilization, which can damage the plants. Regular fertilization will help to ensure a bountiful harvest of nutritious cowpeas.
Harvesting
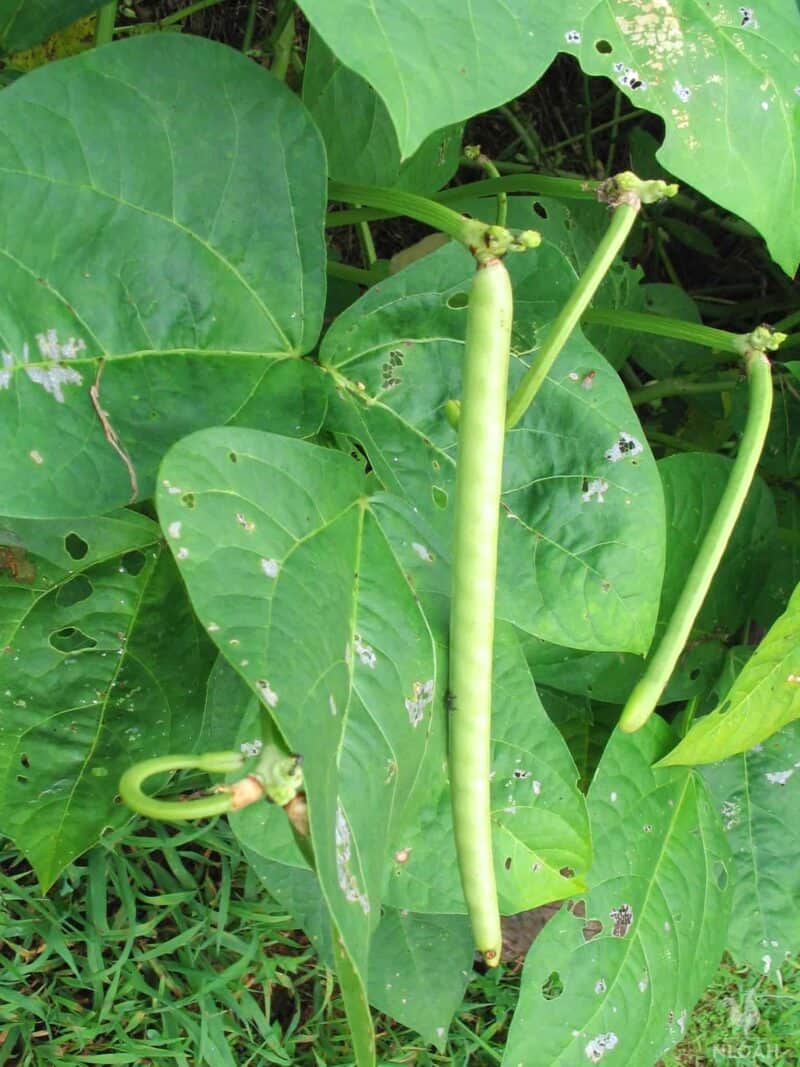
I learned something great about cowpeas, which I didn’t realize before growing them. You can actually pick them at any time during the growing season. The tender, young pods can be eaten just like green beans.
The larger, still green pods can be shelled, and the peas can be boiled and eaten fresh. (I actually boiled some in chicken stock, and they were fantastic!) Or, you can wait until they turn brown and dry on the vine, then pick them to save for later.
Essentially, you can harvest cowpeas at any time you might harvest your green beans. They can be harvested early on for a more tender flavor or you can wait until they have become dry to save the pods for shelling.
How will you know when your pods are ready to harvest? You can harvest pods as soon as they begin to turn yellow, but if you watch them carefully, you can leave them on the plants until they are tan.
You just need to keep an eye out for shattering, which can cause you to lose all of your seeds. Pick your pods as they mature or wait until all the pods on the plant are ready and simply uproot the plant.
Keep in mind your intended culinary purposes before you decide how and when you are going to harvest. While young pods are best eaten canned, frozen, or fresh, dry cowpeas need to be soaked and boiled before you eat them.
While this does add another step to the cooking process, remember that dry cowpeas can be stored for many years without any extra preservation.
Saving Seeds from Cowpeas
You can also save your cowpea seeds. Saving seeds is a great way to maintain your own stock for the following year. I recommend experimenting with a couple different varieties of cowpeas and saving the ones that you like most.
Try to save seeds from at least one plant, but if you want to maintain variety over many generations, try to save seeds from 10-25 plants (more if you are trying to preserve a rare variety).
Here’s another fun fact – it’s not just the cowpea pods you can eat. You can also munch on the leaves!
Especially when you can harvest them when they are young and tender, they are absolutely delicious. Just pick them as needed for your salads or cook them up like spinach.
Pests and Diseases
I’ve seriously considered replacing green beans with cowpeas in the garden. The problem I have with green beans is that they grow so darn quickly, and once they get to a certain size they’re no longer tasty.
Of course, you can save the huge beans for seed, but you only need so many. I’ve tossed a lot of overgrown green beans to the chickens. Cowpeas, on the other hand, are usable at all stages of their growth, so there’s really no reason any of them have to go to waste!
Pests
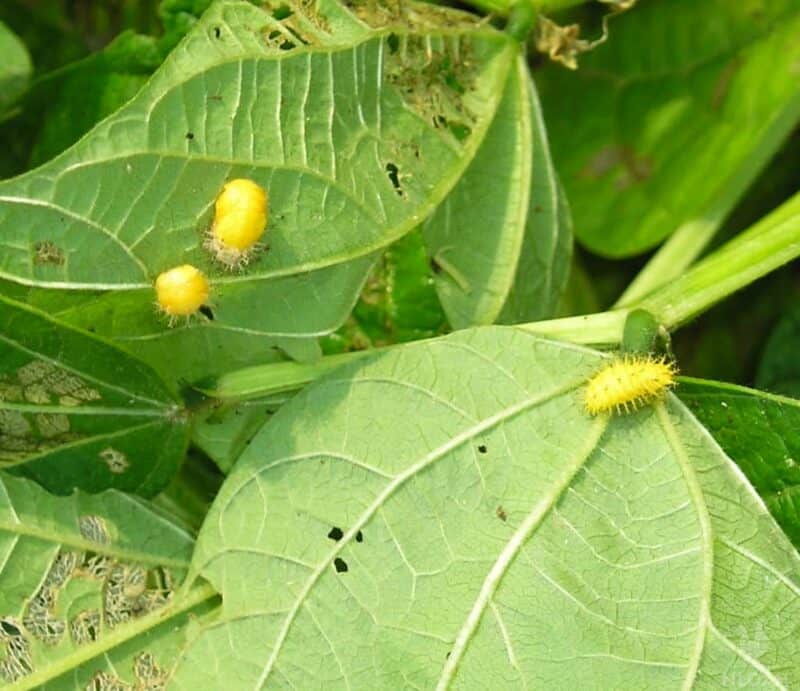
I’ve also discovered that cowpeas have the same pests as green beans: Mexican Bean Beetles. Sprinkling the plants with a generous amount of wood ashes should help reduce the problem. Hand picking the bugs is also a must.
You can also get rid of them by dunking them into buckets of soapy water.
An easy way to prevent pests from nibbling on your plants? Cut down and compost plants that have passed their prime – even if they are still producing –to interrupt the life cycles of these pests.
Some of the other pests that tend to go after cowpeas include aphids, cutworms, weevils, and leafhoppers. Leafhoppers in particular can be devastating, since they not only cause injury and stunt the growth of your plants, but they can also spread diseases. You may need to use insecticidal soaps to get rid of them.
Deer also love cowpeas, but you should be able to keep them out with a simple fence (unless you’re growing cowpeas specifically for the deer, that is!).
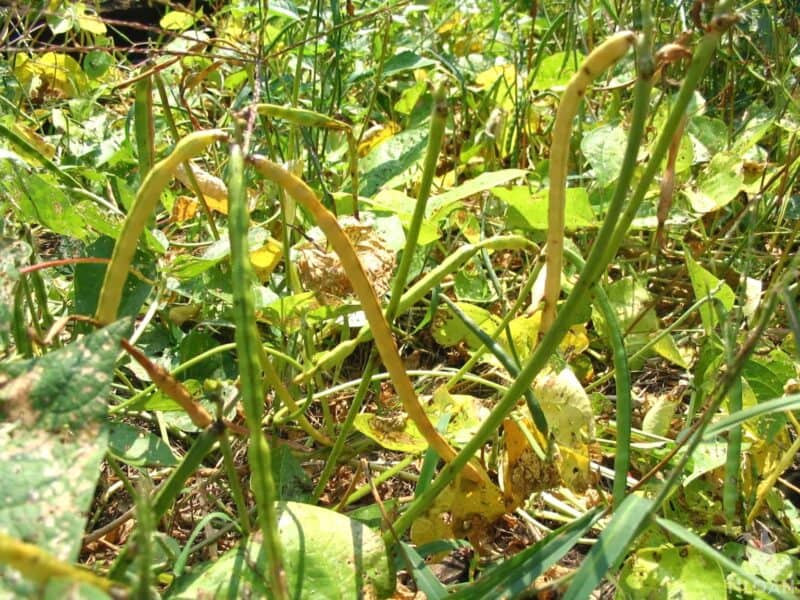
After a few weeks, the cowpeas will start drying on the vine. If you’re having a particularly rainy season, you might pick them a little before they turn brown and finish drying indoors so the peas don’t mold. You also want to pick the pods before they start splitting open.
Diseases
Cowpeas can be susceptible to a variety of diseases and viral infections. The most common ailments include root rot, fusarium wilt, powdery mildew, downy mildew, common bean mosaic virus, and anthracnose.
Some remain in the soil for many years after you’ve harvested your crop, so you will want to rotate your crops each year to prevent this. Try not to work in your beans when the foliage is wet, as you risk spreading bacterial or fungal disease during these times.
One common problem that people notice with their cowpeas is that they have flowers, but have not formed pods. People often think that is due to a disease, but fortunately, that’s not the case.
Usually, a lack of pods is caused by a nutrient deficiency (generally calcium or phosphorus) as well as heat or moisture stress. Check the levels of all of these factors and address them as needed.
Other Uses for Cowpeas
Cowpeas are a type of legume that is popular in many parts of the world, especially Africa and Asia. While they are most commonly eaten as a fresh or dried vegetable, cowpeas can also be used in a variety of other ways.
Grind Into Flour
Did you know that it can be ground into a flour that can be used for making bread or pancakes? Yep! And it’s delicious!
Food for Livestock
Cowpeas are a type of legume that is often grown as a food for livestock. While they are not as popular as other kinds of fodder, cowpeas can provide a number of benefits for animals.
For one, they are a good source of protein and essential nutrients. Additionally, cowpeas can help to improve the quality of milk and meat. They can also be used as a green manure, helping to improve soil health.
While cowpeas may not be the first choice for livestock owners, they can be a valuable addition to the diet of many animals.
Using Them as Cover Crops
Cowpeas are also sometimes used as a cover crop, helping to improve soil fertility and prevent erosion.
Cowpeas can be planted as an early spring or fall cover crop in cooler climates. Cowpeas produce a lot of biomass and are deep rooted, which make them excellent at preventing soil erosion. They also add nitrogen to the soil and help to improve soil structure.
Cowpeas can be grown on a wide variety of soils, but they prefer well-drained soils with a pH between 6.0 and 7.0.
Cover crops should be incorporated into the soil before they flower to avoid adding excess nitrogen to the soil. Cowpeas can be incorporated with a plow, harrow, or roller-chopper. You can also mix cowpeas with other cover crops such as rye or vetch to create a more diverse cover crop mix.
Planting Cowpeas for Deer
We aren’t the only ones who love cowpeas! Deer love them, too.
These fast-growing plants produce a high yield of nutritious pods that are favored by deer. Cowpeas can be planted in spring or summer, and they will typically mature within 60 days.
When choosing a location to plant cowpeas, it is important to select an area that receives full sun and has well-drained soil.
Once the plants have matured, they can be left in the field to provide food for deer throughout the winter months. In addition to being an excellent food source, cowpeas also help to improve the soil by fixing nitrogen, making it easier to plant other deer food sources later on. Genius!
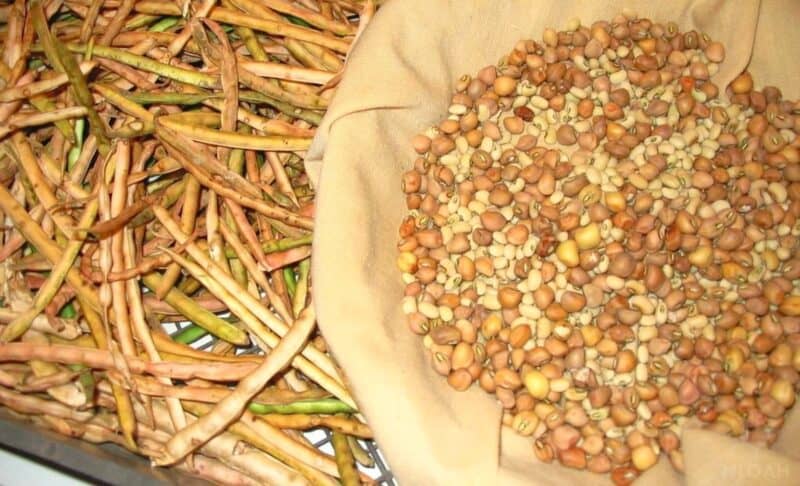
Shelling and Storing Cowpeas
Shelling peas is actually pretty fun. You simply just split the pods open and dump out the peas. My children literally begged to help.
I was glad for their company, and grateful for another opportunity to let the kids participate in the process of growing and storing our food.
I did learn that you need to let the cowpeas dry further before storing them. When we first started shelling, we were pouring them straight into a mason jar. But after a few days I noticed that some of the beans were getting a little fuzzy.
The not-quite-dry ones were molding. Definitely lay the shelled peas out to dry completely before storing in a jar. And separate the green pods from the dried ones as you pick them. The green pods will also start to “sweat” and mold when crowded together and left out for a few days.
Tips for Using Cowpeas
Cowpeas are a good source of protein and can be used in many different dishes. Here are some tips for using cowpeas:
- Soak the peas in water for several hours before cooking to soften them.
- Cook the peas in boiling water for 30 minutes to an hour, or until they are soft.
- Add the peas to soups, stews, or casseroles, or serve them on their own as a side dish.
- Cowpeas can also be used in salads or as a filling for sandwiches and wraps.
With these tips, you can easily add cowpeas to your diet and enjoy their delicious flavor and nutritional benefits.
Growing Cowpeas in Containers
You can even grow cowpeas in containers! While you’ll experience lower yields than if you were growing them in the ground, you can easily cultivate cowpeas in containers that are at least 12 inches deep.
This will leave plenty of room for the roots to develop, and will also give you room to insert stakes if needed.
As annual plants, cowpeas should be grown in full sunlight. You can also grow them in partial shade, making them candidates for containers (you can easily move them around). They don’t tolerate cold temperatures, so if temperatures dip, simply bring them inside.
You can use any kind of container for growing your cowpeas, but plastic, wood, or clay containers are best. Make sure the container has good drainage holes and fill the container in with potting mix.
Add a bit of compost on top to add nutrients, since containers not only dry out more easily, but also have a tendency to be nutrient-deficient.
Avoid overwatering your cowpeas, but don’t underwater, either. Generally, you will need to water every few days. Check the moisture before watering, though. If it feels dry at a depth of one inch, water.
Your container-grown cowpeas will be ready for harvest in 60 to 90 days.
Differences in Varieties
There are many different varieties of cowpeas out there, each of which has a unique growing habit. While some climb like pole beans, others are more compact, like bush beans. If you’ve ever grown green beans in the past, you’re probably already familiar with this growing habit.
All cowpeas are considered warm season and are best adapted to heat and dry conditions. Some of the most popular varieties are:
- Colossus: vigorous growers with few side runners that produce dark brown, easy-to-shell peas
- Big Red Ripper: good table pea with 10 inch pods containing up to 18 large peas each
- Big Boy: produces tall bushes that bear ten peas per od
- Carolina Crowder: produces bright cranberry-red pods that are resistant to nematodes and other problems
- Queen Anne: dependable producer that puts out seven inch pods that are ready in just 60 days and are great for canning, freezing, and drying
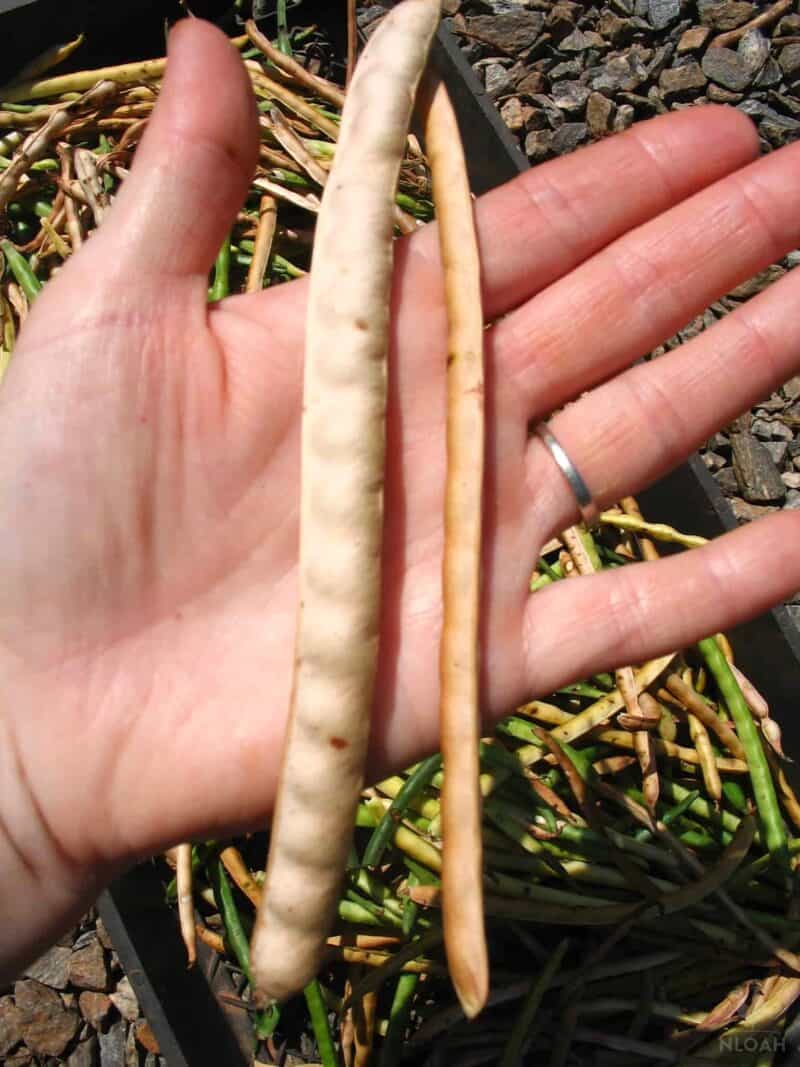
I did notice a significant enough difference in varieties to develop a preference. As you can see, the Shanty Pea was much larger in size than the Risina Del Transiorfino cowpea.
Considering that they both took up the same amount of garden space, even though the Risina produced slightly more pods, the Shanty variety was definitely more bang for your buck.
The Risina also vined like mad. I wondered if I should have trellised them instead of letting them sprawl the garden bed. The long tendrils tangled and twisted around neighboring plants, and made harvesting a real pain. The Shanty peas didn’t really do that.
The Shanty Cowpeas are definitely my top choice. That’s my experience with field peas so far. I’d love to know if you have any tips or advice to add!
Have you tried growing cowpeas? What’s your favorite variety and how do you use them?
Common Questions
Cowpeas are typically ready to harvest around 60-90 days after planting, depending on the variety. The pods should be green and slightly tender to the touch before they are picked. If they are allowed to mature further on the plant, the pods will become hard and dry.
At this point, they are still edible but are best suited for use as animal feed. For human consumption, it is best to pick the cowpeas while they are still young and tender.
When grown on a trellis, cowpeas can reach up to six feet in height. Trellising also helps to improve air circulation around the plants, which can reduce the risk of powdery mildew and other fungal diseases. In addition, vines that are supported by a trellis are less likely to fall over when heavy with fruit.
For these reasons, trellising is often recommended for cowpeas. However, it is possible to grow cowpeas without a trellis if space is limited.
Cowpeas (Vigna unguiculata) are an annual legume that can be grown in a wide range of climates. Cowpeas are relatively easy to grow, and they are tolerant of poor soils and drought conditions.
These are some of the most drought-resistant plants around and they are also suitable for long term storage.
However, they do require a long growing season, so they are not well suited to areas with short growing seasons.
A rule of thumb for planting cowpeas is to allow about 10 square feet per person. This will give you a good yield of peas and also leave some room for other vegetables in your garden. If you have a larger family or are particularly fond of cowpeas, you can plant up to 15 square feet per person.
One advantage of cowpeas is that they can be planted relatively close together; unlike other legumes, they do not need to be spaced too far apart in order to thrive.
So if you are tight on space in your garden, cowpeas may be a good option for you. Just remember to leave enough room for other vegetables as well.
These hearty plants are relatively easy to grow, and they can tolerate a wide range of soil and climate conditions.
In general, cowpeas should be planted in the spring, after the last frost date for your region. However, it is important to check the seed packet for specific instructions, as some varieties of cowpea can be sensitive to cold weather.
Cowpeas can be planted as early as the first week of April, and they will typically mature within 60-90 days. For best results, sow the seeds 1-2 inches deep and 12-18 inches apart in a well-prepared seedbed.
updated 07/28/2022 by Rebekah Pierce

A city girl learning to homestead on an acre of land in the country. Wife and homeschooling mother of four. Enjoying life, and everything that has to do with self sufficient living.
First, according to Carol Deppe there is no need to soak cowpeas, unlike other beans, and they cook quicker even not soaked. And, I have certain digestive issues with beans, but cowpeas seem not to cause problems, Third, maybe it’s because I’m relatively north (West Virginia) but I have no problems with bean beetles or diseases (so far) and RABBITS bother other beans including peanuts but don’t touch the cowpeas. So I’m sold. But ironically, last year I grew them mostly as a cover crop, but they matured and I got lots of beans; this year the frost is coming now and they aren’t ready yet so I’m wondering whether I should pick green beans to lay out in a dry place, or hang vines to dry, or possibly leave them out to dry down in the frost (no rain predicted). I grew Tohono O Odham but found another, bush variety for next year as the TO sprawls all over its neighbors.
I’m growing Lady cow peas in Denver. Not a whole lot, it’s only two of us. I don’t want to let them dry out. But I only have one out of about ten plants that have fully grown beans on it. Can I let those sit and harvest and shell them all at once? I’m trying to do them like my granny used to back in Alabama.
To Central Florida gardener: Florida heirloom varieties of yellow squash and zucchini produce well for me in spring. I used to plant in mid-March but with warming climate I now plant in late February. The heirloom Seminole squash is heat tolerant and a good cover among tall plants like tomatoes. It is hard like a butternut and tastes like acorn squash, but grows in the spring and summer. It has an amazing storage life, I just pile them above my kitchen cupboards and use all year.
I assume from reading these entries that cowpeas are annuals? I’m planning on putting these in for a food plot for deer. If left alone, will it self-seed and volunteer over a few years?
They are frost tender. If you live in a cooler climate you will need to replant every year. Also, if you absolutely want more beans, it wouldnt hurt to poke holes in the ground and put beans in yourself, rather than wait on the possibility of nature doing it for you.
I grew several types of Southern field peas this year to see the differences. Of Mississippi Silver, Colussus, and Pink Eye Purple Hull, the latter were our favorite for tasting, and I love the fact that the green pods turn purple when the beans are mature inside. I also have Tohono O’odham (Holstein), Brown Sugar, and Big Red Rippers which will be ready to harvest soon, but those varieties did not produce as well as the others. Next planting, I will try bean inoculant on the seeds, which I hear is a big help in getting nitrogen production going. Pink Eye Purple Hull’s are going in for a mid-season planting this week! They are really great.
Field peas(or cow peas) remind me of my youth in Charleston, SC….my grandparents used them(and only them) for Hoppin John….
I live in Boston and now have some germinated cow peas I’m gonna stick in the ground and see what happens……any tips? They share a veggie garden with zukes and tomatos…..
Mike
How long before I see blooms on my cow peas?? They are the bush variety.
I, too, would move to have an answer to that question. I’ve planed trellis type crowder peas, lots of large leaves and vines but no flowers yet.
About 6 weeks after planting. Then, about 2-3 weeks later, I had peas that were turning purple ready to pick.
Put the dried, even mostly dried, pods in a pillowcase. Toss into clothes dryer on very low for about fifteen minutes. The heat will pull out the rest of the moisture AND split the hulls. Dump into a bucket and shake. Shells and seeds will separate. The dryer heat will also completely discolor to almost black any bad peas.
Great tip, thanks. This Will be my first year with pink eye purple hulls. I’ve grown pole and bush which I am also growing this year.
Thanks.. will look up the Shanty pea.
I’m in Florida. Last year I had over 50 okra plants in containers. This year we built raised beds. The spring crops did well then summer hit and none of the okra, squash, or beans would thrive like before, so I decided to plant cowpeas (varieties resistant to nematodes). As soon as they flowered we got a cowpea curculio infestation. I read about it and it sounded BAD even with insecticides (which we usually don’t use). Fortunately the first mild one we used worked and we haven’t sprayed a second time and the cowpeas are close to maturity. I like that you can eat them whenever. I’ve been eating the peas raw in the yard, lol. I’m also having good luck with Asian long beans and Asian cukes in a pot in the front yard using my rain tree as a trellis. Last year I planted Thai eggplant and am still harvesting this summer from the same plants (with more production than from the Japanese or regular eggplant). Trying different things for our hot summers.
I live in Atlanta with long hot summers. Ive found that Roma tomatoes do well in our heat, as they are from hot Italy. Many tomatoes stop setting fruit when it gets too hot, but not Romas. I also grow Malabar spinach, the green variety, not the red. It is just like regular spinach, but very prolific, loves the heat and is a tall vine that I put on a tripod trellis. Many of the mediterranean vegetables do well in our hot climate.
If you like Roma then you might really love Opalka tomato. Bigger and also more juicy than Roma (just enough seed gel to get more moisture and less grainy than roma) and my absolute favorite the last couple years. It’s a San marzano type tomato and a heavy producer.
Linda,
Curios as to what kind of squash you get to grow in the summer. I am in Central FL and I have the poorest luck with summer or winter squash, no matter what time of year I grow them. Also, would like to know what variety of cowpea has worked best for you. I’m currently growing pinkeye purple hull and they are producing very well. Another thing that has worked very well for me this summer is Astro Arugula. I will definitely be growing it again.
Larry
Hi Kendra-
Great entry on cowpeas! So how many plants of them did you have and what was the yield of the crop? I had planted Jacob’s cattle beans and lima beans this year. What I discovered was that my growing space was better used for other plants than dried beans. Our yield was too low to consider using such good growing space for next year in our raised beds. I would be willing to try a different variety and grow them in our tilled field area where we used to garden before we went to raised beds.
Would appreciate your thoughts on the value of growing the dried beans.
Thanks!
Sherry
Great question, Sherry! Well, in all honesty I just kinda stuck the seeds in the ground and didn’t count how many plants came up. But if I had to guess, I’d say there were probably close to 80 plants (in an 8×4 bed). Maybe. I didn’t weigh the harvest. The beans are very light. But I got about 2 pints of dried cowpeas. That doesn’t sound like much, does it? LOL! I need to keep better notes next year for sure!
We always grow Zipper Cream which is another variety of Southern Cowpeas. They are wonderful eaten green. You can eat any cowpea green even Blackeyed peas can be eaten straight from the garden before they are dried. They are very good either way. Unfortunately the deer ate every plant we had this year. So no peas for us.
Thanks for the tips, Mae Nash!!! 🙂
You should check out the blog “Hickory Holler Farms”. She does a lot of bean drying and has a lot of experience and is an altogether very wise woman! I love the pics of her pantry, if only I could can like that!
I’ll look them up, Jenn. Thanks!! I’m always trying to find other like-minded, more experienced folks to learn from 🙂
I have always loved crowder peas. Which are one of the bigger full pod types of cowpeas like your Shanty. We have planted Purple Top-Pick Crowder Peas the last two years. The grow easy, are a bush variety, and the peas are mostly at the top making them super easy to pick. We also planted blackeyed peas this year which is still a cowpea, but of a smaller variety and not as plump. Therefore it is not considered a crowder pea. They are not a bush variety and needed to be trellised. Both are yummy, but I prefer the crowder taste. I just wrote a post on canning them both.
Summers Acres,
I really like the idea of planting the larger, bush varieties. Thank you for sharing about the Purple Top-Pick Crowder Peas. Definitely something I want to remember!
1. It’s really disappointing to get this far, and then find a batch of peas which have molded in storage. After air drying, I put them in my dehydrator for further drying, then I include silica gel packets when I store them. I got a big box of silica gel packets on E-bay, for a very reasonable price.
2. Oversized green beans can be dried and saved just like any other bean.
3. You can save the hand shelling process. My wife has made several bags (I think from old pillowcases), and puts the bean or peas into them and tumbles them dry in our clothes dryer. When done, they are all shelled. The pods can be picked out and the chaff separated by winnowing on a breezy day. She first tried a mesh bag, but it left too much chaff in the dryer. This also helps if you’ve picked more than you can shell immediately, as they are prone to mold in the shell
Thank you so much for that advice, Dave. I guess I should probably put my beans in the dehydrator. I love the pillowcase idea. What a great tip. We don’t have a clothes dryer, but we could probably just let the kids stomp around on it and get the same effect, lol. Awesome 🙂
I would love a follow up post with recipes too. I love your blog!
Will-do, Cortney 🙂
This year, I grew both Provider bush beans and my family heirloom Yard Long Beans. It was my first success with bush beans… and the first time I grew them in a raised bed where the animals had a harder time getting them. We have possums, raccoons, and skunks… and my free-range hens. So, it takes some work to get a harvest for us. To my surprise, I had a bounty from the bush beans; but they fizzled out by the end of June. Then, in August, my LONE volunteer Yard Long Bean started producing. Would you believe the ONE plant gives hubby and I enough beans for a scant serving every week!
Normally, I plant 5 bean seeds per person and add in 5 extra for friends and guests. For the bush beans, I found they didn’t take very much space compared to the vining Yard Long beans. So, I ended up planting alot more. I think in my 4′ X 6′ space that I put in between 30 and 40 seeds; which gave me about 10 pounds of beans total. I planted 3 rows with only 3 or 4″ apart. The close proximity helped them support each other instead of a short trellis. And for the pole beans, the final spacing is about 6″ to 12″ apart; and seeds can be planted on either side of a sturdy trellis (hog wire?) to make a double row. They vine out about 10 feet, so they do take up some space. I have planted butternut squash and basil below them before and had excellent crops from all three: yard longs, butternut, and basil.
But… my point… by planting both (about mid March for us) I’ve had beans from May until now, excepting July when I used some frozen bush beans since there was nothing to harvest. Provider bush beans are more cold tolerant, and the yard longs love the heat. In fact, the Yard Long seeds just lie in my soil dormant and wake up when it’s finally warm enough for their liking. As I study more about how my plants produce, I’m trying to plant a greater diversity. Often, I can plant less of each type, and get more variety in the same place. Just a thought.
LOVE all the info, SJ!! Thank you!!! I’d love to experiment with those varieties as well 🙂 Do you dry them, or do you just eat them fresh?
Morning,
Can you do a follow post on recipe using cow peas?
Hi Meredith,
Sure! I’ll try to remember to do that 🙂 Great idea!