It has been a couple of months now since our panels have been up and running. I thought I’d catch you all up on our exciting progress.
Let me just say straight out that I’m still learning how to use this system and how everything works. I’m going to try to explain everything to you to the best of my knowledge, or as I understand it.
The Kit
We purchased an off-grid system from Appalachian Energy Solutions). We went with them because they offered an affordable, pre-wired kit which we could install ourselves without having to hire a professional to do it.
Plus, they happily answered a billion questions at all times of the day and night for several months before we finally took the plunge and invested in the system.
Wonderful customer service. We upgraded a few things so that we have the option to add on to the system in the future, if we decide to do so.
The Panels
After a lot of studying and price comparing on monocrystalline vs. polycrystalline panels, we ended up going with four SolarWorld 270 watt Monocrystalline panels.
They ended up being the best deal for our needs. These panels are designed and tested to withstand heavy accumulations of snow, ice, hail, and other extreme weather conditions. And they come with a 25 yr. warranty. Plus, we love that they’re made in America.
Although each of our panels is rated at 270 watts, it’s likely we’ll get closer to 1000 watts total as some energy is lost in transition from the panels to the house.
We should generate about 1000 watts (1 kW) per hour of full sun (usually 4-6 hrs per day). It’s really not that much power compared to what the average US household uses, but we think it will be enough to supply our most basic needs.
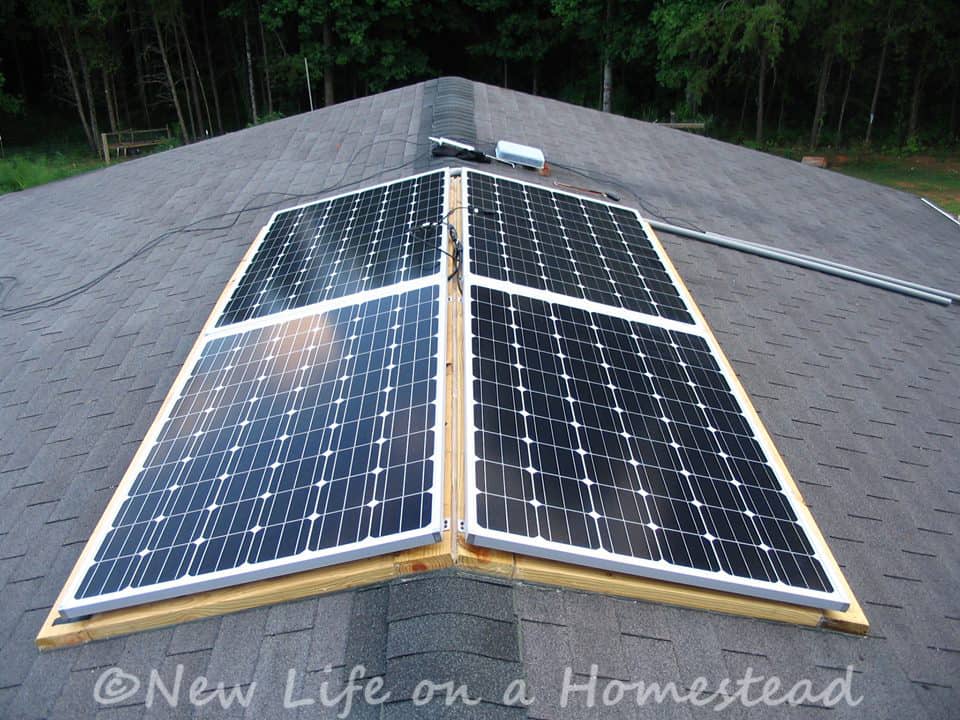
We are fortunate that our roof doesn’t have a very steep pitch. My husband and I were able to install the panels ourselves without any trouble. First, my husband screwed a wooden frame to the roof to mount the panels on.
He used pressure treated lumber, which we were later told was a bad idea as it can rot the roofing. We’ll have to replace the shingles soon anyways, so hopefully it won’t cause too much trouble until then.
Once the frames were installed, we screwed the solar panels in place. We opted to have two panels on either side of the house (2 on the east facing side, 2 on the west facing side), hoping we’ll get maximum exposure as the sun crosses directly overhead.
I’m wondering if we’ll have to rig a way to tilt them in the wintertime when the sun is lower in the sky. We’ll probably have to do some experimenting there.
The panels each came with a positive and negative cord on the back. To connect the panels to each other, we simply had to snap pairs of positive and negative plugs together (positive to negative, negative to positive).
There was a connector that all of these snapped into, which plugged them all into one line leading to the house.
Running The Wires
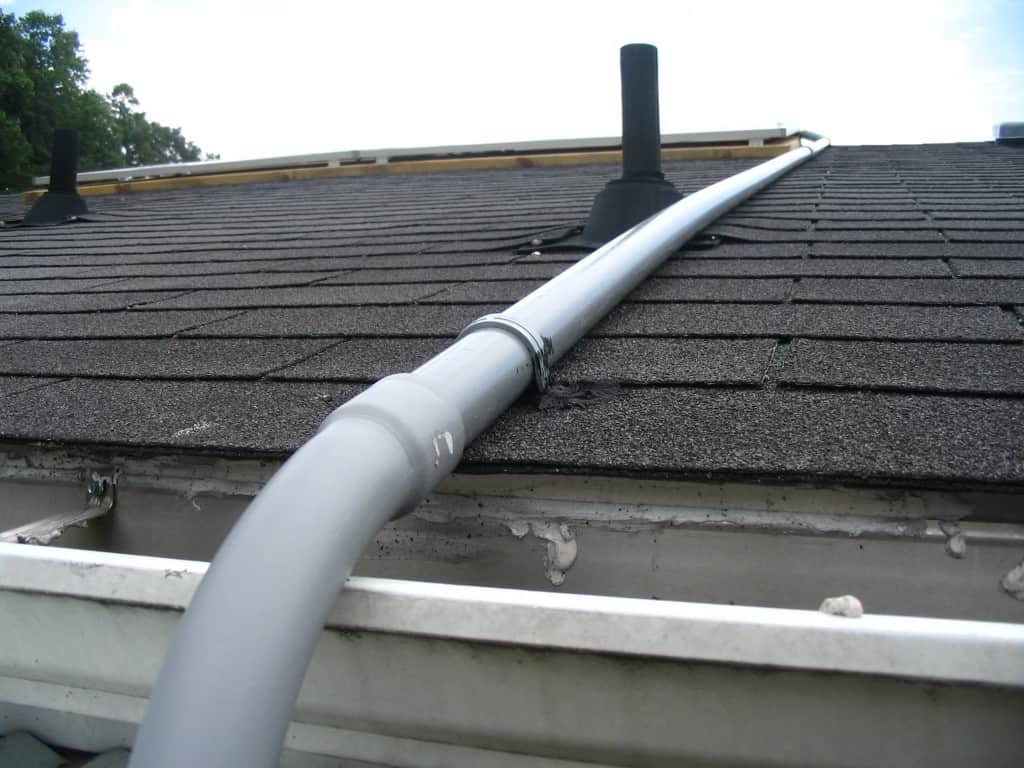
We figured it would be a good idea to cover the wires coming off the roof, so my husband ran them through 2″ PVC conduit. We didn’t want to drill any holes through the roof, so the pipe runs over the gutter and down to the porch roof.
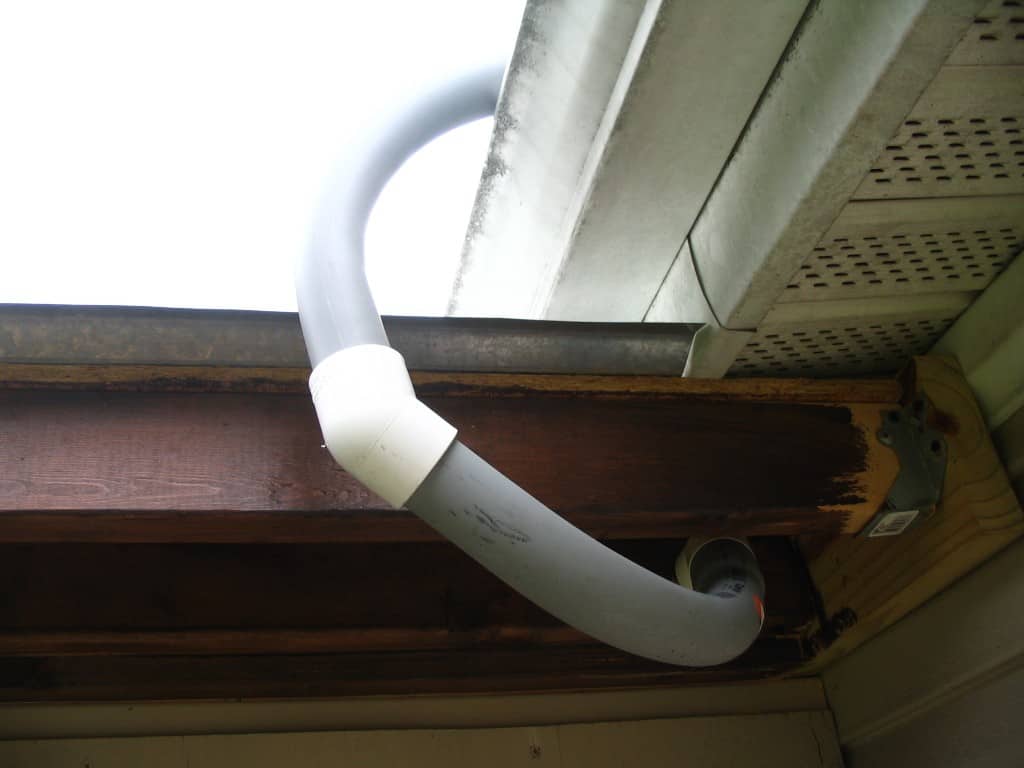
Jerry rigged an elbow on the pipe so that it would bend to fit through a hole he drilled through the porch roof beams. Here you can see it feeding the wires through to the inside of the porch.
Connecting The Panels To The System
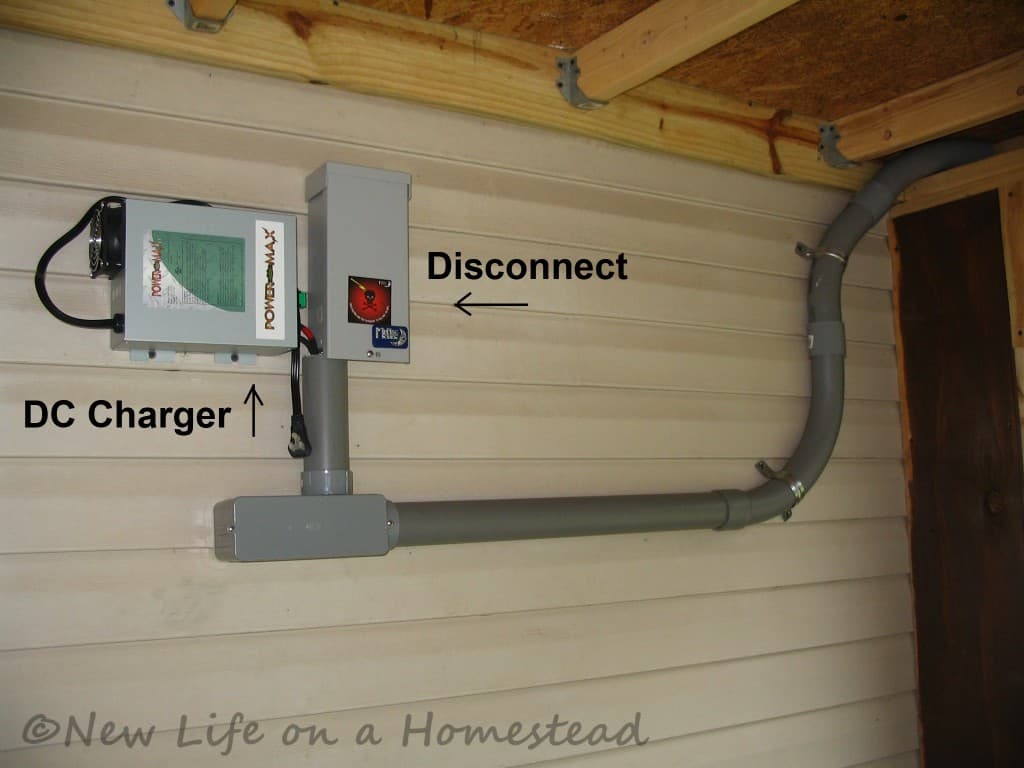
Here you can see where the pipe continues down and along the exterior of the house, sheltered by our back porch.
The wires lead to a junction box (that rectangular grey box horizontal on the wall), which covers a hole leading to the interior of the house. Inside the junction box all of the wires from the panels to the other components are connected.
Above the junction box there is a Disconnect box and a Charger.
Midnite Solar Disconnect Box- Inside this box are breakers. If we ever want to disconnect the power coming from the panels, we just flip those breakers and the system shuts down.
PowerMax 40 amp DC Charger- This box is for us to plug our generator into if/when we need to charge our deep cycle batteries due to long periods of low sunlight.
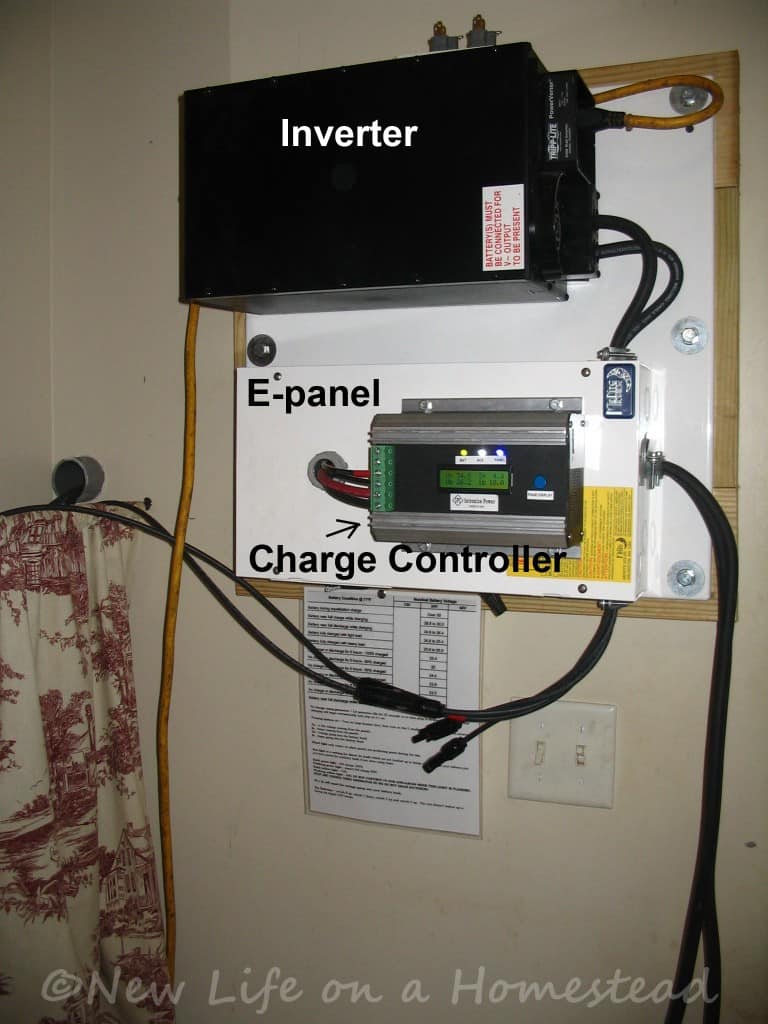
Here is what it looks like on the other side of the wall, in the house. That grey pipe coming through the wall on the left carries the wires from the junction box to connect to the E-panel on the wall. It’s all plug-and-play.
This part of the kit came pre-wired and mounted to a board, so all my husband had to do was screw the board to the wall and plug the wires together. Not to say we weren’t terrified that we’d screw something up as we went along, but it wasn’t complicated.
Here we’ve got a Tripp-Lite 2400 watt 24 volt inverter, a Midnite Solar E-panel with DC breakers, and an Intronic 75 amp MPPT charge controller. Don’t ask me to explain what each one does. I’m still learning.
At this point, all I know is that a green light is good, a yellow light needs to be watched, and a blinking yellow light means we either need to stop running appliances or recharge our batteries with a generator if the sun doesn’t come out soon.
Batteries Hooked Up
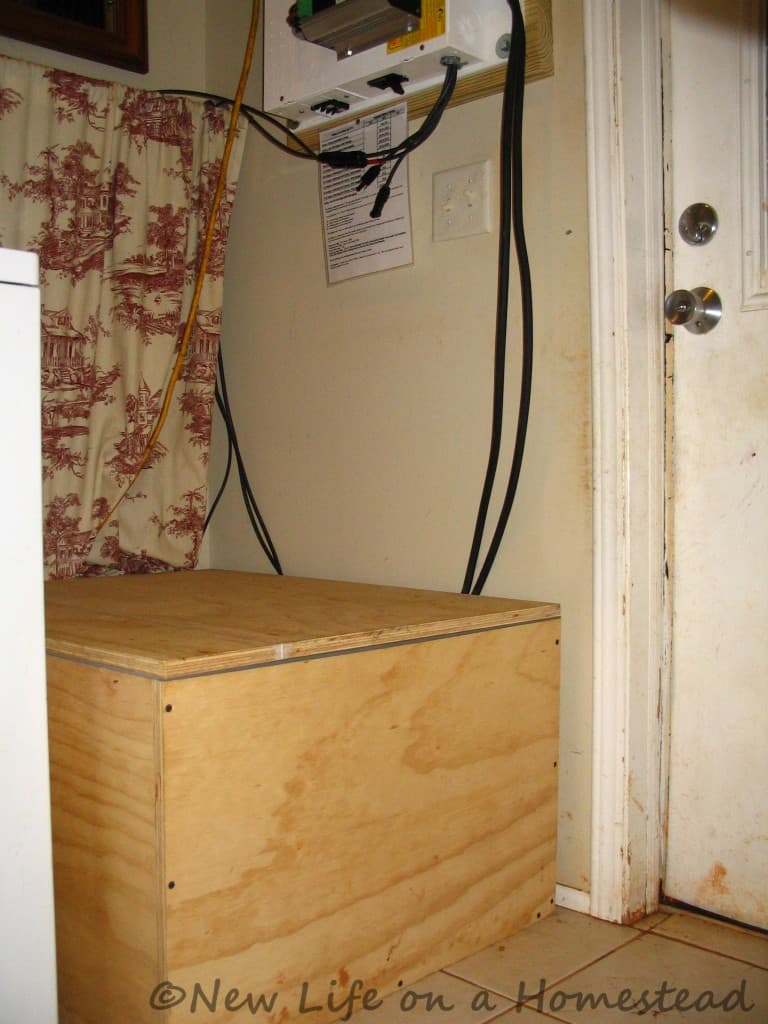
From the wall setup wires continue down to a box where our four deep cycle batteries are housed. Batteries are required to store the electricity generated by the panels.
While the sun is out and the panels are getting a charge, any energy we aren’t immediately using gets stored in the battery bank. On cloudy days when the panels aren’t getting a charge, we will run our home off the batteries.
If we’re careful, we should have enough energy stored to last us for 2 days. Once the batteries have been drained about half-way we’ll need to hook up our generator to recharge the batteries. We have to be careful not to drain the batteries below 50% of their charge, or it will drastically reduce their lifespan.
The charge controller tells us how much energy we’re generating, and how much juice is in the batteries. It will warn us if we’re getting low and need to recharge so that we don’t completely drain our battery bank. That would be bad.
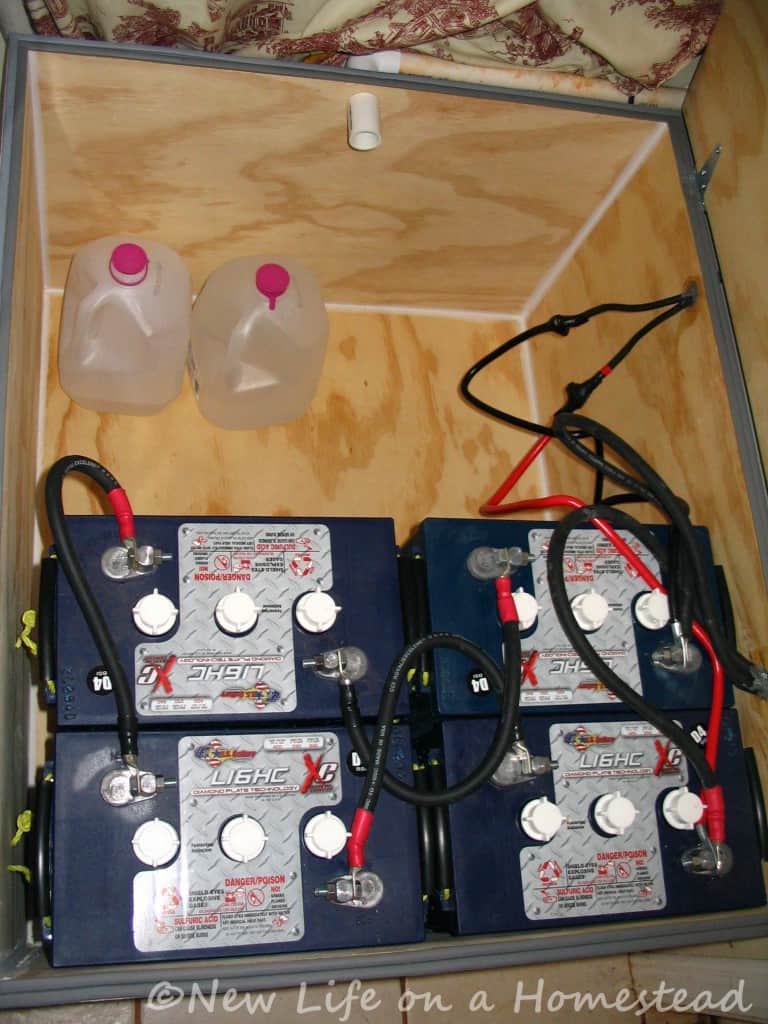
These batteries put off gases which need to be vented outdoors, so Jerry built this sealed box to house them in which has a pipe going through the wall back outside. Here you can see the four batteries inside the box. These are 420 ah L-16 deep cycle batteries.
We wired it according to the manufacturer’s directions, but there are many theories on which is the best way to wire the battery bank. Different wiring patterns can effect the life-span of the batteries.
Batteries aren’t cheap. I hope we don’t mess this up.
We have to keep an eye on the water level in the batteries, and top them off with distilled water as needed (maybe once a month). If we take good care of them, they should last for several years.
It’s important that the box is sealed up well. We considered keeping the battery setup outdoors, but the batteries need to be protected from extreme heat and cold, so we decided it was best for us to keep them in the house. We made the box big enough to add a few more batteries in the future, if we need to.
Up and Running!
It took a couple of days to get everything mounted and wired. We were extra cautious at every step, and made many phone calls to the distributor to double-check things before we moved forward.
All of this was very new to us. We had no experience whatsoever with solar panels, and very limited electrical knowledge. We were scared to death that we’d fry something.
The day finally came when everything was mounted and installed. Jerry and I stood in awe of all of the boxes, wires, and gadgets. The next step was to flip the breaker switches to turn it all on.
We were scared to death.
We looked at each other nervously. Were we ready? What if something was wired wrong?
Jerry made one last call to our contact at Appalachian Energy Solutions. (The poor guy, he was so patient and good with us.) Jerry took photos of everything and sent them to the guy to make sure everything looked okay.
We got a thumbs-up.
And Jerry flipped the switch.
The control board came alive. Lights began blinking, numbers flashed across the screen, and a fan began a steady hum. What did it all mean? I had no idea. It was a very exciting and scary moment.
We went to bed that night praying the house didn’t burn down.
The next morning after my husband had gone off to work, one of the kids noticed a funny smell. What is that mommy? It smelled like burning electrical wires, and it was coming from the E-panel box. The smell got very strong, we had to open windows to get some fresh air coming into the house.
I immediately called Jerry to tell him what was going on. Shut it down, he said. He told me how to go out to the disconnect box, and instructed me on which breakers to flip in which order.
I kept the system off for the rest of the day.
A couple of phone calls later, we decided to try again. Maybe it was just that the system was new and needed to be broken in? The next day, while my husband was home, we started it back up again and let it run for several hours. This time there was no more smell.
It has been about 2 months now that the system has been running continuously, and we haven’t had any more complications.
Not Quite Off-Grid Yet
Right now, our system is running independently from the rest of our home’s electric system. We’re still on the grid, but we’re running a few things off of the panels via an extension cord. Once we tie the kit into our home there’s no going back, we’ll have to disconnect from the power company. You can’t use solar and utility electricity at the same time with an off-grid system. (They do make grid-tied solar kits, which can be used alongside your existing electricity, but you can’t use batteries to store any extra energy you generate.) We want to make sure we have everything necessary in place before we take that last step. We still need to get our wood cook stove hooked up (those stove pipes cost a fortune!) and we’re still working on a source of hot, running water before we’re ready.
Currently our chest freezer and chest fridge are running solely off of the solar panels. I’ll do a separate post on the chest fridge, but we found a very simple and inexpensive way to convert a standard chest freezer into a highly energy efficient fridge. Our upright fridge/freezer pulls way too many watts to run off of the solar panels, but the chest fridge and freezer only require a fraction of the energy the upright uses, so they’ve been running beautifully.
That’s pretty much where we’re at so far. I’m sure there will be lots more to share in the coming months! Stay tuned…

A city girl learning to homestead on an acre of land in the country. Wife and homeschooling mother of four. Enjoying life, and everything that has to do with self sufficient living.
just wondering how the fridge freezer is working 4 years later.We are putting in solar at our cottage which we spend about 6 months at spring through the fall. Thanks for all your plain simple instructions everything is down to a +b + c.Wish all instructions were as good.
You can find a lot of things already set up for 12 volts at rv supplies. Then they can run off battery without being converted with the converter loss.
Hi Kendra,
I have really enjoyed reading your shared information, I just found it today. I too, have a solar powered ranch. It is a very small ranch, only 334 acres in the Texas Hill Country. My “neighbors”, most of them absentee land owners, have thousands of acres.
Congratulations on your system! and thanks for sharing your insight!
My solar panels are on a rack, and the rest is stored inside a large metal box under the solar array (for the inverter, batteries, and all other electrical gadgets). It is a 7 Kw system, and is both off-grid and grid-tie, so you really don’t have to choose between the two systems. I have a switch that allows me to disconnect from the grid, and I have tested off-grid living several times (during sunshine a month at a time), once unintentionally after a summer night storm knocked out the grid transformer, and all I saw was a blink inside my house. I had no idea that Medina EC had been toasted. Three days later my solar system cried calf rope. Fortunately, my batteries were not hurt. Now I have a green LED signal light, right by my breaker box on the electric pole, that tells me if Medina EC is up (if it is on) or down (if it is off). The computer system that was supposed to give me all kinds of information never worked like it should have.
I have a windmill to pump water. Right now we have had torrential rains, and my creek is at flood level, so it disconnected my poly waterline that travels from the windmill, across the creek, to my house. The violent creek surge pulled it apart (it’s happened before). The poly line is at least 1500 feet long, but it is only vulnerable as it crosses the creek. I’ll have to fix it when the creek goes down to normal level.
I did not see you mention water storage tanks when I read about your well hand pump. I have abundant water storage in poly and concrete tanks (plus two large stock tanks). I have 9 thousand gallons in storage at my house from the windmill, and 30 thousand gallons storage across the creek at the windmill. I also have 10 thousand gallons of rainwater collection at my house for the orchard and gardens. I also have an additional 30 thousand gallons in storage at one of my pastures for a few of my goats and in reserve for whatever, in case of drought, for my Morgan (harness) horses. My 103 year old barn collects rainwater for my 300,000 gallon pond (loved by my geese and ducks). I encourage everyone to get water storage tanks for their well.
I did not understand how your hand pump connects to your pressure tank to deliver water to your house. I would have to gravity feed water to my house from the bottom of my water storage tanks and bypass the pressure pump in my “well house” (if my solar system failed). There used to be a hand dug well next to the well house that went dry in 2009, which is why the pressure tank and pressure pump are in the well house.
Right now my most immediate project is to build a milking parlor for my 2 Jersey cows. I have had (and still have) dairy goats for many years, and love to make cheese, but longed for butter and cream. Now I have plenty of cream, and will be making butter in a few minutes (Right after feeding the chickens, turkeys, guineas, ducks and geese as well as the meat rabbits, pigs, and everyone else that expect handouts, with their paw, hoof, or distal extremity extended in the upward position! and pointing to their empty mouth!
Since you are an active homesteader, I would be most appreciative If you hear from anyone that might be interested in working on a holistic (homeopathic) veterinarians’ ranch as an intern, please share my contact information with them. I do have two cabins and an old ranch house that is scheduled to be remodeled for interns to live in while they are here. I lean heavily on Celtic Christianity, and I hope to provide a nursery for Saints since my ranch is a very “Thin Place” (where heaven and earth are separated by a very thin line). I hope that you do not consider this “spam” if so, I apologize for offending you, please just delete my comment. God’s richest blessings to you and your family.
Catherine,
I enjoyed reading about your setup there! It sounds like you have a wonderful place. We do have 8 or 9 55 gallon rain barrels, though they’re not all hooked up right now. With the hand pump, pond, and three creeks on our property, we don’t rely too heavily on stored water. We don’t have many dry spells here, so hopefully that won’t be a problem for us down the road. The hand pump on our well is tied directly into the pressure tank, so when we pump at the well it’s filling the pressure tank. When the tank is full, we go back to the house and have about 5 gallons of pressurized water before we have to pump again. There’s a valve we can switch to allow us to pump water directly at the well if we want to fill a bucket instead of feeding it to the house. Hope that makes sense! I wish you all the best with your ranch!! Maybe somebody will see your comment and will be interested in working with you. 🙂
Hi Kendra,
Thanks so much for your reply. I can’t even imagine a place that is not in a drought, or going into a drought, or trying to come out of a drought, but that is life here in my part of Texas.
I will show your system to my “pump consultant” and see if he can duplicate your system. I really like the idea of getting pressurized water to my house, even if it is only 5 gallons at a time!! Gravity feed is very low pressure, unless you have an elevated water storage tank, which has its own set of obstacles. I will not have to lift water out of a well, since it is stored in above ground tanks. I will let you know if I am successful in bypassing my electric transfer pump and still get pressurized water. I am sure that there are lots of other folks with this same delima and I feel sure that someone has already solved the problem.
Thanks again,
Blessings,
Ct
From what I understand, the Simple Pump is the only pump that can give you pressurized water in the house. FYI. Good luck with it all!! If you want a quote on a hand pump I’ll be happy to help you! http://www.emailmeform.com/builder/form/d8pXxC9S320a49u5fGrb
Oh in this picture, I see you do have a combiner box. Good!
I was wondering which state you live in?
We actually took delivery of a new 15 cu ft freezer today (I’m told, I’m still at work) which I will be converting to a fridge from several other articles I encountered on the web, yours included. My Johnson controller should be in from Amazon in a couple days and I hope to get very favorable energy consumption as numerous other people have indicated is the norm for such a setup. I plan on putting in a 2nd chest freezer, this one will be a dedicated unit only for freezing and will be DC powered from a single solar panel, I am told it is possible to run these off a single panel of approx 100w (much smaller than your 270w panels) without battery or inverter; just directly wire the panel to the DC powered fridge and it will run only during the day, of course; but can store sufficient cold to last through the night or most cloudy periods. I think SunDanzer produces very noteworthy DC chest freezers and can be found online lots of places. Good luck.
Walt (in sunny hawaii trying to get a similar PV setup like yours!)
That’s wonderful, Walt! I hope it all works out well for you. Best wishes!
This is so awesome. I’m happy for you. Solar panels are definitely something we would like to install in the future. 🙂
Congratulations. I, too, have put 1Kw of panels on the roof with batteries for storage. I run one circuit for the garage which has the freezer and dehydrator on it. Some hints for you. I have a well that has a 3/4 horsepower pump. If you plan on using your system to power your well it will need a lot more than the 550 watts for the 3/4 pump. They usually require between 1.5Kw and 1.9 Kw to run and 4.5 Kw to start. Your inverter will have to supply this at 220 volts since most pumps are 220 volts. Also be careful of the fan in your battery box. It will have to be spark free or it might ignite the hydrogen gas. My batteries are AGM which are more expensive but don’t outgas. I am not a professional installer, but if you have any questions just give me a yell. I may be able help you from making the mistakes that I made.
Les
Hi Les,
Thank you for the advice! We don’t plan on running the well pump on our solar. It pulls way too much for our system to handle. We actually just had a hand pump installed not too long ago. I don’t think we’ll need a fan in the battery box, so far it seems to be okay venting as is. It’s good to hear from somebody who has a very similar setup. 🙂
How does the hand pump hook up to ur well?
The pump’s pipe slides down into the well tube alongside a submersible pump (if you have one). Simple Pump has a well cap designed with a hole in the top for the pump to fit into. Then you can pump water right out of the spigot there at the well, or you can connect it into your home’s pressure tank and have pressurized water to the house.
Battery based photo voltaic systems do qualify for Federal tax credits and do meet the criteria for North Carolina State tax credits as well if installed on your main residence. Our customers use them every year for our battery based installations. Wooden battery boxes are fine and have been used for many years. While plastic boxes are nice ones specifically designed to house 8) l-16 batteries are around 450 dollars and generally have a month or more lead time. We just replaced a bank of batteries this week that were housed in a wooden battery box that was more then 15 years old with little damage to the box itself. Passive venting is recommended now for most battery boxes( depending on charge factors and location). Hydrogen is around 10 times lighter then air so with intake for fresh air at the bottom of the box and an outlet for the hydrogen at the top it will naturally rise. Active venting (fans) can cause drastic temperature fluctuations.
That’s all good to know Powell. Thanks for answering those questions!
Congratulations, Kendra, on (almost) getting off the grid. That’s a big project to undergo. I look forward to hearing how it goes for ya’ll.
Thank you, Sally! 🙂
Your math is incorrect. If you assumed that you avereaged 5 kwh a day then your saving is whatever 5 kwh costs you from your utility. My utility charges $.06/kwh so for me it would save me $.30 a day or $109 a year. But then you factor in the losses; about 3% between your PV panels and the batteries, about 10%-15% in the batteries themselves and about 5% converting to AC. Then there is the loss of kwh on cloudy days. So a reasonable estimate for me would be $80 savings a year more or less. If your electricity costs $.18/kwh (as it does in states who have forced alternative energyu on it’s citizens) then you can expect to save a whopping $240 a year. At that rate it will take you over 19 years to pay it off and that assumes you ignore the value of money (your $4650) for 19 years. It also assumes there were no subsidies paid by the taxpayers to reduce the cost of the PV system to you.
GoneWithTheWind,
Actually, you’re not quite getting the whole picture. We aren’t just reducing our electricity usage by an estimated 5kwh/day. We’ll be replacing 100% of our electricity with off-grid alternatives. What we won’t be powering with the panels, we’ll be replacing with manual or wood powered alternatives. When we disconnect from the grid, we will not have a power bill. THAT is where the savings will be. With our average bill costing us around $250/month, that’s actually $3000+ that we’ll be saving per year. And no, taxpayers have not subsidized our system. You cannot get tax rebates on off-grid systems, only on grid-tied solar. Not in my state, anyways.
Good article, but I think you got bad advice on treated lumber rotting the shingles. Have never heard of a single incident where treated lumber does damage to shingles. Wish you the very best and this was an excellent read. Christ bless.
Plowboy,
Hopefully this setup will last a while! 🙂 Thanks!
looks nice.
I have a couple of questions;
1.the wood under the panels? won’t they hold water ? & I hope that wont cause quick rot of the wood.
2. the wood box ? plastic in my opinion would be better if you had a acid spill/leak ?
3. adding a ? very small fan? “from a computer”.to the hydrogen vent.
Keebler.
Keebler,
Yeah, we’re gonna have to keep an eye on the panel mounts to watch how they hold up. It was an inexpensive solution to getting the panels up asap. We’ll probably switch to metal mounts as we can afford to buy them. My husband built the battery box per the distributor’s instructions- he told us to build it out of wood. Hopefully it will do. So far no problems venting the box. A fan would be a good idea if we feel we need more circulation down the road. Thanks for your questions. 🙂
You don’t need the fan, but you do need to add an air INTAKE down low on the opposite side of the outlet. Use one of the round eve vents (any big box hardware store has them). And believe me, I’ve seen a battery blow up during charging. Acid blew everywhere. Use GOGGLES, not safety glasses, when filling or checking the batteries, and some rubber gloves too. You can put a large, low sided, plastic container in the bottom to hold the batteries, that will keep any possible leaks from ruining the box. Just some quick, easy, cheap ideas which will help. (Power plant operator by trade, tinkerer by heredity)
I read your comment to my husband, James. We appreciate your advice, and will definitely do these things.
Hi,
Do you the know approximate weight of the panels and mounts that you placed on your roof?
Good luck with your system.
Grunk,
The panels weight about 50 lbs each. The wood was pressure treated 2x6s. Not sure what they weigh. The entire setup is probably around 250 lbs, give or take.
Appalachian Energy did my solar system almost 2 years ago and its doing great. We powered the core of the house including refgig and internet and lights. Its awesome to have power when the grid goes out!
Looks great Kendra! On another note, I just wanted to let you know while I was shopping at Fleet Farm up here in MN I saw your DVD for sale on the shelf with the canning supplies! That was pretty cool 🙂
Oh really, Jess? That’s awesome, lol!
I am a union Electrician. Your set up looks fine, even though a couple things wouldn’t pass code requirements.Not to worry though, it’s good. I am getting ready to do the same at my house soon. I have a solar powered box at my lake that gives me, stereo, lights, cb, etc. It has been up and running for 7 years. It is powered by an 5 watt trickle charger panel. Last year I built my own home made wind charger to help charge the battery. Learning about these systems is fun. Hope yours works good for you. Have fun! Keep reading!
Thanks for your input, Tim! 🙂
Thanks for this thorough and simple explanation of how the panels work. Would it be rude of me to ask how much this set up cost? If so, feel free to tell me so. Just trying to get an idea for our own house. 🙂
Hi Laurie,
Nope, not rude at all! 🙂 I actually went over that in another post: https://www.newlifeonahomestead.com/solar-installing-a-power-transfer-switch/