This year I’m trying something different to water my tomato plants. As I’ve mentioned before, I’ve had trouble with my tomatoes splitting from uneven watering.
So, this time around I thought I’d try using a slow release drip irrigation system. To do this, I’m planting 2-liter soda bottles alongside my tomato plants. I’ll fill them with water and plant fertilizer (manure tea maybe) once a week.
I decided to use a drip irrigation system because that way they will get a constant moisture supply. Plus, I won’t have to worry about fungus or disease from the leaves of the plant getting wet. I also won’t have to worry about feeding any weeds in my garden as the water goes directly to my plants.
Why DIY a System?
Simply put; it’s cheaper. Shopping around for a pre-made system is possible and those systems may save a lot of time and effort. Unfortunately, they’re often also very, very expensive – especially if you’re living in a rural area.
With that in mind, why go putting your poor bank card through the trauma of purchasing an expensive system when you can make one yourself for practically nothing?
What Can You Use Besides a Water Bottle?
You don’t have to use a plastic water bottle. Many other containers will do the trick. Upcycle things like:
- milk jugs
- metal food cans
- small Tupperware boxes
- glass jars with loose lids (those have to be moved from their position to fill, but still)
- plastic bags (with 1-2 tiny holes pocked at the bottom)
You can even use PVC pipes to connect them with your containers and spread the water to more plants.
The Very Basic Drip Irrigation Design
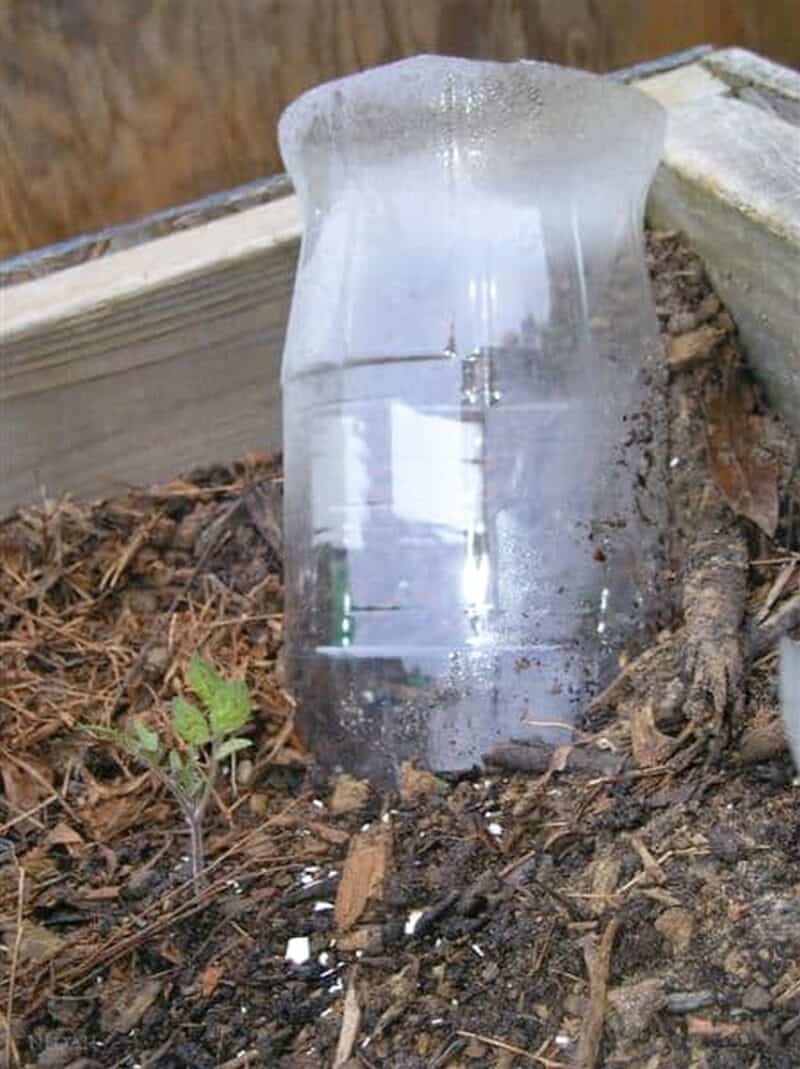
Step 1: First, using a sharp knife, cut the bottom half of the bottle:

Step 2: Next, use a hammer and a small nail to poke two of holes in the lid or cap of the bottle. This is where the water will drip out at the roots of the plant.

A Slightly More Advanced (But Efficient Design)
What You’ll Need
- 2-liter bottle works best (or similar plastic container)
- Scissors, Knife, or box cutter
- Nail, drill bit, or hole puncher
- Hammer
- Small Rubber Gasket
- Aquarium/Airline Tubing
Instructions
Step 1: First, using a sharp knife, cut the bottom half of the bottle. I just cut where the seam/molded line is.
Alternatively, you can cut it only partway off, the remaining plastic acts like a hinge. This gives you a way to close the irrigator if/when needed.
Step 2: Use a hammer and a small nail or hole puncher to poke a couple of holes in the lid or cap of the bottle. This is where the water will drip out at the roots of the plant over a period of time. You need around four to eight holes in the cap of the plastic bottle.
Step 3: Use some crafting foam and make a small washer.
Step 4: Take the craft foam washer and use it to seal the cap to the bottle.
Step 5: Use a nail, drill, or drill bit and make a hole in the side of your bottle around 2 – 3 inches (5 -7 centimeters). When using a nail, it’s a good idea to heat it over a flame for a bit first (just make sure you don’t burn yourself). This makes making the hole in the bottle easier.
Step 6: Insert the rubber gasket and 2 – 3 inches of aquarium tubing (you can get some at aquarium supply stores) into the hole in the side of your bottle.
Step 7: Put some sealant (you only need a thin band of the stuff so don’t go crazy with it) around the joint where the gasket and the tubing meet. Use a toothpick or popsicle stick to smooth it out.
Step 8: Fit a knob or faucet to the end of the tubing that’s outside the bottle. This will allow you to control the flow of water through the system.
Step 9: Do a quick test. Fill the bottle with water and see how fast the water drips out. It needs to be a slow drip if you want to keep the watering even.
Step 10: Empty the bottle.
Step 11: Dig a deep hole around 4 – 6 inches from the plant’s stem. Be careful not to disrupt the delicate root system of an established plant when digging.
Step 12: Bury the bottom 2/3rds of the bottle with the neck and the cap-side-down next to the plant so that it’s angled toward the roots of the plant.
Congratulations, you’ve made yourself a plastic bottle drip feeder!
Adjusting your System
The adaptors for your emitters/drippers, if you’re using ¼’’ emitters, will typically range between 0.15 and 2 gph (gallons per hour). If that isn’t quite ideal for where you are, you can adjust it to fit your needs.
What Plants Work Best?
These systems are great for maintaining a vegetable garden. One of the strong points of a drip irrigation system is that the water goes directly to the roots of the plant. Plants that benefit from a system like this include:
- Zucchini
- Cantaloupe
- Pumpkins
What if You Have Container Plants?
You can still use this system if you have small container plants. All you need to do is make a few adjustments to use smaller soda bottles.
What about Clay?
If you don’t want to use plastic bottles, you can use clay. Burying an unglazed terracotta pot is a great alternative because it allows the water to seep out of the sides of the clay.
It will take up a bit more space because the pots are often quite wide, but you can get pots that meet whatever size-related needs you may have.
Use Pebbles, String, or Wire
If you want to stand your irrigator on a table above your plants, you can fill the bottom inch or so with pebbles to keep it steady. On the other hand, you may prefer to hang your irrigator above your plants. That’s another easy adjustment to make.
Simply put a few hanging holes along the edge of the opening and thread a bit of strong, sturdy string through them tie a good knot in it and hang the irrigator from a hook above the plants – you can install one if you don’t have one.
Have you tried this watering system before? Do you have a better idea for watering tomato plants (and others) consistently? What works for you?

A city girl learning to homestead on an acre of land in the country. Wife and homeschooling mother of four. Enjoying life, and everything that has to do with self sufficient living.
I have seen dozens of the same idea posted and no one addresses the fact that inserting the soda bottle upside down, with the bottom cut off and filled with water creates a perfect environment for mosquitoes to lay eggs.
Would be better to add something about putting a piece of screening over the opening
The water drains too quickly for mosquito eggs to be laid and hatch.
Looks like a Coca-Cola bottle and cap to me.
P.S. We did just install a dripline system in our high tunnel a couple of weeks ago and hooked it up to a timer. What a BIG time-saver!
That’s a great watering idea! We’ve done the same things with empty milk jugs before–just poke a couple holes in the bottom of the jug, fill it, and set it on the ground. We’ve actually used this method for newly planted trees that require a lot of water during the first months after planting. It’s basically a homemade dripline irrigation system. 🙂
We did driplines for everything in the last garden. We started with mini sprayers while waiting for germination and then driplines when things were established. It was amazing.