Last night, I stayed up ’til almost 1 a.m. canning tomato juice. ‘Cause I’m crazy like that.
Actually, we have a quarter of a cow coming tomorrow, and I needed to make room in my freezer for all that beef. Plus, I’d procrastinated on this summer bounty long enough. It was time to turn those 55 lbs. of frozen tomatoes into tomato juice!
I use a lot of tomato juice for soup, so I figured it would be the best use of my produce. And it isn’t too hard to make. Just takes time.
Tomato juice is not only delicious, but it is also packed with nutrients that are essential for good health. Tomatoes are an excellent source of Vitamin C, which helps to boost the immune system and protect the body against infection.
They are also a good source of lycopene, an antioxidant that has been linked with a reduced risk of cancer.
In addition, canned tomato juice is a convenient way to get your daily serving of fruits and vegetables. It can be enjoyed on its own or used as a base for soups and stews.
And because it is shelf-stable, canned tomato juice can be stored in your pantry for months at a time.
If you’ve never tried canning tomato juice, and you find yourself buying it on a fairly regular basis, you really should consider putting some up the next time you’re overloaded with ripe (or frozen) tomatoes! Here’s how easy it is.
Table of Contents:
What You Need to Can Tomato Juice
Canning your own tomato juice is a great way to preserve the taste of summer tomatoes for year-round enjoyment. And it’s not as difficult as you might think! Here’s what you’ll need to get started:
- Tomatoes (obviously!) – You can use any variety of tomato, but if you want a really tasty juice, try using heirloom tomatoes that you grew yourself. They have a richer flavor than store-bought tomatoes, and they’ll make your juice taste like summer in a jar!
- Salt (optional, but recommended for best flavor) – A little bit of salt will help to bring out the flavor of your tomatoes and make your juice tastier. Just add a teaspoon of salt (tsp) or so per quart of juice.
- Citric Acid or bottled lemon juice – This is added to increase the acidity of the juice, which helps to preserve it. You can use either citric acid or bottled lemon juice, but I prefer citric acid because it gives the juice a nice tangy flavor.
- Dishpan or containers to put the tomatoes in – You’ll need something to put your chopped tomatoes in as you work. A dishpan or other large container will work just fine.
- Knife – You’ll need a good sharp knife for chopping the tomatoes. I like this brand because it’s easy to hold and doesn’t slip in my hand.
- Large kettle or large saucepan – This is for boiling the chopped tomatoes before putting them through the food mill. A regular sized kettle will do, but a larger one will make things go faster. You can also use a pressure cooker if you have one. Add enough water to cover the bottom of the kettle, then add the chopped tomatoes. Bring to a boil over medium high heat, stirring occasionally.
- Long spoon to stir tomatoes – You’ll need a long spoon for stirring the boiling mixture of tomatoes (regular stirring, by the way, can help prevent the pulp and juice separation). I like this kind because it has a nice long handle that stays cool even when the tomatoes are boiling. If you don’t have one of these, any long spoon will do. Just be careful not to get too close to the hot steam!
- Ladle for transferring tomatoes and juice – This is for ladling the hot tomato pulp into the food mill or strainer. I like this kind because it has a nice long handle that stays cool even when the tomatoes are boiling. If you don’t have one of these, any ladle will do. Just be careful not to splash yourself with the hot tomato pulp
- Canning funnel – Be sure to use a canning funnel when pouring hot tomato pulp into jars to avoid making a mess! Canning funnels come in different sizes depending on how wide mouth jars you are using so be sure and get the right size for your jars!
- The canner itself – This is a large pot with a rack that holds the jars in place while they’re boiling. The average canner load is around seven jars.
- Canning jars, lids, and bands – You can reuse jars and bands but not the lids – always start fresh with those.
Finally, you’ll need a damp rag to wipe the tops of the jars before sealing them, a small pan to boil the lids in, and a jar lifter to remove the hot jars from the canner. With these supplies on hand, you’ll be ready to start canning your own delicious tomato juice.
What Kind of Tomatoes Should I Use?
While you can technically juice any type of tomato, sauce tomatoes like Romas work best. This is because they have fewer seeds and less water content, which results in a smoother, more flavorful juice. Additionally, sauce tomatoes tend to be more acidic, which helps to preserve the juice for longer.
How to Can Tomato Juice: Step by Step
Although canning tomato juice may seem like a daunting task, it is actually fairly simple and only requires a few basic steps.
Wash Tomatoes and Blanch the Tomatoes
Once the peels and stems were removed, I tossed the semi-thawed tomatoes into the biggest pot I have:
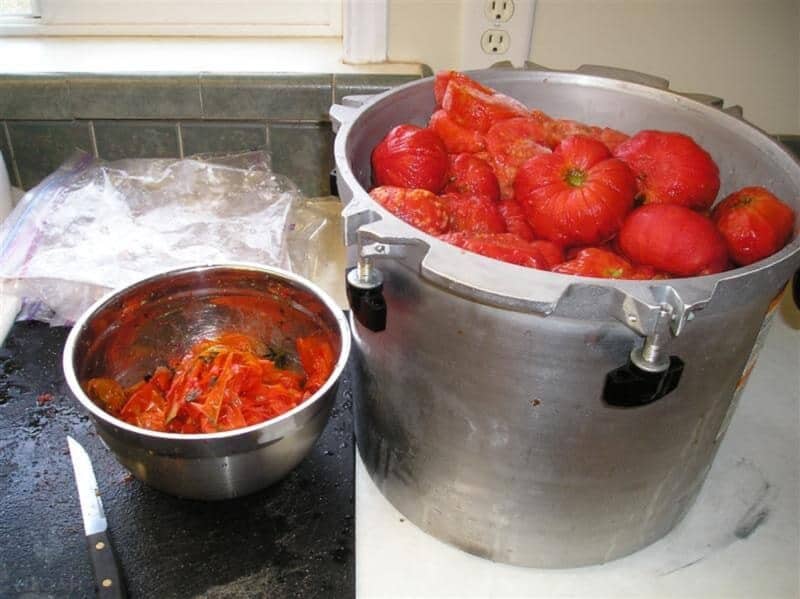
Yes, that’s a pressure canner you see there, but we won’t be pressure canning these tomatoes, I just use this pot to simmer large batches of food in because it’s the biggest one I have.
Core and Cut the Tomatoes
If you are starting with fresh tomatoes, simply core them, and cut into tomato quarters. You don’t need to worry about peeling them, the strainer will remove the peels later for you.
Simmer the Tomatoes
Once the pot was as full as it could get, I heaved it over to the stove and turned the heat up to a little higher than medium for a nice simmer:
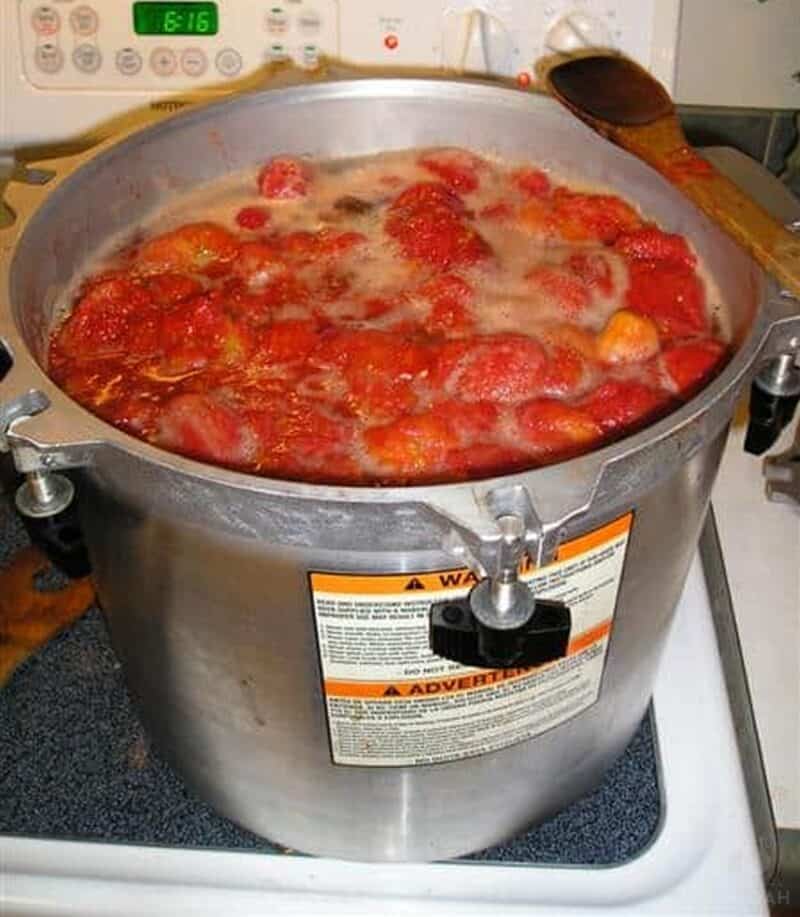
Don’t add any water to the tomatoes. As they cook down, they will create their own juices to simmer in.
Just keep stirring every now and then to prevent scorching on the bottom. As the tomatoes reduced, I added in some remaining tomatoes from the batch, since they didn’t all fit at once. Continue to slowly simmer until the tomatoes are nice and soft.
This is a Back To Basics Food Strainer/Mill. You put the tomatoes in the top, turn the handle, and the juice comes out of the shoot with the peels and seeds squeezed out the end to discard.
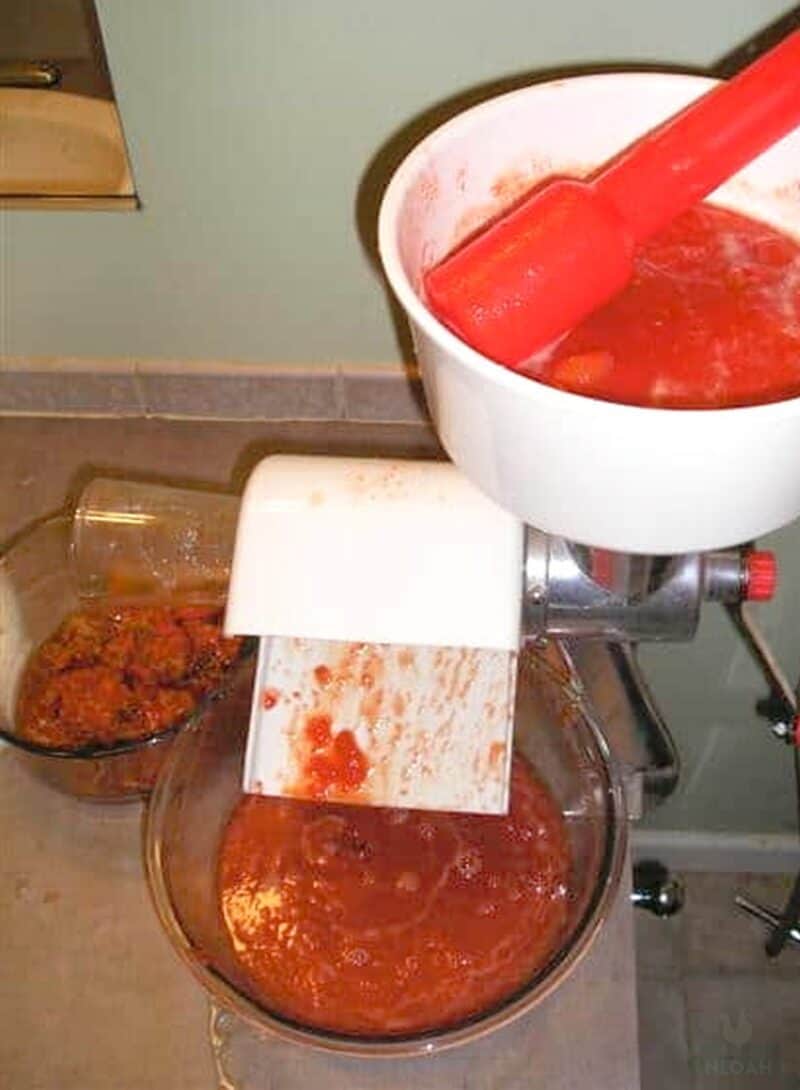
It works quite well, though it’s a messy chore. You might see tomato juice splattered on my wall if you look close enough.
Put the Juice Back on the Stove
Return the juice to the pot and bring to a low simmer. Heat it to 190F. Be sure you don’t bring it to a boil:

Prepare Your Jars
Meanwhile, your jars should be clean and warm. I run mine through the dishwasher to keep them sanitized and hot until I’m ready to use them.
You should also have a small pot of simmering water going for your lids to be sanitized in (for at least five minutes).
Ladle the hot juice into hot jars. Fill it just shy of the funnel for now:
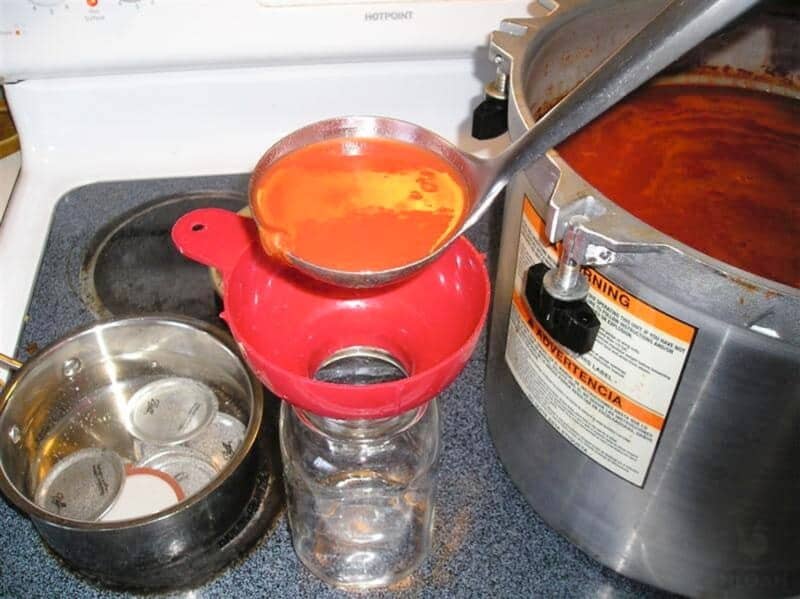
You may want to use a sieve or funnel to make sure all the remaining tomatoes get inside the jars and that you don’t end up with tomato sauce all over your counters!
Now, this is where experience teaches what the books fail to mention. NOW is when you add the lemon juice. See, all of the books say to add bottled lemon juice to each jar, and then fill it with sauce.
But I learned one day the hard way that cold lemon juice from the fridge poured into a hot jar will immediately cause the glass to crack.
Do yourself a favor and add the lemon juice to an already filled jar: 1 Tbsp lemon juice per pint; 2 Tbsp lemon juice per quart of tomatoes. This will help you reach a safe acidity.
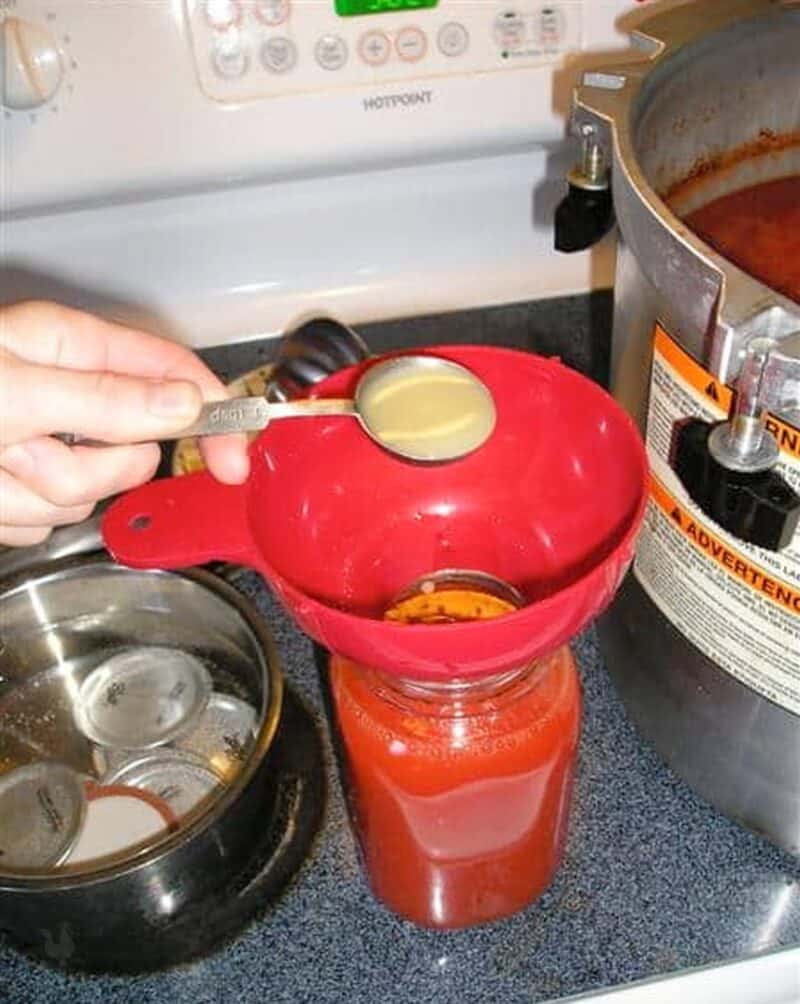
Then top it off with enough tomato juice to fill the jar leaving 1/4 in. to 2-inch of headspace.
Now, why do you need to add lemon juice? It brings up the acidity of the product. Tomatoes are “iffy” when it comes to water bath canning. For the most part, they’re safe, but need a touch more acidity, which the lemon juice provides. You could also use citric acid.
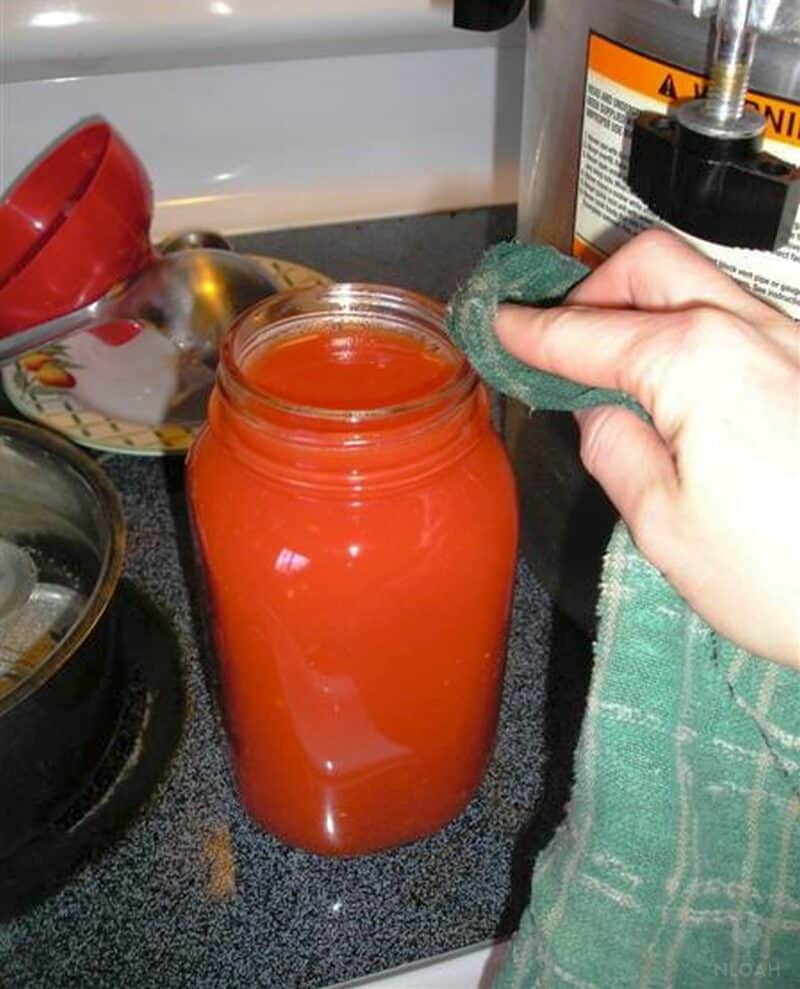
Wipe the Rims
Using a wet cloth, wipe the rim of the jar to remove any drops of food or anything that could prevent the lid from sealing:
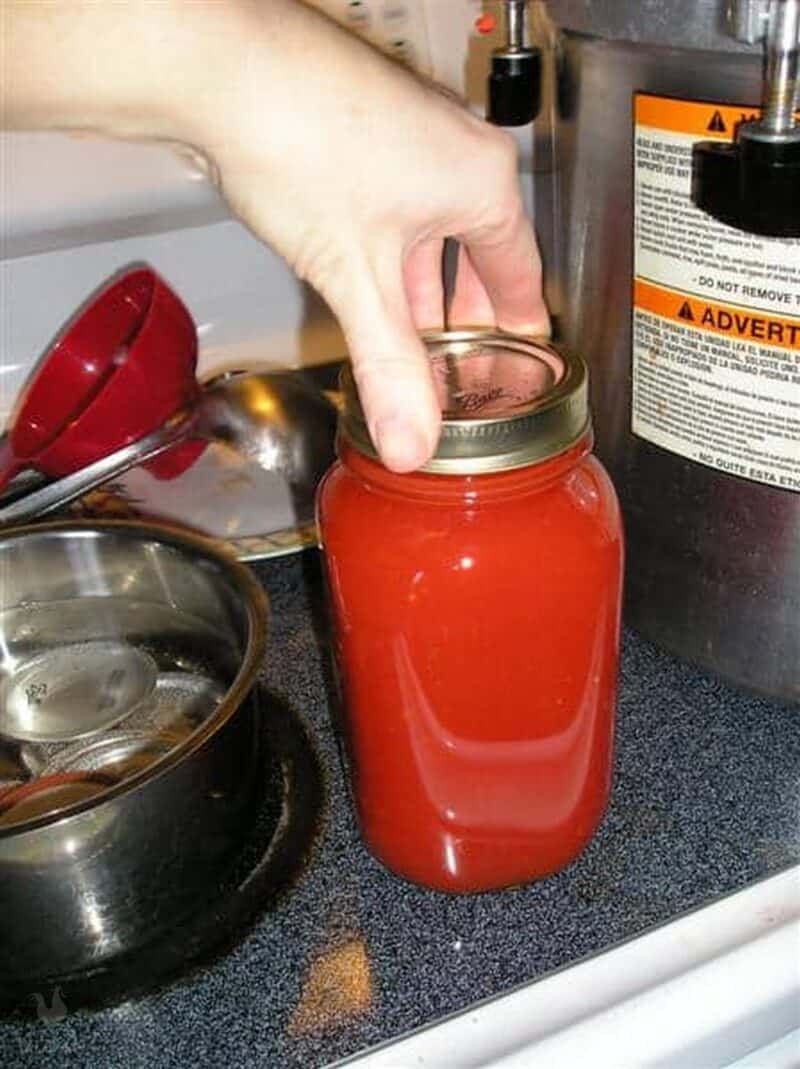
Put Lids and Rings on Jars
Now you’re ready to put your previously simmered lid onto your jar:
And screw the ring on snuggly:
Set your jar aside and repeat this process until you have all of your sauce in jars. If you have a small amount of leftover sauce you can either cool it and put it in the fridge in a clean jar, or freeze it in a Ziploc.
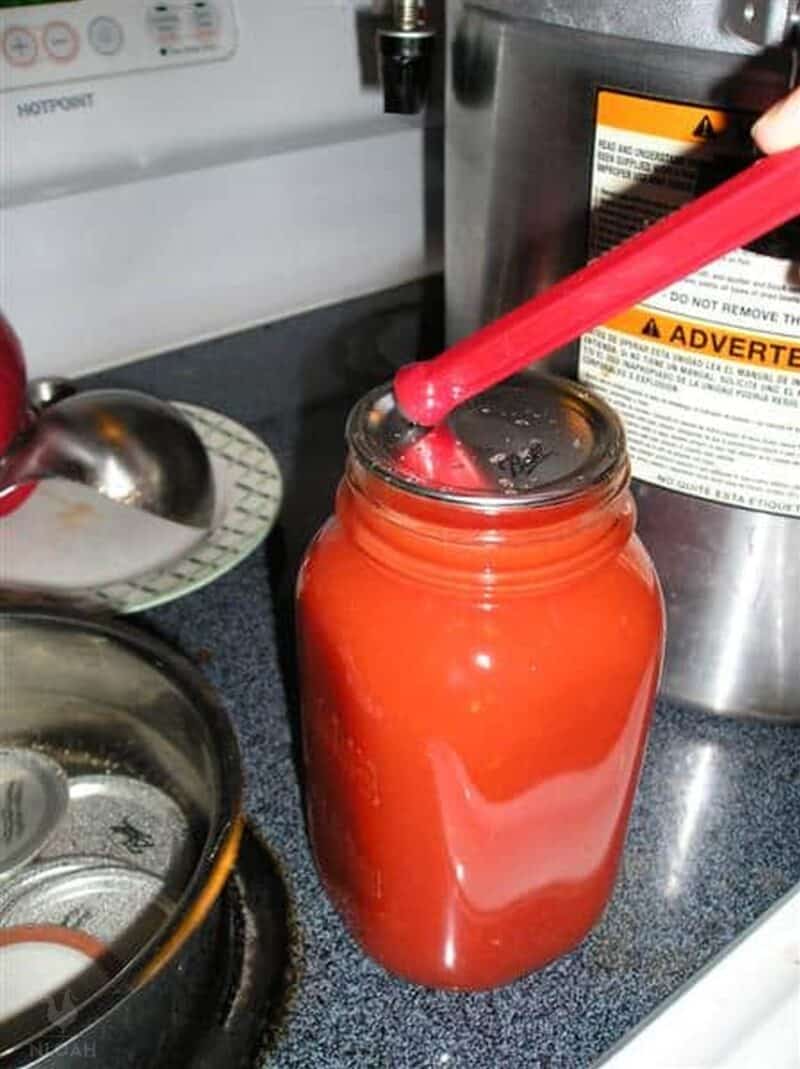
Check for air bubbles before you put your tomatoes in the canner.
Load the Canner
Time to break out the water bath canner! This guy takes forever to bring to a boil, so get a head start by filling it with very hot water before placing on the stovetop.

Once the water starts boiling, you can submerge your jars in a jar rack. The water needs to cover the jars by at least 1″.
Place a rack in the bottom of a canning pot and fill it with hot water, covering the jars by at least two inches. Carefully lower the jars into the pot using a canning lifter or tongs.
Boil the Jars
Put the lid on the canner and bring back to a rolling boil. When the water is boiling again you can start your processing time…
Process pints for 35 min. and quarts for 40 min. If you have pints and quarts together, process them all for 40 min. The quart of tomatoes takes longer but it won’t harm the pints to cook the hot tomatoes a little longer!
Remember, if you’re canning at altitude, you will need to make the appropriate adjustments!
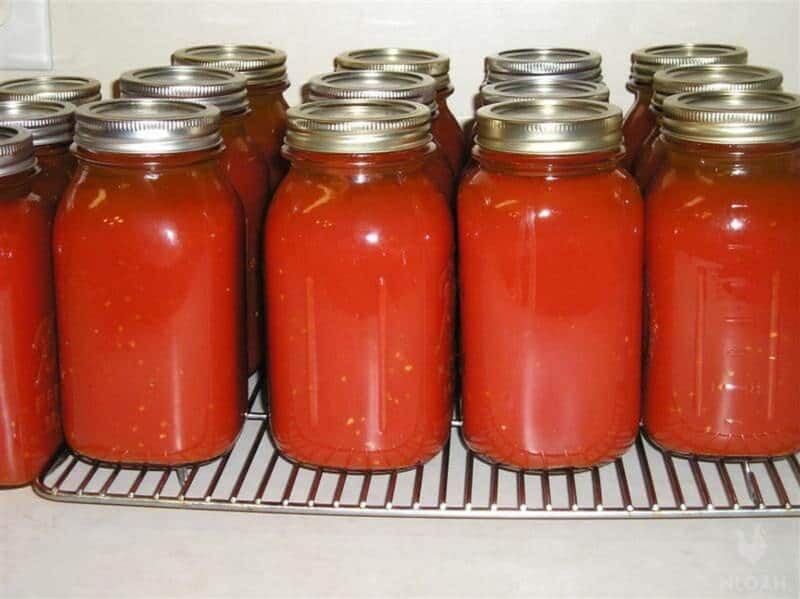
Remove the Jars and Check the Lids
When the time is up, remove the jars from the canner, and allow them to cool for 24 hours before testing the lids. I like to make sure the rings are still tight before the jars cool.
Also, you may have a problem with the jars spewing over when you remove them from the canner. I think almost all of mine leaked some juice out as I was placing them on the cooling rack.
Don’t worry about that, though. It has been my experience that the lids will still seal even though the jars have leaked a little before cooling. Just test the lids to make sure they don’t come off when pried with your fingers.
If one of your lids does not seal, just stick that jar in the fridge to use within a week, or pour that juice into a Ziploc to freeze for a future use. You can also re-can it using a fresh lid and a clean jar.
What to Do With the Tomato Scraps
After a day of canning tomato juice, you may be wondering what to do with all the leftover tomato scraps. If you have livestock, such as chickens or pigs, they will be happy to eat the scraps.
Otherwise, you can add the scraps to your compost pile. They will break down over time and help to improve the quality of your soil.
In either case, there is no need to let the tomato scraps go to waste – there are many uses for them!
Can I Add Other Veggies to My Tomato Juice?
Canning tomato juice is a great way to preserve the harvest from your garden, but you may be wondering if you can mix in other vegetables. The answer is yes, but you’ll need to use a formal canning recipe that is tried and tested.
See the Tomato and Vegetable Juice Blend recipe in the USDA Complete Guide 3-6 for instructions on how to add celery, onion, carrot, and/or pepper.
When flavoring your tomato juice with other veggies, it’s important to use a pressure canner to ensure that the finished product is safe to consume. They just don’t have the acidity that tomatoes do and won’t last if canned in a water bath canner (plus, it could make you quite sick).
With a little planning and preparation, you can enjoy delicious, home-canned tomato juice all year round.
How Do You Use Tomato Juice?
Tomato juice is a versatile ingredient that can be used in a variety of soups, sauces, and recipes. It can also be enjoyed on its own as a refreshing drink. One popular way to use tomato juice is to make a simple soup. To do this, simply combine tomato juice with water, celery, onion, and garlic. If you want a heartier soup, you can add some chopped tomatoes or beans.
Common pasta sauces such as marinara and Fra Diavolo typically include tomato juice as one of the main ingredients. Similarly, many stews and chili recipes also call for tomato juice.
Finally, tomato juice can also be enjoyed on its own as a healthy and delicious beverage. When drinking fresh tomato juice, it is important to add a bit of salt or sugar to taste. This will help to balance out the acidity of the tomatoes and make the drink more enjoyable.
Can You Make Your Tomato Juice One Day and Can it the Next?
Canned tomato juice can be a great way to enjoy the flavor of tomatoes year-round. But can you make your tomato juice one day and process it in the canner the next?
The answer is yes, as long as you reheat the juice before canning it. This will help to improve the quality of the final product and ensure that it is safe to consume.
Final Thoughts
Although I didn’t add any spices to my tomato juice, it still tasted really yummy, and surprisingly sweet when cooled. I’m glad to have this on my shelves for making my favorite vegetable beef soup!
All in all, canning my own tomato juice was an amazing experience that I can’t wait to try again next year – and I definitely can’t wait to drink all of my fresh homemade tomato juice!
Have you ever tried canning tomato juice? Got a tip you can share?

A city girl learning to homestead on an acre of land in the country. Wife and homeschooling mother of four. Enjoying life, and everything that has to do with self sufficient living.
Can I process my tomato juice one day and can it the next and how do I do that? Thank you.
I cooked down cherry tomatoes In crock pot, strained and made tons of tomato juice from the tomatoes. I used the strained tomato juice (pure liquid from crock pot) in a big pot for my hot packed whole tomatoes. After tomatoes heated and juice covered tomatoes in pot, I hot packed the whole tomatoes topped the jars with the juice And ended up having about a gallon of juice left over. This is pure juice from the original crockpot. Can I reuse this juice since it has been heated and use it the next batch of hot pack whole tomatoes? I kept the juice in the fridge for a couple of days and then froze the entire juice in quart jars because I’m not sure if I could use the juice again in a hot pack of whole tomatoes. Pure juice, no critic acid in frozen juice. Any advice out there?
all method very good
l will try to make it
I’ve never heard of adding lemon juice. Does this take place of the salt and sugar? Just wondering. Sherrie
Sherrie,
It brings up the acidity of the product, to make it safe for water bath canning.
We’ve been canning salsa and stewed tomatoes for years, but did juice for the first time last year. What a blessing it has been! With 4 kids into all sorts of activities, and our vow to never eat fast food, we developed some quick soup recipes. By far the favorite was tomato. Take 1 qt of stewed tomatoes, 1 qt of juice, garlic and spices (basil, dill, oregano, etc) to create whatever taste you want. Salt to taste. Throw in some Parmesan and milk/cream if you want, then blend it with a submersible blender. The kids fight over who gets to take the leftovers for lunch to school the next day!
That’s great Matt! Thanks for sharing your recipe. 🙂
When I make juice, I use my blender and blend the whole tomato. That way you have thicker juice. Also you can use vinegar in place of lemon juice.
Thank you for this great post Kendra, I will definitely try it. You know, as a kid my dad always had a veggie garden every summer (I think he was a frustrated farmer). My mom then used to mince the excess tomatoes with her meat mincer (!!) and pour the pulp into ice cube trays, freeze and then decant into zip loc bags. Every time she cooked stew or soup, which was most days, one or two of the cubes would be added. I know this isn’t what your post was about, but I just thought I would share it anyway as it’s so quick and easy to do if you haven’t the time or inclination to bother with canning.
This is now completely off topic, but when I’ve cooked a roast I also freeze leftover gravy this way for some instant ‘stock cubes’ for later use.
Reinette,
I loved hearing about what your mother used to do! What a great idea. The frozen roast gravy is a fantastic idea as well. Your tips are always welcomed here 🙂
I think it’s because a lot of people use a food mill to strain, which won’t push raw tomatoes through. Most importantly, when using the strainer like we have, there’s no need to peel the tomatoes. Just wash them off, quarter, and grind away.
This is also the same process for making tomato sauce. The only difference is that you cook the sauce down until it’s as thick as you want. You can add spices if you want, but I wait until I’ve decided what I’m doing with each jar so I can change it up a bit.
First I want to say that I thoroughly enjoy and appreciate your blog. It’s my best find for 2012!
Second, I’ve done tomato juice as well as tomato sauce for years. My strainer is similar to yours and I love it. (I have the advantage of being able to attach it to the kitchen table, so I don’t need to use the bathroom!)
I’m wondering, though, why you cook the tomatoes before straining them? I’ve never done it with frozen ones, so I suppose you’d have to let them thaw, but I just quarter raw ones and crank ’em right through. (Or if my arthritis is kicking up, I have my son come visit and he does the cranking.) It seems to me this would eliminate a step and quite a bit of the mess.
Just curious.
akaGaga,
You know, somebody else said the same thing about not cooking before straining. I just did it ’cause the books I have said to cook before straining. Sounds like I need to cut that step out, though!! I’m all for less work 😉
I just wash and quarter my tomatoes, put them in a blender, when it looks like all chunks are juice, pour it into my food mill to get ride of seeds and skins, then pour the juice into my pot and cook to what thickness I want. Put in jars in water bath for 40 minutes. Done
P.S. As long as you washed them before you froze them all you have to do is thaw and put them straight in the mill.
Hi Kendra, canned tomato juice is the best! I have the same sauce maker/mill that you do. Did you know that it is so efficient that you don’t have to cook your tomatoes first. Just give em a good wash. Halve or quarter and put thru the mill. Then finish as you did. It saves so much time and you end up with the same results. Happy New Year!!
Julie, that is FANTASTIC to know!! I’ll definitely have to skip the cooking part if I can go straight to the straining. Plus, I feel like the tomatoes would retain more nutrients if I didn’t have to cook them before canning. Thanks for the great advice!!
I have mentioned your wonderful blog in a new post! Happy New Year!
http://theredeemedgardener.blogspot.com/2013/01/top-10-for-2012-and-thanks.html
Thank you, Redeemed Gardener 🙂 Happy New Year to you as well!
By the way.. I just tried canning pomegranate jelly.. I have a disaster on my hands..:-(. I have 10 half pints of pomegranate jelly that didn’t set.. How can I fix that??
Justine,
I have found that some jellies need to sit on the shelf for a couple of months before they set up (my grape jelly did that). If all else fails, I bet it’ll make a fantastic syrup 😉 Next time, you might need to let it boil a bit longer to get it to the right consistency before canning. Did you do the “spoon test” to make sure the jelly was ready?
I’ll be putting up some juice with my harvest of tomatoes this summer..
Kendra, this is awesome. Thank you for posting.
Hubby and I have been trying to find ways to do tomatoe juice as my husband is addicted to it (and the store-bought is not only expensive but loaded with salt!). I am saving this post in my favorites so that we can do this in the summer! Right now, hubby is buying tomatoe paste from the store and makes a jug from there (adding his own salt to taste). I love that we will be able to do this ourselves! THANK YOU!
Meg,
If he likes the V-8 type of juices, there are recipes you can try for that. Use the same canning method as what I’ve described, but add in some herbs and other veggies (carrots, etc.). Have fun!!
We had a very small harvest of tomatoes this year. But I’m hoping to do this next year 🙂 I notice that you have a glass top electric range very similar to mine. I have problems canning on mine and I wondered if you do too?
I’d love to have you share this on Wildcrafting Wednesday this week! You can find me at:
http://www.theselfsufficienthomeacre.com/
Happy New Year!
Lisa Lynn,
What types of problems do you have? The only trouble I have is that it takes FOREVER to heat the water in my large canners to boiling.
Wonderful! I have some frozen tomatoes in my freezer that need to be made into something. 🙂
Awesome. Thank you! :o)